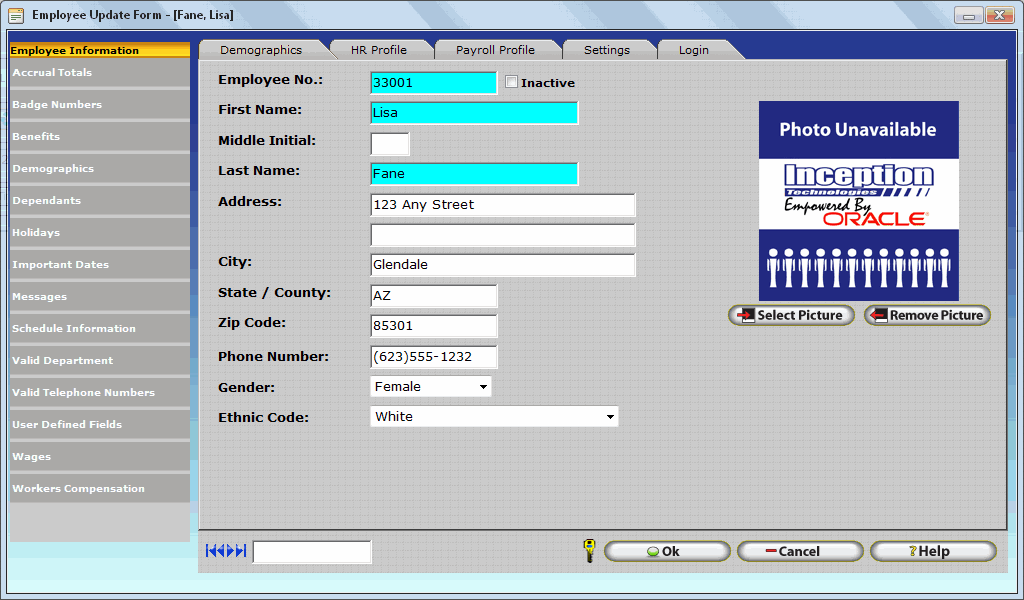
The Employee Table is a central part of the InfiniTime software. Most employee information can be viewed and edited from this table. After the initial installation employee setup is generally the first item that needs to be addressed. Employees can either be inserted manually or imported from a comma-separated file. (.CSV) If possible importing from a file will often save data entry time. Refer to the Employee Import section of this document for more information regarding the import feature.
Note: The amount of employees that can be inserted or imported into InfiniTime depends on the employee count specified by your InfiniTime Software license. Should you require additional capacity please contact the Inception Technologies Sales Department or your Authorized InfiniTime Dealer.
Accessing the Employee Table:
1. Click on the Employee Button as shown below:

The Employee Table
The employee table lists all employees that have been inserted into InfiniTime. Fields within the employee table are fully customizable and may be altered or reordered to suit the user’s needs. Refer to the Grid Configuration Section of the Quick Start Guide: Usage document for more information on grid configuration. Employee information, settings, and the Employee Timecard Activity table may be accessed from the employee table.

Insert – Displays the employee update form. Used to Insert a new employee.
Change – Opens the Employee Update Form for the highlighted employee.
Delete – Deletes the highlighted employee from the InfiniTime Database. All timecard activity associated with the employee will also be removed.
Timecard – Opens the Timecard Activity window and displays timecard information for the highlighted employee only.
Hide Inactive Employees - If this box is checked inactive employees will be hidden from view.
Employee Update Form
The employee update form is shown when attempting to insert a new employee or when viewing an employee’s information. All employee related information and most employee settings can be edited from within the employee update form. An overview of each field is provided below.

Required fields are noted as such in the field description. Should a required field be left blank upon attempting to save the record by clicking the OK button, the system will prompt the user to fill out the required fields that were missed.
Demographics
Employee Number: This number defaults to the numeric order in which the employee was added to the database. You can accept the default or change it by typing in the appropriate Employee number. This number is useful when exporting data or as an employee point of reference. This field is required.
Inactive: Checking this box will change the employee’s status to inactive. Inactive employees do not count towards the global employee limit, nor will they show up on reports. Employees that are set to inactive will be highlighted in red in the employee table. This feature is useful to keep information about an employee who may no longer work for the company. Inactive employees will not be available for reporting or other InfiniTime features where you are prompted to select an employee.
First, Middle Initial, and Last Name: First and Last Name fields are required.
Address, City, State, County or Province, Zip/Postal Code, Phone Number: Enter the appropriate contact information for the employee.
Gender: Select the sex of the employee from the drop down list.
Picture (Optional): Click on the Select Picture button to choose an employee image or company logo. This will bring you to the File Selection window. Choose the path, then select the file. The image selected will appear when the employee logs on and acts as a security measure and reference. InfiniTime will automatically size the picture to fit a 100X100 pixel area. For best results select a .jpg file, 100 X 100 pixels, not larger than 64 kb. Choose the Remove button to remove the image previously selected.