InfiniTime uses policies, or sets of rules, to dictate how Timecard Information is handled in regards to break rules, overtime calculations, scheduling rules, pay cycle configuration, rounding rules, and shift differentials. One of the most challenging aspects of policy configuration involves identifying groups of employees, or individuals, who require different policy settings. Once each group of employees has been identified a single policy can be created for each group with the appropriate options. The questions below will help your company identify groups of employees who require different policy settings.
Overall, four steps must be performed when gathering Company Information for Policy Setup:
To assist you with each of these steps a brief overview of the capabilities offered in each area of the policy and Shift Differentials is provided below along with the conditions that would require an additional policy. While reviewing the settings below, it may be helpful to know that in most cases a different policy is required for employees with different pay methods. For example, Full Time Employees, Part Time Employees, and Salary Employees often have different policy settings. Additional policies may be required for specific departments or individuals in your organization who are subject to different sets of rules. It is also important to understand that few policy settings are required. Only policy settings and options that meet the needs of your company should be configured. For example, if your company does not use the functionality provided by the Payroll Override Feature simply skip over the section when filling out the answer sheet.
A basic introduction for each section of the Policy Update Form is provided below to assist with separating employees with different policy requirements. Additional details on the exact settings in each of the following sections, with configuration examples, is provided in the Policy Settings section of this document.
General Policy Settings:General Policy Settings include general settings such as a Name for the Policy, Pay Cycle Configuration and related options. Each group of employees with different Pay Cycle requirements such as the Start of Week Day, or the Payroll Cycle (Bi-Weekly, Weekly, Semi-Monthly etc.) will require separate policies.
Break Rules: Break rules make it possible to track employee Breaks. Both Paid Breaks and Unpaid Breaks can be tracked, either manually or automatically. A different policy would be required for the configuration of Break Rules under the following conditions:
Groups of Employees receive break periods of different length
Not all Groups of Employees are eligible for breaks
Not all Groups of Employees are required to punch in and out for breaks
Not All Groups of Employees will have their break automatically deducted
Certain Groups of Employees will require Paid Break Limits. Paid Break Limits are used to configure constraints on Paid Breaks such that each break has a minimum or maximum duration. A Daily Paid Break Maximum can also be enforced.
Certain Groups of Employees will require Unpaid Break Limits. Unpaid Break Limits are used to configure constraints on Unpaid Breaks such that each break has a minimum or maximum duration.
Exceptions: Exceptions are conditions tracked by the InfiniTime Software such as Late, Early, Absent, Missing Break, etc. Each group of employees for which different exceptions are tracked will require an additional policy.
Hours and Time Limits:Hours and Time Limits provide Auto Punch functionality and are primarily used for salary employees to allocate hours to individuals without requiring them to punch in and out. Each group of employees with different settings for Hours and Time Limits would require a different policy. For example, a company With Hourly Employees paid according to hours worked and Salary Employees with Auto Punch would require at minimum two policies, one for Salary Employees and One for Hourly Employees.
Overtime Rules: Overtime Rules include various settings for the tracking of overtime. An additional policy would be required for any group of employees with different Daily, Weekly, Day of Week, Or Consecutive Day Overtime Requirements.
Payroll Overrides: Payroll Overrides are primarily used for Salary Employees. They make it possible to export a predefined number of Regular and / or Overtime hours to payroll regardless of the amount of hours the employee worked. An additional policy is required for each group of employees with different Payroll Override settings. Remember, these settings are generally only configured for Salary Employees.
Rounding Rules: Rounding Rules make it possible to round employee punches to the nearest Tenth Hour, Quarter Hour, or Half Hour. Employee punches can also be rounded to Scheduled Start and End Times. An additional policy is required for each group of employees with different settings for Rounding Rules, though it is rare for a company to use different rounding rules for different groups of employees.
Scheduling Rules: Scheduling Rules include Schedule Related features such as Auto Clock In and Auto Clock Out, Schedule Lock Out, and Shift Differentials. An Additional policy would be required for each group of employees with different Scheduling Rules. The following conditions would require an additional policy:
Lockout will be used for Certain Groups of Employees
Auto Clock In / Out will be used for Certain Groups of Employees
Certain Groups of Employees are eligible for specific Shift Differentials
Stand By Time: Stand By Time makes it possible to track On Call Hours for employees. An Additional policy is required for each group of employees with different On Call Hours.
Complete the chart for Step 1 on the Answer Sheet by describing each group of employees, individual employees or positions within your company that require different Policy Settings. Remember, a different policy is generally required for employees with different pay types such as Full Time Employees, Salary Employees, Part Time Employees, and Contract Employees, though it is also possible for a single policy to be used for all employees at companies with simple policies and procedures. List any special requirements for each group. Keep in mind there is no limit to the number of policies that can be configured within InfiniTime.
Policy # |
Description of Employee Category or Individual |
Special Requirements |
Ex. 1 |
Full Time Office Employees |
Weekly Overtime after 40 Hours, Quarter Hour Rounding, 1 Hour Unpaid Lunch Break: Employees Must Punch for Breaks |
Ex. 2 |
Salary Employees |
Not Eligible for Overtime, Quarter Hour Rounding, One Hour Unpaid Auto Break to be deducted after 6 Hours of Work, Employees do not punch for breaks. |
Ex. 3 |
Registered Nurses |
Daily Overtime after 12 Hours, Quarter Hour Rounding, One Hour Lunch with 30 Minutes Paid and 30 Minutes Unpaid, Eligible for Evening and Weekend Shift Differentials. |
Ex. 4 |
Certified Nurse Assistants |
Daily Overtime after 12 Hours, Quarter Hour Rounding, One Hour Lunch with 30 Minutes Paid and 30 Minutes Unpaid, Eligible for Evening and Weekend Shift Differentials. |
To assist with identifying your organization's Time and Attendance related rules, Inception Technologies has developed a Questionnaire and corresponding answer sheet with specific questions to prompt Human Resources and Payroll Personnel with specific questions for analyzing Time and Attendance policies for a given set of employees. The InfiniTime Questionnaire and corresponding answer sheet can be downloaded from the links below.
InfiniTime Questionnaire Answer Sheet
After completing the InfiniTime Questionnaire Answer sheet for each category of employees who require different policy settings, use the Answer sheet as a template to configure policies within InfiniTime. One policy should be created for each previously completed answer sheet.
The Policy Table lists all policies currently configured within the InfiniTime software. At time of installation, InfiniTime includes only one policy - the 'Default' Policy as shown below. Additional policies must be configured as appropriate to meet your organization's needs.
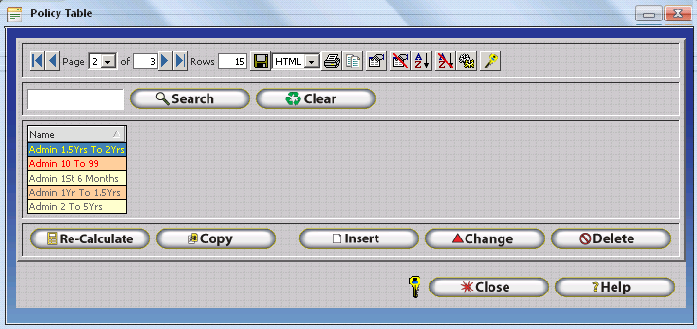
Recalculate - Opens the Timecard Recalculate Window for the selected policy which permits the InfiniTime Administrator to recalculate timecards for all employees assigned to the selected policy.

Copy - Creates a new policy with the same settings as the highlighted policy. Useful when creating a policy for a new category of employees or an individual with requirements only slightly different from an existing policy.
Insert - Opens the Policy Update Form to create a new policy.
Change - Opens the Policy Update Form for the selected policy, allowing the InfiniTime Administrator to adjust policy settings as needed.
Delete - Deletes the selected policy. A policy cannot be deleted if it is already assigned to an employee.
For ease
of use, the Policy Update Form is separated into different sections and
tabs as shown below. The remainder of this document will reference individual
settings for each section and tab on the Policy Update Form. Examples
are provided for the most common configurations and settings. Additionally,
for feature rich sections a set of prompts are provided to assist with
determining your organization's needs.

The details below are intended to be supplemental and / or for reference purposes to look up the functionality of a specific policy setting or policy section. The InfiniTime Questionnaire includes all necessary details and prompts to assist with determining your organization's needs and completing the InfiniTime Questionnaire Answer Sheet for each category of employees with different policy requirements. Inception Technologies strongly recommends using the provided Questionnaire and corresponding answer sheet to assist with Policy Configuration.
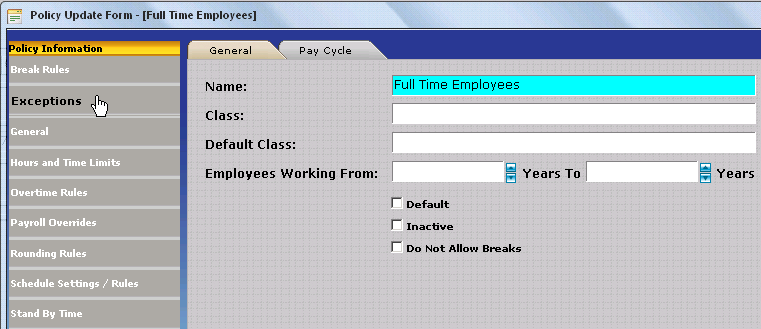
The General Section of the Policy Update Form includes basic settings such as Policy Description, employee tenure related settings which permit employees to automatically be moved from policy to policy based on the length of their employment with the company, and Pay Cycle Related settings which define Pay Period date ranges for the respective policy.
REQUIRED CONFIGURATION: The General Section, including settings on both the General Tab and Pay Cycle Tab, must be configured for every policy.

Policies can be grouped together in such a way that employees will be automatically moved from one policy to the next after they have been with the company for a certain length of time.
Name – The policy name is listed in the Policy Table and should describe the group of employees who will be assigned to the policy.
Class – A class is a group of policies. All policies in a single group must be assigned to the same class.
Default Class – The default class refers to a secondary group of policies. If an employee assigned to the policy should be ineligible for all policies within the current class (or group) the software will search the default class for a policy matching the employee’s tenure.
Employees Working From – The minimum length of time in years an employee must be with the company to be eligible for the policy.
Employees Working To – The maximum length of time, in years, an employee may work with the company and still be eligible for the policy.
Do Not Allow Breaks – If this option is enabled the Clock In / Clock Out Paid Break and Clock In / Clock Out Unpaid Break options will not be available within the employee or punch modules.
An example showing the proper use of classes and tenures is provided below. Notice how all values from 0 to 99 years are covered by the class.
Policy Name |
Class |
Min Tenure |
Max Tenure |
Full Time New Hires |
Full Time |
0 |
1 |
Full Time Employees |
Full Time |
1 |
99 |
Do you have any employees that have different settings for overtime, schedule rules, break rules etc based upon how long they have been with the company?
Yes? – Set a policy name and configure classes & tenures
No? – Set a policy name and move on. Classes & Tenures are not required.
It is only necessary to configure classes and tenures if employees have different settings for break rules, scheduling rules, overtime rules etc based upon how long they have been with the company. If classes and tenures are deemed necessary be sure to span all tenure values from 0 to 99 years with each class as shown in the example above. Tenures must be continuous from policy to policy without gaps.
When configuring classes and tenures it often helps to understand the software’s logic. Employees will be automatically assigned to policies according to the following conditions:
If an employee is no longer eligible for their current policy the software will search the current class (or group) of policies for a match. Remember the software looks at an employee’s hire date to determine policy eligibility. IE: Employees who have been with the company for more than a year are no longer eligible for the New Hire Policy which has a tenure range of 0 to 1 years.
If an employee is not eligible for any of the policies within the current class (or group) the software will search policies within the default class for a match.
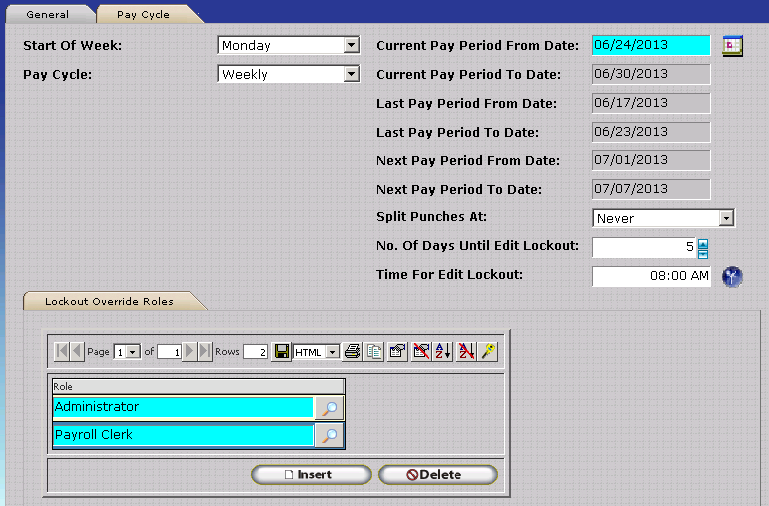
Start of Week – Specifies the starting day of the work week. This affects the ‘Last Week’ and ‘This Week’ date settings used by Reports and the Timecard editor.
Pay Cycle – Specifies a rotation method for pay period dates which makes it possible for InfiniTime to automatically calculate and update Current and Last Pay Period dates.
Current Pay Period From Date – Specifies a start date for the Current Pay Period. The ending date for the current pay period and the last pay period dates will be calculated and filled automatically based upon the chosen pay cycle type.
Split Punches At – Determines how punches will be split. The available option scan be used to split hours on an overnight shift between the current and last pay period or the current or last week depending on the chosen option.
No. of Days until Edit Lockout – Specifies a number of days from the end of the last pay period after which it will no longer be possible to edit timecards in last pay period. For example:
Last Pay Start |
Last Pay End |
No. of Days until Edit Lockout |
Date Timecards for Last Pay will no longer be editable |
09/21/2008 |
09/27/2008 |
5 |
10/02/2008 |
Time for Edit Lockout – Defines the time at which timecard activity for Last Pay Period will no longer be editable. If the Time for Edit Lockout was set to 8:00 AM in the above example it would no longer be possible to edit timecards for last pay period at 8:00 AM on 10/02/2008.
What type of pay cycle does your company observe?
Set the pay cycle appropriately.
What day is considered the start of your work week?
Set the start of week appropriately.
What is the start date of your current pay period? Remember – InfiniTime is only concerned with date ranges for which employees are paid, not the actual date when employees receive their check.
Set the Current Pay Period From Date appropriately.
Click OK to save the new pay cycle settings.
Select the Policy then click on Change to edit the policy again. Click on the Pay Cycle Tab to continue configuration.
Confirm the Current and Last Pay Period Dates are correct.
Do you have any employees that work overnight?
Yes? – Lets say an employee is working overnight on the last day of the pay period. Should their hours all be associated with the current pay period or should they be split across the current pay period and the next pay period?
All on the current? – Leave Split Punches to None.
Split between current and next? – Set to End of Pay Period or End of week as desired.
No? – Split punches does not apply, move to the next item.
Arbitrary Pay Periods: Some companies may have a pay period that does not follow one of the predefined pay cycle options or has arbitrary pay dates. In this case it will be necessary to configure a Custom Pay Cycle and change the Start Date and Custom Interval Amount each time the pay period length changes.
IE: A customer follows a 2 Week / 3 Week repeating pay Cycle.
A Custom Pay Cycle is used with a 14 Day Custom Interval for the 2 Week Pay Period.
A Custom Pay Cycle is used with a 21 Day Custom Interval for the 3 Week Pay Period.
The Custom Pay Cycle Interval must be changed in the policy each time the organization switches from the 2 Week Pay Period to the 3 Week Pay Period.
The only drawback to Custom Pay Cycles is the Last Pay Period dates are calculated based upon the settings used for the Current Pay Period. Therefore the ‘Last Pay Period’ date range used for reports and the Timecard Table will not be correct.
Semi-Monthly Pay Periods: When configuring a Semi-Monthly Pay Period the user is prompted for the First and Second Pay Day. These labels can be misleading – the First Pay Day refers to the start day of the first pay period. The Second Pay Day refers to the start day of the second pay period.
IE: A customer follows a Semi-Monthly Pay Period where the 1st and 16th are always the starting days of the pay period. The first pay period ends on the 15th and the second pay period ends on the last day of the month.
The Break Rules Section includes settings related to tracking employee breaks. InfiniTime can be configured to track Paid Breaks, Unpaid Breaks, or both. Breaks can automatically be inserted, without requiring employees to punch in or out, through use of Auto Breaks. Alternatively, Change To Break settings can be configured to automatically insert paid or unpaid breaks in place of non-working periods up to a certain duration. The Break Rules section also includes both Paid Break and Unpaid Break limits which provide the InfiniTime Administrator with the ability to limit the maximum duration for Paid breaks and / or configure a minimum duration for unpaid breaks. With Change to Break, Auto Break, and Break Limit settings configured appropriately InfiniTime supports a wide variety of break configurations to meet the needs of any industry.
OPTIONAL
CONFIGURATION: The Break Rules Section, including settings on the
Change to Breaks, Auto Breaks, Paid Break Limits, and Unpaid Break Limits
Tabs are optional.
Break Rules should only be configured if you wish to track Breaks for employees
assigned to the respective policy.
Change to break is used when employees are required to punch in and out for lunch. Change to break uses the duration of time an employee is clocked out and automatically changes the employee's punch to an unpaid or paid break as appropriate based on Change to Break configuration. Additionally, many companies track only a single break type, such as Paid Breaks or Unpaid Breaks, within InfiniTime. In this scenario only the First Change to Break settings must be configured.
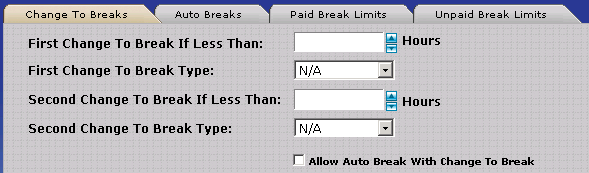
First Change to Break If Less Than – If an employee is clocked out for a duration shorter than the value specified in this field the duration the employee was clocked out for will be changed to either an unpaid or paid break.
First Change to Break Type – Specifies the break type which will be associated with the First Change to Break.
Second Change to Break If Less Than – If an employee is clocked out for a duration shorter than the value specified in this field the duration the employee was clocked out for will be changed to either an unpaid or paid break.
Second Change to Break Type – Specifies the break type which will be associated with the Second Change to Break.
Allow Auto Break With Change to Break - When this option is checked, InfiniTime will perform Auto Breaks even if the employee has already taken a break according to Change to Break rules. For organizations which require employees to punch for breaks only if they leave the premises, this option should be unchecked. Refer to the Break Examples for additional details on how Allow Auto Break with Change to Break is used.
NOTE: All break related settings are entered in
hours and hundredths of hours. For example, 30 Minutes must be entered
as 0.50 Hours as shown below.

Are your employees required to clock in and out for all breaks?
No? – Would you like to deduct an unpaid break automatically from your employees?
Yes? – Skip to Auto Breaks Tab.
No? – Your organization does not require breaks. Skip to Hours and Time Limits.
Yes? – Do you track Unpaid, Paid Breaks, or both?
One type? Configure First Change to Break
Both Types? Configure First and Second Change to break
First Change to Break Configuration:
What is the longest duration employees are permitted to take as their break?
Enter this duration, as hours, in the First Change to Break if Less Than Field.
Set the First Change to Break Type to either Paid Break or Unpaid Break as appropriate.
Second Change to Break Configuration:
What is the longest duration employees are permitted to take as their break?
Enter this duration, as hours, in the First Change to Break if Less Than Field.
Set the First Change to Break Type to either Paid Break or Unpaid Break as appropriate.
Auto break is used when employees are not required to punch in and out for lunch. Auto breaks can be configured to automatically deduct a specified amount of time from employees after they have worked a predetermined number of hours.
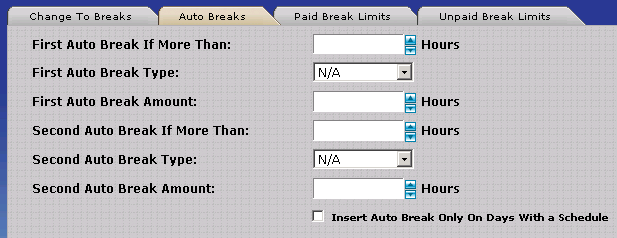
First Auto Break if More Than Hours – Employees must work the number of hours specified in this field before the automatic break will be applied to the employee’s timecard.
First Auto Break Type – Specifies the break type which will be associated with the First Auto Break.
First Auto Break Amount – Specifies the break duration, in hours, which will be automatically inserted by the First Auto Break.
Second Auto Break if More Than Hours - Employees must work the number of hours specified in this field before the automatic break will be applied to the employee’s timecard.
Second Auto Break Type – Specifies the break type which will be associated with the Second Auto Break.
Second Auto Break Amount – Specifies the break duration, in hours, which will be automatically inserted by the Second Auto Break.
Insert Auto Break only on Days with a Schedule - When this option is checked, Auto Breaks will only be inserted for employees on dates where the employee was scheduled to work. When this option is unchecked, Auto Breaks will be inserted on any day where the employee works the predetermined number of hours regardless of whether the employee had a schedule on the respective work day.
Would you like to automatically insert Unpaid or Paid breaks for employees?
Yes? - Do you wish to automatically insert Unpaid Breaks, Paid Breaks, or Both?
One Type? Configure First Auto Break.
Both Types? Configure both First Auto Break and Second Auto Break.
No? - You do not require Auto Breaks. Skip to the Exceptions Section of this document.
First Auto Break
How many hours must employees work before the First Auto Break will be deducted? Set the 'First Auto Break If More Than' field to this value.
Set the 'First Auto Break Type' field to the appropriate Break Type (Paid or Unpaid).
Set the 'First Auto Break Amount' field to the desired break duration, in hours, which will automatically be inserted by the First Auto Break
Second Auto Break
How many hours must employees work before the First Auto Break will be deducted? Set the 'Second Auto Break If More Than' field to this value.
Set the 'Second Auto Break Type' field to the appropriate Break Type (Paid or Unpaid).
Set the 'Second Auto Break Amount' field to the desired break duration, in hours, which will automatically be inserted by the Second Auto Break
Paid Break Limits are used with Change to Break settings to enforce minimum and maximum break durations for Paid Breaks. By configuring paid break limits paid breaks can be configured with a minimum or maximum duration providing complete control over Paid Break Durations.
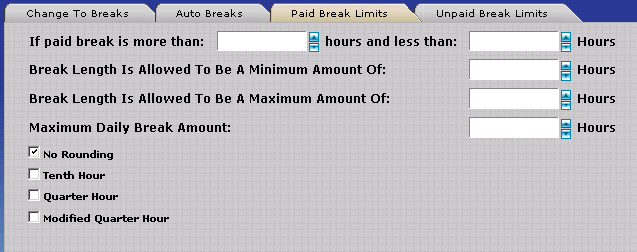
If Paid Break is More Than And Less Than – Defines the break durations to which Paid Break Limits will be applied. Paid breaks with a duration that falls between the “More Than” and “Less Than” amount will be subject to paid break limits.
Break Length Is Allowed To Be A Minimum Of – Specifies a minimum duration for paid breaks. The minimum break length setting is commonly used with Unpaid Break Limits as employees will receive overtime if they do not take a break of a certain length though it is not as common for Paid Break Configurations.
Break Length Is Allowed To Be A Maximum Of – Specifies a maximum duration for paid breaks. The maximum break length setting is commonly used with Paid Break Limits in order to limit the break length employees will be paid for. Employees will be unpaid for any time in excess of the maximum break length specified in this field.
Maximum Daily Break Amount – Specifies a maximum paid break duration for a single day. For example employees are often permitted two 15 minute paid breaks. In this scenario the Maximum Daily Break Amount would be set to .5 resulting in a maximum of 30 minutes paid for breaks in a single day.
Rounding – Rounding for Paid Breaks is optional. If these options are configured Paid Break Durations will be rounded to the nearest Tenth of an Hour or Quarter of an Hour and then Paid Break Limits will be applied. This is often used when employee contracts specify employee hours must be rounded. An example configuration is provided below.
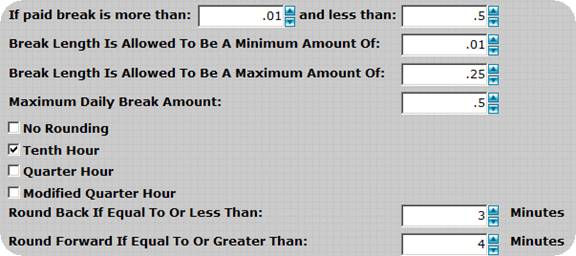
In the preceding example if an employee punched out for 17 minutes their break duration would first be rounded to 18 minutes and then Paid Break Limits would be applied. This results in a Paid Break Duration of 15 minutes (.25 hrs) and an unpaid duration of 3 minutes due to the Maximum Length setting.
Unpaid Break Limits are used with Change to Break settings to enforce minimum and maximum break durations for Unpaid Breaks. By configuring unpaid break limits unpaid breaks can be configured with a minimum or maximum duration providing complete control over Unpaid Break Durations.
If Unpaid Break is More Than And Less Than – Defines the break durations to which unpaid Break Limits will be applied. Unpaid breaks with a duration that falls between the “More Than” and “Less Than” amount will be subject to Unpaid break limits.
Break Length Is Allowed To Be A Minimum Of – Specifies a minimum duration for unpaid breaks. Employees will not be able to take a break shorter than the duration specified in this field. For example if the Minimum Break Length is set to 30 minutes and an employee should take a 15 minute break the employee would be deducted 30 minutes rather than 15. The minimum break length setting is commonly used with Unpaid Break Limits as employees receive overtime if they do not take a break of at least a certain length.
Break Length Is Allowed To Be A Maximum Of – Specifies a maximum duration for unpaid breaks. Employees who take an unpaid break in excess of the Maximum Break Length specified in this field will be paid for any duration in excess of the maximum break length. The maximum break length setting is rarely used with Unpaid Breaks.
It should be noted that the Maximum Duration feature is rarely used for Unpaid Breaks as Unpaid Breaks are generally unpaid - even if the employee were to take an excessively long Unpaid Break the full duration of the break is still generally unpaid time.
Employees at XYZ Manufacturing Co. are required to punch in and out for an unpaid lunch which is 30 minutes in duration. The first change to break should be set to 1 hour not .5 hours. By setting the change to break to 1 hour employees will not receive a longer break – it simply instructs the software to change the duration an employee is clocked out to an unpaid break as long as they are gone for less than an hour. If the employee should take a break for longer than an hour they will still be unpaid – the duration will simply not show as a break in the timecards.
First Change to Break |
First Change to Break Type |
Second Change to Break |
Second Change to Break Type |
1 |
Unpaid |
|
|
Employees at ABC Manufacturing Co. receive two fifteen (15) minute paid breaks and a thirty (30) minute unpaid lunch. If an employee should take a long break any duration in excess of fifteen minutes should be unpaid. When using both the First and Second Change to Break options the first change to break must have a shorter duration. Additionally it is important to recognize Paid Break Limits only apply to break durations recognized as a Paid Break by Change to Break. With this in mind, the Change to Break settings for Paid Breaks must have a slightly longer duration than the desired break time.
To ensure paid breaks are limited appropriately the first and second change to breaks should be configured as shown below. In this way when an employee is clocked out for less than 20 minutes the duration they are gone for will be subject to paid break limits. When they are clocked out for more than 20 minutes and less than 1 hour the duration they are gone for will be shown as an unpaid break.
Change to Break Configuration
First Change to Break |
First Change to Break Type |
Second Change to Break |
Second Change to Break Type |
.33 |
Paid |
1 |
Unpaid |
Paid Break Limits Configuration
If Paid Break is More than |
And Less Than |
Minimum Break Length |
Maximum Break Length |
Maximum Daily Break Length |
.01 |
.33 |
.01 |
.25 |
.5 |
Break Examples
Examples of individual break durations and their respective Paid and Unpaid Time are shown below. Timecard records are shown for the highlighted examples.
Individual Break Examples
Break Duration |
Paid Break Time |
Unpaid Break Time |
12 Minutes (.2 Hrs) |
12 Minutes |
|

Break Duration |
Paid Break Time |
Unpaid Break Time |
18 Minutes (.3 Hrs) |
15 Minutes |
3 Minutes |

Break Duration |
Paid Break Time |
Unpaid Break Time |
45 Minutes (.75 Hrs) |
|
45 Minutes |
Daily Break Examples
1st Paid Break Duration |
2nd Paid Break Duration |
Lunch Break Duration |
Total Paid Time |
Total Unpaid Time |
12 Minutes (.2 Hrs) |
12 (.2 Hrs) |
35 Minutes |
24 Minutes |
35 Minutes |
12 Minutes (.2 Hrs) |
18 Minutes (.3 Hrs) |
30 Minutes |
27 Minutes |
33 Minutes |
18 Minutes (.3 Hrs) |
25 Minutes (.42 Hrs) |
45 Minutes |
30 Minutes |
58 Minutes |
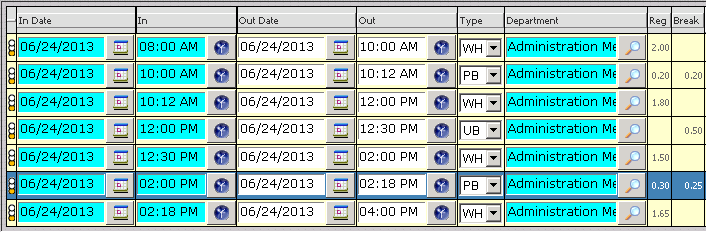
Notice how the Paid Break from 2:00 PM to 2:18 PM exceeds the Maximum Paid Break Duration. The Timecard Table shows the full duration in the Regular Hours Column and the Paid Break Duration in the Break Column. The difference - 0.05 hours - is then deducted from the last Regular Hours Punch Pair on the day which in this case is 2:18 PM to 4:00 PM. Note that 2:18 PM to 4:00 PM is 1.70 Hours, the final total is 1.65 Hours after the Paid Break Duration in excess (0.05 Hours) of the Maximum Break Amount (0.25 Hours) is deducted.
Office Employees at ABC Manufacturing company are only required to punch out for lunch if they leave the office building. If employees choose to stay onsite a 30 minute break is automatically deducted from their timecard. If employees choose to leave the building they are required to punch out for lunch and are unpaid for the entire duration they are gone for. Employees are permitted 30 minutes for lunch.
Change to Break Configuration
First Change to Break |
First Change to Break Type |
Second Change to Break |
Second Change to Break Type |
1 |
Unpaid |
|
|
The ‘Allow Auto Break with Change to Break’ box must be unchecked on the change to break tab.
Auto Break Configuration
First Auto Break if More than Hours |
First Auto Break Type |
First Auto Break Amount |
6 |
Unpaid |
.5 |
Paid & Unpaid Breaks w/ Change to Break: It should be noted that many companies opt to not track paid breaks within InfiniTime.. Employees will be required to punch for unpaid breaks but can take paid breaks at their leisure. In this scenario it is only necessary to configure the First Change to Break for Unpaid Breaks.
Exceptions permit InfiniTime Administrators to track employee compliance with Schedules and other Time and Attendance related metrics such as industry specific rules. It is important to note that Schedules must be configured for most exception types to function. As of InfiniTime 7.08 exceptions can be configured in one of three ways:
Company Wide Exceptions Only - Company Wide Exceptions are ideal for organizations who wish to track the same exceptions for all employees.
Policy Based Exceptions Only - Policy Based Exceptions are ideal for organizations who wish to track different exceptions for each group of employees.
Company Wide Exceptions & Policy Based Exceptions for Specific Categories of Employees - When used together, Company Wide Exceptions and Policy Based Exceptions make it possible for InfiniTime Administrators to define exceptions for the company as a whole and then define exceptions for specific groups of employees in the Exceptions Section of the Policy Update Form as needed. Using both Company Wide Exceptions and Policy Based exceptions provides the most flexible configuration. When using both Company Wide Exceptions and Policy Based Exceptions, it is important to note that Policy Based Exceptions override Company Wide Exceptions. For example, if only the Absent Exception were defined on an employee's policy and the Company Wide Exceptions included Absent, Tardy, Early, and Late Departure only the Absent Exception would be tracked for the employee.
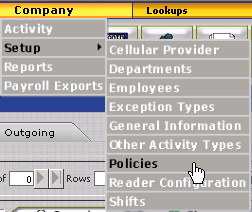
Click on Lookups
Click on Calculation Setup
.gif)
Click on Exception Types

Insert - Opens the Exception Type Update Form. Click Insert on the Exception Type Table to Define a new Company Wide Exception.
Change - Opens the Exception Type Update Form for the selected Exception.
Delete - Deletes the Selected Exception from the Exception Type Table. The exception will no longer be tracked for employees. Additionally, all previous occurrences for the selected exception will be removed from employee timecards upon the next recalculate.

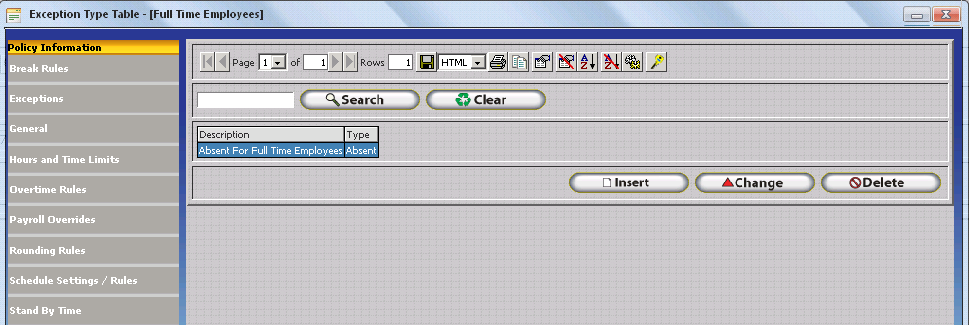
Insert - Opens the Exception Type Update Form. Click Insert on the Exception Type Table to Define a new Exception for all employees assigned to the respective Policy.
Change - Opens the Exception Type Update Form for the selected Exception.
Delete - Deletes the Selected Exception from the Exception Type Table. The exception will no longer be tracked for employees assigned to the respective policy. Additionally, all previous occurrences for the selected exception will be removed from employee timecards upon the next recalculate.
The Exception Type Update Form is used to add exceptions to the InfiniTime Software for both Company Wide and Policy Based Exceptions. The Exception Type Update Form includes two tabs. The general tab includes for all fields and settings related to the specific Exception Type while the Notifications Tab includes options related to sending notifications to employees and / or employee supervisors when exceptions occur.
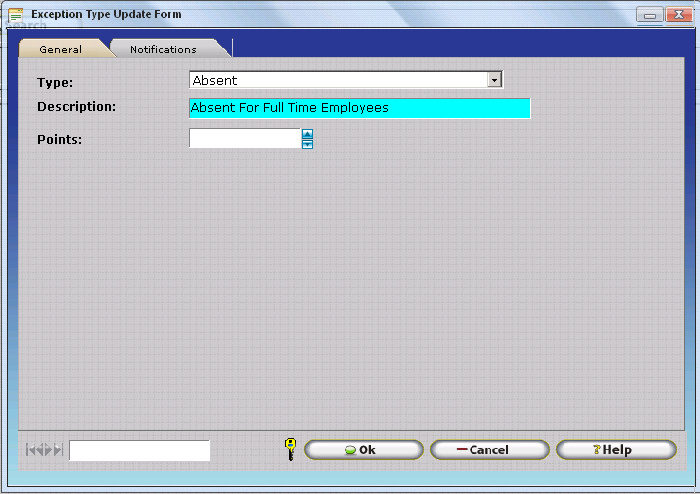
Type – Use the drop down box to select the desired exception type from those available.
Description – Enter a description for the exception. This description will be entered into the exception type table and will be used in the Timecard Activity Table and Exception related Reports. The description does not need to be the same name as the exception type, but should be related. For example “Employee Not Present” for the Absent Exception. It should be noted that the exception name must be unique - even between Company Wide and Policy Based Exceptions. No two exceptions can have the same description.
Points – Enter a point value for the specified exception type. The exception point system is an optional feature that accrues a preset amount of points when an employee receives a specific exception. This preset amount is then added to any previous exception points the employee may have and can be viewed in the Employee Exception Points Report. This allows managers to take disciplinary measures for various point values.
Technical Note: The Exception Type Update Form also includes Exception Specific Fields which include prompts for details related to the selected Exception Type. For example, the Threshold Field is shown below which is used to adjust the exact threshold at which several exceptions trigger. For additional details on the Threshold Field, or other exception specific fields, please refer to the specific Exception Type as listed in the Available Exception Types section of this document for each individual exception type.
InfiniTime permits SMS (IE: Text Messaging) and Email Exception notifications to be configured on a per exception basis. Email and SMS notifications can be sent to either employees or supervisors at the discretion of the InfiniTime Administrator. Requirements for SMS and Email Notifications are outlined below.
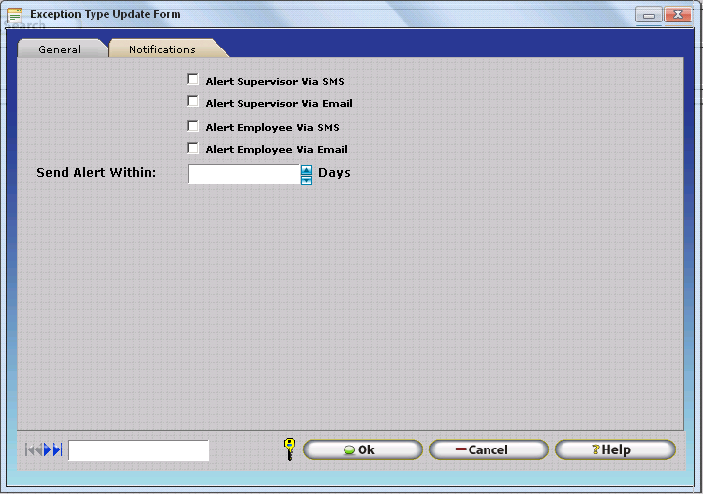
Alert Supervisor Via SMS - If this option is checked, when the respective exception is triggered for an employee the employee's supervisor will receive a text message alerting the supervisor that the exception occurred.
Alert Supervisor Via Email - If this option is checked, when the respective exception is triggered for an employee the employee's supervisor will receive an email alerting the supervisor that the exception occurred.
Alert Employee Via SMS - If this option is checked, when the respective exception is triggered for an employee the employee's supervisor will receive a text message alerting the supervisor that the exception occurred.
Alert Employee Via Email - If this option is checked, when the respective exception is triggered for an employee the employee's supervisor will receive an email.
Send Alert Within - The 'Send Alert Within...Days' Option sets the duration of the time period during which InfiniTime will send Exception Notifications after an exception is triggered. For example, the number line below shows November 7th as a date an employee had the Missing Scheduled Punch Exception. The number line also shows the Sent Alert within...Days value for each day from November 7th to December 7th.
The Missing Scheduled Punch Exception triggers when an employee has a scheduled punch but does not have a punch within the bounds of the On Time and Late Grace Periods for a given scheduled Punch. The exception will trigger automatically if an employee forgets to punch in or out. Additionally, the Missing Scheduled Punch Exception would also trigger if a supervisor were to delete an employee's out punch prior to inserting an adjusted time. The Send Alert Within Days option should be set accordingly so that Exception Notifications received by managers communicate an actionable task.

NOTE: Most customers choose to leave the Send Alert Within setting at 0 Days to ensure exception notifications are only sent for exceptions that are triggered for today's date.
Technical Note: All Mobile Phones with support for text messaging (SMS) have a built in email address with the mobile provider which can be used to send text messages to the device via email. With this in mind, InfiniTime uses the Windows Simple Mail Transfer Protocol Service to send both SMS and Email Notifications.
The InfiniTime Server must have an active Internet connection at all times.
Power Management must be disabled on the Network Interface Card of the InfiniTime Server.
The InfiniTime Housekeeping Service must be started and running.
The InfiniTime Server does not need to have a user logged into the console. However, it must at least be powered on and idle at the Windows Login Splash Screen.
Your fully qualified domain name may need to be configured in the advanced delivery options of the Simple Mail Transfer Protocol Server within Internet Information Services Management depending on your domain policies and mail server's configuration.
The server must be granted permissions to relay email through the SMTP Virtual Server installed by InfiniTime.
Depending on your network configuration and domain settings it may be necessary to forward all outgoing email messages from the InfiniTime SMTP Virtual Server to a Smart Host. Generally the Smart Host will be a server running exchange on your local network. The smart host can be configured under Advanced Options of Delivery tab for the InfiniTime SMTP Virtual Server Properties.
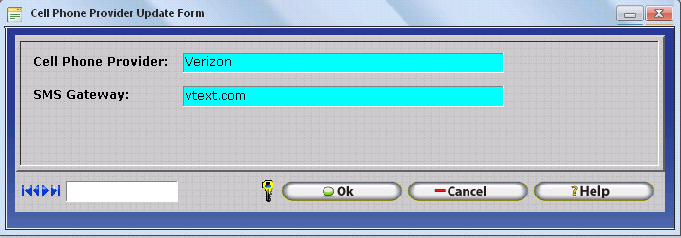
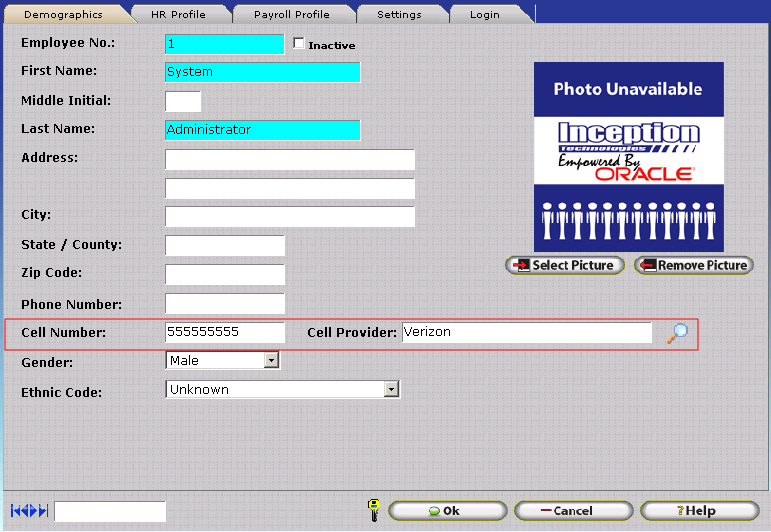
Cell Number - When entering the Employee's Cell Phone Number, enter only the 10 digit phone number as shown in the example below. Do not enter dashes.
Cell Provider - Select the employee's cell phone carrier by clicking on the Lookup Magnify Glass and selecting the appropriate carrier. If the employee's cell phone carrier is not present in the list of Cell Phone Providers it must be added with the correct SMS Email Gateway address. The SMS Email Gateway address for a given cellular carrier can be obtained by contacting technical support personnel for the respective carrier or by sending an SMS text to any email address from a device on the respective carrier's network. Exception Notifications utilize the cell phone provider's SMS Email Gateway to send SMS Notifications to supervisors and employees.
When using 'Alert Employee Via SMS' all employees must have the following fields defined on their employee profile:
Cell Number - When entering the Employee's Cell Phone Number, enter only the 10 digit phone number as shown below. Do not enter dashes.
Cell Provider - Select the employee's cell phone carrier by clicking on the Lookup Magnify Glass and selecting the appropriate carrier. If the employee's cell phone carrier is not present in the list of Cell Phone Providers it must be added with the correct SMS Email Gateway address. The SMS Email Gateway address for a given cellular carrier can be obtained by contacting technical support personnel for the respective carrier or by sending an SMS text to any email address from a device on the respective carrier's network. Exception Notifications utilize the cell phone provider's SMS Email Gateway to send SMS Notifications to supervisors and employees.
Cell Phone Provider Table:

Cell Phone Provider Update Form:
Email Address - Enter the Primary Email Address to be kept on file for the supervisor. Supervisor Email Exception Notifications will be sent to this email address. Some customers choose to use a single Distribution Group Email Address, configured on the Mail Server such that all InfiniTime Supervisors receive email messages sent to the group address, in this field.
When using 'Alert Employee Via SMS' all employees must have the following fields defined on their employee profile:
Email Address - Enter the Primary Email Address to be kept on file for the employee. If enabled, Employee Email Exception Notifications will be sent to this email address.

The following exception types can be selected from the “Type” drop down menu when inserting exceptions. Each exception type performs a different function. Familiarize yourself with each exception before deciding to track them. This section is organized into a table layout as outlined below.
| Exception Type | Exception Type, as listed in the 'Type' Drop Down Menu on the Exception Type Update Form. |
| Summary | Provides a short description of the exception's intended usage. |
| Exception Type
Specific Fields |
Lists Exception Type Specific Fields, as displayed on the Exception Type Update Form, for the specific exception type. Available Exception Type Specific fields are outlined below. |
| Additional Required
Configuration |
Lists any additional configuration, such as a specific Policy Setting, required for the exception to properly trigger. |
| Exception Trigger | Details the exact trigger that causes the exception to occur. |
Exception Type Specific Fields
Threshold - The Threshold Field is used for many exceptions which trigger after a set number of minutes, hours, or days. Refer to the specific exception type below for additional details on how the threshold field is used for a given exception. Pay special attention to the unit displayed to the right of the Threshold Field which indicates wether the threshold is measured in minutes, hours, or days.
Department - The Department Field is used with the Non Arrival Exception to indicate a specific Department / Job / Task Combination to check for Schedules. Refer to the Non-Arrival Exception for additional details.
Job - The Department Field is used with the Non Arrival Exception to indicate a specific Department / Job / Task Combination to check for Schedules. Refer to the Non-Arrival Exception for additional details.
Task - The Department Field is used with the Non Arrival Exception to indicate a specific Department / Job / Task Combination to check for Schedules. Refer to the Non-Arrival Exception for additional details.
Use Count as Day Worked for Other Activity Types - 'Use Count as Day Worked for Other Activity Types' toggles the method for determining which, if any, Other Activity Types count toward Consecutive Days Worked for purposes of the Consecutive Days Exception. If 'Use Count as Day Worked For Other Activity Types' is checked, Hours for Other Activity Types with the 'Count as Day Worked' option checked will count toward the Consecutive Days Exception and Hours for Other Activity Types with the 'Count as Day Worked' option unchecked will not count toward the Consecutive Days Exception. If 'Use Count as Day Worked for Other Activity Types' is unchecked, the user may select specific Other Activity Types to count toward the Consecutive Days Exception using the 'Other Activity Types Counted Toward Consecutive Days' Tab.
Count Regular Hours toward Consecutive Days - 'Count Regular Hours Toward Consecutive Days' is used for both the Consecutive Days and Mandatory Rest Period Exceptions. If this option is checked, Regular Hours on a given date will count the date toward Consecutive Days worked for purposes of the Consecutive Days and Mandatory Rest Period Exceptions. If this option is unchecked, Regular Hours on a given date will not cause the date to be counted toward Consecutive Days Worked for purposes of the Consecutive Days or Mandatory Rest Period Exceptions.
Count OT1 Hours toward Consecutive Days - 'Count OT1 Hours Toward Consecutive Days' is used for both the Consecutive Days and Mandatory Rest Period Exceptions. If this option is checked, OT1 Hours on a given date will count the date toward Consecutive Days worked for purposes of the Consecutive Days and Mandatory Rest Period Exceptions. If this option is unchecked, OT1 Hours on a given date will not cause the date to be counted toward Consecutive Days Worked for purposes of the Consecutive Days or Mandatory Rest Period Exceptions.
Count OT2 Hours toward Consecutive Days - 'Count OT2 Hours Toward Consecutive Days' is used for both the Consecutive Days and Mandatory Rest Period Exceptions. If this option is checked, OT2 Hours on a given date will count the date toward Consecutive Days worked for purposes of the Consecutive Days and Mandatory Rest Period Exceptions. If this option is unchecked, OT2 Hours on a given date will not cause the date to be counted toward Consecutive Days Worked for purposes of the Consecutive Days or Mandatory Rest Period Exceptions.
Count OT3 Hours toward Consecutive Days - 'Count OT3 Hours Toward Consecutive Days' is used for both the Consecutive Days and Mandatory Rest Period Exceptions. If this option is checked, OT3 Hours on a given date will count the date toward Consecutive Days worked for purposes of the Consecutive Days and Mandatory Rest Period Exceptions. If this option is unchecked, OT3 Hours on a given date will not cause the date to be counted toward Consecutive Days Worked for purposes of the Consecutive Days or Mandatory Rest Period Exceptions.
Count OT4 Hours toward Consecutive Days - 'Count OT4 Hours Toward Consecutive Days' is used for both the Consecutive Days and Mandatory Rest Period Exceptions. If this option is checked, OT4 Hours on a given date will count the date toward Consecutive Days worked for purposes of the Consecutive Days and Mandatory Rest Period Exceptions. If this option is unchecked, OT4 Hours on a given date will not cause the date to be counted toward Consecutive Days Worked for purposes of the Consecutive Days or Mandatory Rest Period Exceptions.
Consecutive Days - The Consecutive Days field sets the number of Consecutive Days Worked for purposes of the Consecutive Days and Mandatory Rest Period Exceptions. Refer to the individual exceptions below for additional information.
Total Hours - The Total Hours Field is used with the Mandatory Rest Period Exception. The Mandatory Rest Period Exception will trigger if an employee works more than Total Hours within Consecutive Days without a certain number of consecutive off duty hours. This exception is useful for tracking employee fatigue levels and preventing potentially dangerous working situations.
Off Duty Hours - The Off Duty Hours Field sets the number of Off Duty Hours, or consecutive hours during which an employee is punched out, required to reset the Total Hours Count for the Mandatory Rest Period Exception.
Other Activity Types Counted Toward Consecutive Days - The 'Other Activity Types Counted Toward Consecutive Days' Tab sets Other Activity Types which will count toward the Consecutive Days, Mandatory Rest Period, and DOT Off Duty Rule Exceptions.
| Exception Type | Absent |
| Summary | Clearly marks dates on which an employee was scheduled to work
where the employee failed to punch in the Company Timecard Table
as shown below. Like all exceptions, the Absent exception also
appears on all exception related reports.

|
| Exception Type
Specific Fields |
N/A |
| Additional Required
Configuration |
Employee's must have Schedules Defined for the Absent Exception to trigger. |
| Exception Trigger | The Absent Exception will trigger under the following conditions:
|
| Exception Type | Approaching DOT Consecutive Hours Rule One |
| Summary |
The Approaching DOT Consecutive Hours Rule One exception is intended to alert supervisors when employees are close to breaking the Department of Transportation (DOT) Hours of Service Rule 1 which states that employees may drive a maximum of 11 hours after 10 consecutive hours off duty. |
| Exception Type
Specific Fields |
|
| Exception Type | Approaching DOT Consecutive Hours Rule Two |
| Summary |
The employee is getting close to Breaking DOT Hours of Service Rule 2. A threshold can be set to signify when the approaching exception will fire in relation to the actual exception. IE: Approaching Rule 2 with a two hour threshold will cause the Approaching DOT Hours of Service Rule 3 exception to occur when an employee is within two working hours of breaking DOT Hours of Service Rule 2. |
| Exception Type
Specific Fields |
|
| Exception Type | |
| Summary |
The employee is getting close to Breaking DOT Hours of Service Rule 3. A threshold can be set to signify when the approaching exception will fire in relation to the actual exception. IE: Approaching Rule 3 with a ten hour threshold will cause the Approaching DOT Hours of Service Rule 3 exception to occur when an employee is within ten working hours of breaking DOT Hours of Service Rule 3. |
| Exception Type
Specific Fields |
|
| Exception Type | |
| Summary | Occurs when an employee uses enough accrued time that their Remaining Accrual Balance is less than the threshold set for the exception. For example if an employee has 40 hours of vacation and the Approaching Exceeded Accrual Exception Threshold is set to 10 the exception will occur after the employee uses 30 hours or more. The Approaching Exceeded Accrual exception can only be viewed on the Employee Exception Detail Report as accrual exceptions are not related to employee timecards. When using the Employee Exception Detail report to view the Exceeded Accrual Exception the Date Range should match the Accrual Period for the Accrual Type in question. |
| Exception Type
Specific Fields |
|
| Additional Required
Configuration |
|
| Exception Trigger |
|
| Exception Type | |
| Summary | The Approaching Overtime Exception warns supervisors when employees are within a certain number of hours from receiving Weekly Overtime. The Approaching Overtime Threshold should be set to the number of hours away from Weekly Overtime you wish to be notified at. For example, a Threshold of 8 Hours with a Weekly Overtime 1 Setting of > 40 Hours will trigger the Approaching Overtime Exception at 32 Hours Worked for a given work week. |
| Exception Type
Specific Fields |
|
| Additional Required
Configuration |
|
| Exception Trigger |
|
| Exception Type | |
| Summary | The Approved Overtime Exception triggers for any date with Approved OT1, OT2, OT3, or OT4 Hours. |
| Exception Type
Specific Fields |
|
| Additional Required
Configuration |
|
| Exception Trigger |
|
| Exception Type | |
| Summary | The Consecutive Days Exception is intended for Employee Fatigue Tracking purposes. InfiniTime tracks the number of consecutive days worked by employees and triggers the Consecutive Days exception if employees have hours for valid Hours Types over a number of days, as specified by the Consecutive Days field, in a row. |
| Exception Type
Specific Fields |
|
| Additional Required
Configuration |
N/A |
| Exception Trigger |
|
| Exception Type | |
| Summary | Service Rule One as enforced by the Department of Transportation states 'Employees may drive a maximum of 11 hours after 10 consecutive hours off duty. Report a Rule 1 Violation if break is less than 10 hours.' InfiniTime tracks |
| Exception Type
Specific Fields |
|
| Exception Type | |
| Summary | Employee may not drive beyond the 14th consecutive hour after coming on duty, following 10 consecutive hours off duty. Off-duty time does not extend the 14-hour period. Any working duration over 14 hours is considered a Rule 2 Violation. |
| Exception Type
Specific Fields |
|
| Exception Type | |
| Summary | Drivers using the sleeper berth provision must take at least 8 consecutive hours in the sleeper berth, plus a separate 2 consecutive hours either in the sleeper berth, off duty, or any combination of the two. In other words, there must be a minimum of ten hours from when the employee punches out on one shift before they punch in again. The DOT Off Duty Rule exception occurs if the employee should punch in before taking their full ten hour break. |
| Exception Type
Specific Fields |
|
| Exception Type | |
| Summary | Employee may not drive after 60/70 hours on duty in 7/8 consecutive days. A driver may restart a 7/8 consecutive day period after taking 34 or more consecutive hours off duty. The 7/8 day period is reset if there is a consecutive break of 34 hours at any point. If this rule is broken a Rule Violation is reported. |
| Exception Type
Specific Fields |
|
| Exception Type | |
| Summary | Early is an employee performance related exception used to compare employee Clock In punches to their scheduled arrival time. The Early Exception Triggers if an employee punches in prior to their scheduled start time. |
| Exception Type
Specific Fields |
N/A |
| Additional Required
Configuration |
|
| Exception Trigger | The Early Exception Triggers if an employees first punch on a given date is prior to the employee's Scheduled Start Time - On Time Grace Period. For example, if an employee is scheduled to work from 8:00 AM to 5:00 PM with a 5 Minute On Time Grace Period the Early Exception will trigger if the employee punches in prior to 7:55 AM. |
| Exception Type | |
| Summary | Early Departure is an employee performance related exception used to compare employee Clock Out punches to their scheduled departure time. The Early Departure Exception Triggers if an employee punches out prior to their scheduled departure time. |
| Exception Type
Specific Fields |
N/A |
| Additional Required
Configuration |
|
| Exception Trigger | The Early Departure Exception Triggers if an employee's last punch on a given date is prior to the employee's Scheduled End Time - On Time Grace Period. For example, if an employee is scheduled to work from 8:00 AM to 5:00 PM with a 5 Minute On Time Grace Period the Early Departure Exception will trigger if the employee punches out prior to 4:55 PM. |
| Exception Type | |
| Summary | The Exceeded Accrued Time exception triggers when an employee has a negative accrual balance. The Exceeded Accrual exception can only be viewed on the Employee Exception Detail Report as accrual exceptions are not related to employee timecards. When using the Employee Exception Detail report to view the Exceeded Accrual Exception the Date Range should match the Accrual Period for the Accrual Type in question. |
| Exception Type
Specific Fields |
N/A |
| Additional Required
Configuration |
|
| Exception Trigger |
|
| Exception Type | |
| Summary | The Excessive Pay Period Hours Exception is useful for identifying
employees who work over a certain number of hours, as defined
by the Excessive Pay Period Hours Threshold, in a single Pay Period.
The Excessive Pay Period Hours Threshold should be set such that
when employees work over the number of hours defined by the threshold
the Excessive Pay Period Hours exception will trigger.
For Example, if you wish to know if an employee works more than 50 Hours in a single pay period the Excessive Pay Period Hours Exception should be set to 50 Hours. The Exception will then alert supervisors to review the respective employee's timecard or schedule to reduce overtime hours in the future and / or redistribute hours to other employees. |
| Exception Type
Specific Fields |
|
| Additional Required
Configuration |
N/A |
| Exception Trigger | Triggers if Total Hours for a Single Pay Period Exceed the number of hours set on the Excessive Pay Period Hours Threshold. |
| Exception Type | |
| Summary | The Excessive Weekly Hours Exception is useful for identifying
employees who work over a certain number of hours, as defined
by the Excessive Weekly Hours Threshold, in a single Work Week.
The Excessive Weekly Hours Threshold should be set such that when
employees work over the number of hours defined by the threshold
the Excessive Weekly Hours exception will trigger.
For Example, if you wish to know if an employee works more than 50 Hours in a single work week the Excessive Weekly Hours Exception Threshold should be set to 50 Hours. The Exception will then alert supervisors to review the respective employee's timecard or schedule to reduce overtime hours in the future and / or redistribute hours to other employees. |
| Exception Type
Specific Fields |
|
| Additional Required
Configuration |
N/A |
| Exception Trigger | Triggers if Total Hours for a Single Work Week Exceed the number of hours set on the Excessive Pay Period Hours Threshold. |
| Exception Type | |
| Summary | InfiniTime includes a Valid Department list within the employee table. If valid departments are assigned to employees the Invalid Department exception can be used to track punches assigned to departments that are not considered valid for the employee. |
| Exception Type
Specific Fields |
N/A |
| Additional Required
Configuration |
|
| Exception Trigger |
|
| Exception Type | |
| Summary | Late Departure is an employee performance related exception used to compare employee Clock Out punches to their scheduled departure time. The Late Departure Exception Triggers if an employee punches out after their scheduled departure time. |
| Exception Type
Specific Fields |
N/A |
| Additional Required
Configuration |
|
| Exception Trigger | The Late Departure Exception Triggers if an employee's last punch on a given date is after to the employee's Scheduled End Time + Late Grace Period. For example, if an employee is scheduled to work from 8:00 AM to 5:00 PM with a 5 Minute Late Grace Period the Late Departure Exception will trigger if the employee punches out after 5:05 PM. |
| Exception Type | |
| Summary | Late Meal Break is an employee performance related exception used to determine if Meal Breaks are taken late. The Late Meal Break Exception triggers after a certain number of hours, defined by the Late Meal Break Threshold, where the employee has not yet taken a Break. Or, if an employee has taken a break, if the duration from the employee's first punch in to the employees first break punch exceeds the Late Meal Break Threshold.
For Example, if the Late Meal Break Exception Threshold is set to 6 Hours the employee must take a break within the first six hours of their shift or the Late Meal Break exception will trigger. |
| Exception Type
Specific Fields |
|
| Additional Required
Configuration |
|
| Exception Trigger |
OR
|
| Exception Type | |
| Summary | The Long Break Exception is an employee performance related exception which compares employee Breaks Lengths to their Scheduled Break Length. The Long Break Exception triggers if an employees actual break length is longer than the length of their scheduled break. |
| Exception Type
Specific Fields |
N/A |
| Additional Required
Configuration |
|
| Exception Trigger |
|
| Exception Type | |
| Summary | The Mandatory Rest Period Exception is intended for Employee Fatigue Tracking purposes. InfiniTime tracks the number of hours works by employees over a given number of consecutive days and triggers the Mandatory Rest Period if employees work over Total Hours within a given number of Consecutive Days without a certain number of consecutive Off Duty Hours. |
| Exception Type
Specific Fields |
|
| Additional Required
Configuration |
N/A |
| Exception Trigger |
|
| Exception Type | |
| Summary | The Missed Punch Exception is intended to notify supervisors when employees miss a punch. The Missed Punch Exception can be triggered in two different ways, depending on if 'Enable Missed Punch Schedule Check' option on the Company Update Form is checked.
The Housekeeping Service automatically checks to determine if the Missed Punch Exception should be triggered for employees on an hourly basis. |
| Exception Type
Specific Fields |
N/A |
| Additional Required
Configuration |
|
| Exception Trigger | If 'Enabled Missed Punch Schedule Check' is checked on the Company Update Form, the Missed Punch Exception will trigger in both of the scenarios below:
If 'Enabled Missed Punch Schedule Check' is unchecked on the Company Update Form, the Missed Punch Exception will trigger as follows:
|
| Exception Type | |
| Summary | The Missing Break Exception is a performance based exception which checks for a given number of work hours without a Paid or Unpaid break on a specific date. Schedules are not required for tracking the Missing Break Exception. The Missing Break Threshold should be set to the maximum number of hours an employee is permitted to work before taking a break.
For example, if the Missing Break Threshold is set to 6 hours, employees may work up to 6 hours without taking a break. After the total working duration is 6 Hours and 1 Minute, the Missing Break exception will occur. |
| Exception Type
Specific Fields |
|
| Additional Required
Configuration |
N/A |
| Exception Trigger |
|
| Exception Type | |
| Summary | The Missing Scheduled Punch Exception assists supervisors with managing missed punches and is commonly used with Exception Notifications to notify supervisors and / or employees when an employee fails to punch according to their schedule. The Missing Scheduled Punch Exception is an employee performance related exception which requires schedules to be configured. |
| Exception Type
Specific Fields |
|
| Additional Required
Configuration |
|
| Exception Trigger | The Housekeeping Service checks to determine if the Missing Scheduled Punch should be triggered for employees each minute as follows:
For example, let us assume the following settings:
Based on John's Schedule, InfiniTime will check for Punches to determine if the Missing Scheduled Punch Exception should be triggered at 8:15 AM and 5:15 PM due to the 15 Minute Threshold set on the Missing Scheduled Punch Exception.
At 8:15 AM, InfiniTime will check for a punch during the Clock In Grace Periods for the 8:00 AM Scheduled Punch. Specifically, if John does not have a punch between 7:50 AM and 8:10 AM, the Missing Scheduled Punch will trigger.
At 5:15 PM, InfiniTime will check for a punch during the Clock Out Grace Periods for the 5:00 PM Scheduled Punch. Specifically, if John does not have a punch between 4:50 PM and 5:10 PM, the Missing Scheduled Punch will trigger. |
| Exception Type | |
| Summary | The Non Arrival Exception is intended for use with managing
the arrival of multiple personnel for a given facility or location
and is commonly used with Exception Notifications to inform management
if no employees have arrived at a given facility. The Non Arrival
Threshold controls exactly when InfiniTime
will trigger the Non Arrival Exception if no employees have arrived
on site.
In order to track employees arriving at multiple sites, the Non Arrival Exception may be inserted multiple times with different values for the Non Arrival Threshold, Department, Job, and Task. |
| Exception Type
Specific Fields |
|
| Additional Required
Configuration |
|
| Exception Trigger | InfiniTime checks to determine if the Non Arrival Exception should be triggered every minute as follows:
For example, if the first employee is scheduled to arrive at Department 'Barista' for Job 'South Ave Coffee Shop' at 4:00 AM and the Non Arrival Threshold is set to 10 minutes, the Non Arrival Threshold will expire at 4:10. At 4:10, InfiniTime will check for the presence of one or more punches in Department 'Barista' for Job 'South Ave Coffee Shop' for all employees in the database. If no punches are present for 'Barista' / 'South Ave Coffee Shop' on the respective date then the Non Arrival Exception will trigger. It should be noted that Schedule Grace Periods are not used with the Non-Arrival Exception. InfiniTime checks for the presence of a punch in the department / job / task combination at any time on the respective date. A punch at 2:00 AM, 3:00 AM, and 4:05 AM would indicate that at least one employee was on site and would prevent the exception from triggering. |
| Exception Type | |
| Summary | The Outside Schedule Exception occurs when an employee's punches do not align with their schedule for the respective date based upon Clock In or Clock Out Schedule Grace Periods. |
| Exception Type
Specific Fields |
N/A |
| Additional Required
Configuration |
|
| Exception Trigger | The Outside Schedule Exception is triggered for each individual punch if the punch does not fall within Schedule Grace Periods. For example, if an employee is scheduled to work at 8:00 AM to 5:00 PM with a Clock In On Time Grace of 10 Minutes and a Clock In Late Grace of 10 Minutes the employee's Clock In Punch is expected between 7:50 AM and 8:10 AM. If the employee punches in outside of this time, then the Outside Schedule Exception will trigger. |
| Exception Type | |
| Summary | The Overtime Exception occurs on any date with hours in the Overtime 1, Overtime 2, Overtime 3, or Overtime 4 fields. |
| Exception Type
Specific Fields |
N/A |
| Additional Required
Configuration |
N/A |
| Exception Trigger | The Overtime Exception occurs for any Punch Pair with hours in the Overtime 1, Overtime 2, Overtime 3, or Overtime 4 fields. |
| Exception Type | |
| Summary | The Short Break Exception is an employee performance related exception which compares the duration of actual breaks taken by employees to the duration of scheduled breaks. The Short Break Exception triggers independently for Scheduled Unpaid and Paid Breaks. |
| Exception Type
Specific Fields |
N/A |
| Additional Required
Configuration |
|
| Exception Trigger |
|
| Exception Type | |
| Summary | The Short Paid Break Exception is an employee performance related exception which compares the duration of actual breaks taken by employees to the duration of scheduled breaks. The Short Paid Break Exception triggers only for Scheduled Paid Breaks. |
| Exception Type
Specific Fields |
N/A |
| Additional Required
Configuration |
|
| Exception Trigger |
|
| Exception Type | |
| Summary | The Short Unpaid Break Exception is an employee performance related exception which compares the duration of actual breaks taken by employees to the duration of scheduled breaks. The Short Unpaid Break Exception triggers only for Scheduled Unpaid Breaks. |
| Exception Type
Specific Fields |
N/A |
| Additional Required
Configuration |
|
| Exception Trigger |
|
| Exception Type | |
| Summary | Tardy is an employee performance related exception used to compare employee Clock In punches to their scheduled arrival time. The Tardy Exception Triggers if an employee punches in after their scheduled arrival time. |
| Exception Type
Specific Fields |
N/A |
| Additional Required
Configuration |
|
| Exception Trigger | The Tardy Exception Triggers if an employee's first punch on a given date is after to the employee's Scheduled Start Time + Late Grace Period. For example, if an employee is scheduled to work from 8:00 AM to 5:00 PM with a 5 Minute Late Grace Period the Tardy Exception will trigger if the employee punches in after 8:05 AM. |
| Exception Type | |
| Summary | The Unapproved Overtime Exception occurs on any date with unapproved hours in the Overtime 1, Overtime 2, Overtime 3, or Overtime 4 fields. |
| Exception Type
Specific Fields |
N/A |
| Additional Required
Configuration |
In order for the Unapproved Overtime Exception to trigger, one or more of the following settings on the Overtime Rules Section of an employee's policy must be enabled:
|
| Exception Trigger | The Unapproved Overtime Exception occurs on any date with unapproved hours in the Overtime 1, Overtime 2, Overtime 3, or Overtime 4 fields. |
| Exception Type | |
| Summary | The Under Daily Hours Exception occurs if an employee's total worked hours on a given date is less than the Under Daily Hours Threshold. |
| Exception Type
Specific Fields |
|
| Additional Required
Configuration |
N/A |
| Exception Trigger | The Under Daily Hours Exception compares the total number of hours worked on a given date to the Under Daily Hours Threshold. If an employee's total worked hours are less than the Under Daily Hours threshold the Under Daily Hours Exception will trigger. |
| Exception Type | |
| Summary | The Under Pay Period Hours Exception occurs if an employee's total worked hours for a pay period are less than the Under Pay Period Hours Threshold. |
| Exception Type
Specific Fields |
|
| Additional Required
Configuration |
N/A |
| Exception Trigger | The Under Pay Period Hours Exception compares the total number of hours worked during a given pay period to the Under Pay Period Hours Threshold. If an employee's total worked hours are less than the Under Pay Period Hours threshold the Under Pay Period Hours Exception will trigger. |
| Exception Type | |
| Summary | The Under Weekly Hours Exception occurs if an employee's total worked hours for a work week are less than the Under Weekly Hours Threshold. |
| Exception Type
Specific Fields |
|
| Additional Required
Configuration |
N/A |
| Exception Trigger | The Under Weekly Hours Exception compares the total number of hours worked during a given work week to the Under Work Week Hours Threshold. If an employee's total worked hours are less than the Under Weekly Hours threshold the Under Weekly Hours Exception will trigger. |
Hours and Time Limits are primarily used for salary employees in order to allocate hours to an individual without requiring them to punch in and out. Before configuring Hours and Time Limits for Salary employees it is important to determine what benefit tracking hours for employees automatically will provide. If there is no obvious benefit to the customer – it may not be necessary to configure Hours and Time Limits. For example, Salary Employees are often paid a straight dollar amount per pay period from the payroll system. The most common use of Hours and Time Limits is to automatically award a daily number of hours for Salary Employees with a single punch.
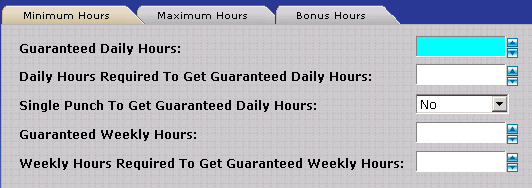
Guaranteed Daily Hours – Specifies the minimum amount of hours an employee will receive for a day. For example if this field was set to 8 hours and an employee worked four hours they would still be paid for 8.
Daily Hours Required to Get Guaranteed Daily Hours – Specifies the duration an employee must work in order to receive the Guaranteed Daily Hours. For example if Guaranteed Daily hours is set to 8 hours and this field is set to 2 hours employees must work at least two hours in order to receive 8 hours. Should the employee work less than 2 hours they will be paid for the duration worked.
Single Punch To Get Guaranteed Daily Hours – If this option is set to Yes employees must punch in to receive Guaranteed Daily Hours.
Guaranteed Weekly Hours – Specifies the minimum amount of hours an employee will receive for a week. For example if this field was set to 40 hours and an employee worked 20 hours they would still be paid for 40.
Weekly Hours Required to Get Guaranteed Weekly Hours – Specifies the duration an employee must work in order to receive the Guaranteed Weekly Hours. For example if Guaranteed Weekly hours is set to 40 hours and this field is set to 20 hours employees must work at least 20 hours in order to receive 40 hours. Should the employee work less than 20 hours they will be paid for the duration worked.
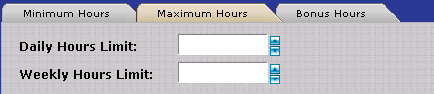
Daily Hours Limit – Specifies the maximum number of hours an employee can receive in a single day. IE: If the employee works 10 hours and the Daily Hours Limit is set to 8 hours the employee will only receive 8 hours for the day.
Weekly Hours Limit – Specifies the maximum number of hours an employee can receive in a week. IE: If the employee works 48 hours and the Weekly Hours Limit is set to 40 hours the employee will only receive 40 hours for the day.

Bonus Hours – Duration, in hours, to be given to employees when required hours are met.
Hours Required to Receive Bonus Hours – Duration, in hours, employees must work in order to receive bonus hours.
Daily Max After Bonus Hours are Awarded – Specifies the maximum number of hours an employee can receive for the day after bonus hours have been added. Employees can still work over this amount though they will only be paid for worked hours. Bonus hours will not be allotted if an employee works over the amount specified in this field.
Correct me if I’m wrong, these employees are only paid for exactly what they work?
Yes? – Hours and Time Limits are not required for this Policy. Employees must punch in and out.
No? – Are employees on the policy awarded a minimum number of hours per day or week?
Yes? - Configure Settings on the Minimum Hours tab as appropriate. Refer to the Minimum Hours Tab section if needed.
No? - Leave the Settings on the Minimum Hours Tab blank.
Are employees on the policy subject to a maximum number of hours per day or week?
Yes? - Configure Settings on the Maximum Hours tab as appropriate. Refer to the Maximum Hours Tab section if needed.
No? - Leave the Settings on the Maximum Hours Tab blank.
Are employees on the policy awarded bonus hours for working on specific days of the week?
Yes? - Configure Settings on the Bonus Hours tab as appropriate. Refer to the Bonus Hours Tab section if needed.
No? - Leave the Settings on the Bonus Hours Tab blank.
Will salary employees on this policy be required to punch in and out?
Yes? – Hours and Time Limits are not required for this Policy. Employees must punch in and out.
No? – Are salary employees required to punch at least once to receive minimum hours? This requires employees to be on site to receive their daily hours.
Yes? – Configure Settings on the Minimum Hours Tab and ensure Single Punch Required to Get Guaranteed Daily Hours = Yes. Schedules must be configured to track the Absent Exception. The Absent exception must also be defined on the respective policy or in the Company Wide Exceptions. Employees must punch in at the start of their shift. They do not need to punch out.
No? – Please confirm: Do you want InfiniTime to automatically insert punches for Salary Employees assigned to this policy according to their schedule and Minimum Hours Tab settings? Employees will not be required to punch in or out. Since punches will be automatically inserted for dates which the employee has a schedule, it will not be possible to track the absent exception or whether the employee arrived on site. Punches will simply be automatically inserted.
Yes? - Configure Settings on the Minimum Hours Tab and ensure Single Punch Required to Get Guaranteed Daily Hours = Yes. 'Auto Clock In' on the General Tab of the Schedule Settings / Rules section must be checked for this policy.
No? - Based on your decisions thus far, Salary Employees will:
1. Not punch in or out
2. Not be automatically awarded hours on a daily or weekly basis
3. In this scenario, Salary Employees do not need to be added to the InfiniTime Software for purposes of tracking employee timecards. Salary Employees will simply receive their salary paycheck as usual independent of the InfiniTime Time and Attendance system. You may however wish to:
1.) Add Salary Employees to the software
2.) Place salary employees on a blank policy with the correct Pay Cycle Settings
3.) Assign the employee to an Accrual Type to track accruals for Salary Employees within InfiniTime
WARNING:
Regarding use of 'Auto Clock In' and Punching In and Out:
Employees should not under any circumstance
punch in or out when using the Auto Punch In option as detailed above.
The customer may also wish to show the employees have taken a break. This
can be accomplished by setting up an auto break on the salary policy.
The General Tab of the Overtime Rules Section includes specific settings related to the Excessive Hours Report, Missing Punch Exception, approval of overtime, and how Daily Overtime vs Weekly Overtime hours are calculated.
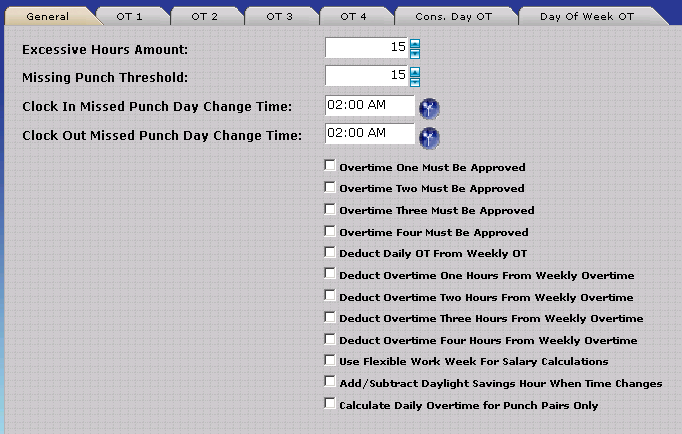
Excessive Hours Amount – Defines a Daily Hours Amount after which employees will appear on the Excessive Hours Report along with the total number of excessive hours worked for the day. For example if the Excessive Hours Amount is set to 10 hours and an employee works 12 hours in a single day their name will be displayed on the Excessive Hours Report along with a total of 2 hours.
Missing Punch Threshold – The Missing Punch Threshold is an amount, entered in hours, which is used as a countdown timer to assist InfiniTime with identifying missed punches. InfiniTime starts the timer when an employee clocks in and expects them clock out before the timer expires. For example, if the Missing Punch Threshold is set to 12 hours then InfiniTime expects employees to clock out within 12 hours after punching in. If the employee does not clock out within this duration then the employees punch in will be marked with a Missed Punch Exception and the employees next punch will be considered a Clock In.
NOTE: A 12 hour setting is the recommended value unless it is known for sure that employees may work longer than twelve hours without punching.
NOTE: If employees work more than 12 hours the Missing Punch Threshold should be set to a value at least 30 minutes higher than the highest expected amount of hours employees on this policy will work in a day. If only a small group of employees work over 12 hours it is worthwhile to create a separate policy for those individuals. A properly configured Missed Punch Threshold helps InfiniTime correctly identify Missed Punches, even if schedules are not defined.
Clock In & Clock Out Missed Punch Day Change Time – Worked Hours are associated with a particular day for the purpose of calculating hour totals for a specific date range. The Clock In and Clock Out Missed Punch Day Change Time can be manipulated to change which date – Today, Tomorrow, or Yesterday – an employee’s activity will be associated with. These are generally only required when configuring a policy for overnight employees. The best way to explain how to configure these settings is through example:
Clock In Missed Punch Day Change Time |
Clock Out Missed Punch Day Change Time |
Details |
Blank |
Blank |
Time is associated with the day an employee punches in on. |
10:30 PM |
Blank |
A night auditor shift starts at 11 PM. All Activity for employees clocking in after 10:30 PM will be associated with the next day. |
2:00 AM |
2:00 AM |
Punches are split at 2:00 AM. The Split Punches setting must be set to End of Pay Period or End of Week for General Policy Settings. All time before 2:00 AM will be associated with the prior day. All activity after 2:00 AM will be associated to the current day. |
Overtime Must be Approved Related Options – When checked for a specific Overtime Type, all Overtime Hours for the respective Overtime Type must be manually approved by a supervisor, payroll clerk, or InfiniTime Software Administrator. Unapproved Overtime Hours will be shown in red on the timecard.
Overtime One Must be Approved - If this option is checked, All Overtime One Hours must be approved.
Overtime Two Must be Approved - If this option is checked, All Overtime Two Hours must be approved.
Overtime Three Must be Approved - If this option is checked, All Overtime Three Hours must be approved.
Overtime Four Must be Approved - If this option is checked, All Overtime Four Hours must be approved.
Note: Overtime can be approved at any time during the pay period prior to exporting information to payroll by right clicking on records with unapproved overtime (shown in red) on the Timecard Table and selecting the Approve / Unapprove Overtime option.
Deduct Daily OT from Weekly OT – If you wish to deduct daily overtime from weekly overtime for all Overtime Buckets (OT1 to OT4) then this option should be checked. This is commonly used by companies with employees in California due to unique labor laws and is only required when both daily (Over 8 Hrs) and weekly overtime (Over 40 Hrs) are configured simultaneously within InfiniTime. For example if an employee works 10 hours Monday to Friday on a particular week. There are two different ways overtime can be handled on Friday. Either all hours on Friday are overtime or, if the Deduct Daily OT Hours from Weekly OT option is checked, the employee must work 8 hours before receiving overtime. The calculation for the above example is shown in the table below.
Option |
M |
T |
W |
TH |
F |
Total Hours |
Deduct Daily OT from Weekly OT Unchecked |
8 Hours Regular
2 Hours OT |
8 Hours Regular
2 Hours OT |
8 Hours Regular
2 Hours OT |
8 Hours Regular
2 Hours OT |
8 Hours Regular
2 Hours OT |
40 Hours Regular
10 Hours OT
|
Deduct Daily OT from Weekly OT Checked |
8 Hours Regular
2 Hours OT |
8 Hours Regular
2 Hours OT |
8 Hours Regular
2 Hours OT |
8 Hours Regular
2 Hours OT |
10 Hours OT |
32 Hours Regular
18 Hours OT
|
Deduct Overtime X Hours from Weekly Overtime Options - Permits users to deduct only specific Overtime Buckets from Weekly Overtime. In this way, Hours Mapped to a specific Overtime Bucket can be excluded from Weekly Overtime Calculations.
Deduct Overtime One Hours from Weekly Overtime - Deducts Overtime One Hours from Weekly Overtime.
Deduct Overtime Two Hours from Weekly Overtime - Deducts Overtime Two Hours from Weekly Overtime.
Deduct Overtime Three Hours from Weekly Overtime - Deducts Overtime Three Hours from Weekly Overtime.
Deduct Overtime Four Hours from Weekly Overtime - Deducts Overtime Four Hours from Weekly Overtime.
Use Flexible Work Week for Salary Calculations - This option should be checked if your organization observes Fluctuating Workweeks for purposes of calculating Overtime Wages for Salary Employees paid at a fixed salary for each pay period instead of using the traditional time and half rate for Overtime Hours. When this option is checked, the following must be configured for Salary Employee Overtime Wages to be automatically calculated:
Employees assigned to the policy should be set to the 'Salary' Pay Method on the Payroll Profile Tab of the Employee Update Form.
The Fixed Salary Dollar Amount, as payable to the employee for each work week, must be entered in the Default Wage Field on the Employee Update Form.
Overtime One must be configured for Weekly Overtime.
With the above configuration, InfiniTime will automatically calculate the Regular Hours Wage and Overtime One Wage based on the Fixed Salary Dollar Amount as payable for each work week and the number of hours worked by the employee.
For Example, if an employee with a Fixed Salary Amount of $500 per work week were to work 44 Hours, the employee would be paid as follows:
Fixed Salary Dollar Amount = $500 / Work Week
Total Worked Hours = 44
Resulting Hourly Wage = $500 / 44 Hours = $11.36 per Hour
Resulting Overtime Wage at 1/2 Time = $11.36 * 0.5 = $5.68 per Hour
Gross Wages for Regular Hours: $500.00
Gross Wages for OT1 Hours: $22.72
Total Wages: $522.72
Add / Subtract Daylight Savings Hour When Time Changes - This option should be checked if your organization is located in a time zone that observes Daylight Savings Time. When this option is checked, if an employee's working period crosses 2:00 AM on the Second Sunday in March or 2:00 AM on the First Sunday in November, InfiniTime will automatically subtract or add an hour from the employee's total hours as appropriate to compensate for the clock change.
Technical Note: For this feature to function correctly,
all Time and Attendance Readers (IE: Thor, Athena, Juno, Zephyr, etc.),
must be configured as follows:
1.) 'Set Time at Device' on the Polling Tab of the Reader Address Update
Form must be set to Yes
2.) The Time Zone field on the Polling Tab of the Reader Address Update
Form must be set to reflect the time zone where the Time and Attendance
Reader is located..
Calculate Daily Overtime for Punch Pairs Only - By Default, InfiniTime calculates Daily Overtime Hours on total hours worked on a given day. If 'Calculate Daily Overtime For Punch Pairs Only' is checked, Daily Overtime will be calculated on total hours for individual punch pairs instead of total hours worked during the day. This option is specifically intended for organizations where Daily Overtime Hours are paid only on consecutive hours worked.
General Tab Configuration Procedure
The Excessive Hours Amount Policy Setting is used solely by the Excessive Hours Report. The Excessive Hours Report will display all hours on a day by day basis that exceed this amount. To use the Excessive Hours Report, this field must be filled as appropriate for your organization. For example, if all hours in excess of 8 Daily Hours are to be considered excessive then the Excess Hours Amount should be set to 8. The image below shows the Excessive Hours Report for an employee assigned to a policy with an Excessive Hours Amount of 8 who worked 10 Hours Total in a single day. This report helps administrators to identify employees who are working too many hours.
What is the longest duration employees on this policy are expected to work in a single day?
Is this amount longer than 12 hours?
Yes? – Set the Missing Punch Threshold to the lowest value possible, but not lower than the longest duration worked in a single day.
No? – Set the Missing Punch Threshold to 12 hours.
A few examples:
A software company employes support technicians, sales employees, and administrative employees. All hourly employees who punch in and out work at most 11 hours in a day. This organization would set the missing punch threshold to 12 hours.
A shipping company employs package handlers who may work any combination of 1/2, 1, and 2 shifts in a single day for a total of up to 16 hours. Employees scheduled for doubles may be asked, in rare situations, to stay an extra hour late to fill an overnight truck. This organization would set the missing punch threshold to 18 hours since their employees work at most 17 to 17.5 hours in a day.
Will there be any employees on this policy that work over midnight?
No? – The Clock In and Clock Out Missed Punch Day Change times can be left blank.
Yes? – Is time activity for an employee associated with the day they punch in or the next day?
Same Day? – Leave the Clock In and Clock Out Missed Punch Day Change times blank.
Next Day? – Set the Clock In day change time to one hour before the start time of the earliest shift that crosses midnight. This leaves enough room for employees to arrive early and still have their time associated with the correct day.
If the Overtime Must Be Approved Options are checked for one or more overtime types all occurrences of overtime for the respective Overtime Type must be manually approved by a supervisor or software administrator. This option is especially useful for closely monitoring employee overtime hours, however it requires increased administrative overhead during the timecard review process for each pay period. Would you like to enable this option?
Let’s say an employee worked 10 hours Monday to Friday on a particular week with Overtime 1 set for Daily Overtime after 8 Hours and Weekly Overtime after 40 hours. In this scenario, there are two different ways overtime can be handled on Friday. Either all hours on Friday are overtime or, if the Deduct Daily OT Hours from Weekly OT option is checked, the employee must work 8 hours before receiving overtime. Would you like to enable this option? If so, Deduct Daily OT Hours from Weekly OT should be checked.
The Deduct Overtime One Hours from Weekly Overtime...Deduct Overtime Four Hours From Weekly Overtime are intended for use with overtime buckets configured for hours mapping wherein the hours mapped to the overtime bucket do not count toward weekly overtime hours. For example, XYZ Seafood Restaurant pays chefs 1.5x their base rate for hours worked outside of the employee's established schedule. If a chef is called in outside of their scheduled hours due to high occupancy the chef's hours will automatically be posted to Overtime 2 based on the 'Unscheduled Regular Hours Into OT' setting on the Schedule Settings / Rules Policy section. XYZ Seafood Restaurant does not count Unscheduled Regular Hours toward weekly overtime, thus they would check the option titled 'Deduct Overtime Two Hours from Weekly Overtime'.
To exclude an hours type from Weekly Overtime: Map the hours to an Overtime Bucket and check the appropriate 'Deduct OT X From Weekly Overtime' option.
Additional details on hours mapping can be found in the Hours Mapping Section of this document.
Is this policy for salary employees who are paid for Overtime Hours in accordance with the Fluctuating Workweek Method of Calculating Overtime?
Yes? - Check the 'Use Flexible Work Week for Salary Calculations' option on the General Tab of the Overtime Rules Section.
Ensure all employees assigned to the policy have the 'Salary' Pay Method set on the Payroll Profile Tab of the Employee Update Form.
Ensure all employees assigned to the policy have their Default Wage on the HR Profile Tab of the Employee Update Form.
Ensure Overtime One is configured for Weekly Overtime.
With the above configuration, InfiniTime will automatically calculate the Regular Hours Wage and Overtime One Wage based on the Fixed Salary Dollar Amount as payable for each work week and the number of hours worked by the employee.
Are the employees assigned to this policy located in a Time Zone that observes Daylight Savings Time?
Yes? - Add / Subtract Daylight Savings Hour When Time Changes should be checked. As noted above, you must confirm that each Time and Attendance Terminal is configured to observe daylight savings time.
No? - Add / Subtract Daylight Savings Hour When Time Changes can be left unchecked.
Are employees assigned to this policy paid daily overtime only on consecutive hours worked? If so, 'Calculate Daily overtime for Punch Pairs Only' should be checked.
OT 1 to OT 4 Tabs // Overtime Buckets: Configuring Daily Overtime, Weekly Overtime, Double Time etc.
Overtime Types One, Two, Three, and Four each have identical settings for Daily and Weekly Overtime Hours. Four Overtime Buckets are available to separate overtime hours paid at different rates. For example many companies use Overtime 1 for Weekly Overtime Paid at time and a half and Overtime 2 for Weekly Overtime paid at Double Time. When selecting an overtime pay method pay special attention to the labels on the window as fields are clearly marked with units and descriptive labels.
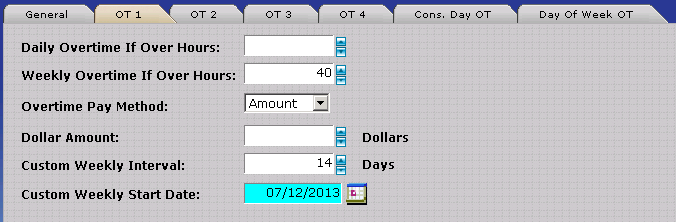
Daily Overtime If Over Hours: Hours worked over the displayed number, within a 24hr period, will be flagged as overtime OT1. If you do not wish to calculate overtime on a daily basis, set this field equal to zero.
Weekly Overtime If Over Hours: Hours worked over the displayed number, within seven days of the start of the week, will be flagged as OT1 Hours. If you do not wish to calculate overtime on a weekly basis, set this field equal to zero.
Custom Weekly Interval :Many companies with a Bi-Weekly Pay Period require employees to work 80 Hours over a two week period. The Custom Weekly Interval allows users to adjust the number of days in a week for overtime calculations. For example, Setting Weekly Overtime If Over Hours to 80 and a Custom Weekly Interval of 14 days will require employees to work 80 hours in a two week period before receiving Weekly Overtime Hours.
Custom Weekly Start Date: The Custom Weekly Start Date is used as a reference date to start the interval count and should generally be set to a date that matches the start of a pay period. InfiniTime will use the reference date and the Custom Weekly Interval to determine the week used for Overtime Pay Calculations.
Overtime Pay Method: Select the Pay Method used to calculate overtime wages. InfiniTime supports three separate pay methods as listed below. If 'None' is selected in the Overtime Pay Method Drop Down wages will not be calculated for Overtime Hours. If Alternate Wages are configured, It is important to note that InfiniTime will select a base wage based upon where an employee is working before Overtime Wage Payment Methods are applied.
Amount Pay Method
The Amount Pay Method pays employees an additional dollar amount for each hour they work. For example, an amount of 5.00 as shown below will pay employees their default wage plus an additional five dollars per hour for Overtime Hours. An example calculation is below.
Employee Default Wage + Dollar Amount = Overtime Wage
$10.00 + $5.00 = Overtime Wage
$15.00 = Overtime Wage
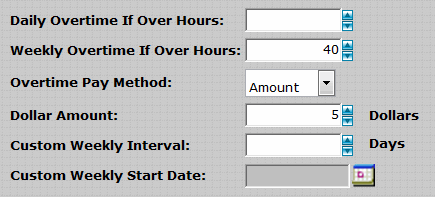
Percent Pay Method
The Percent Pay Method pays employees an additional percentage of their default wage for each hour they work. For example, a percent wage increase of 50 Percent is equivalent to Time and a Half or 1.5 times the employee's default wage. An example calculation is below.
Employee Default Wage + (Employee Default Wage * Percent Wage Increase) = Overtime Wage
$10.00 + ($10.00 * 50%) = Overtime Wage
$10.00 + ($5.00) = Overtime Wage
$15.00 = Overtime Wage
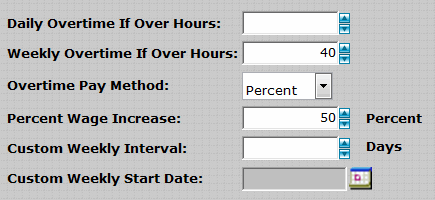
Rate Pay Method
The Rate Pay Method defines a specific wage for overtime hours. When the Rate Pay Method is used employee default wages are ignored and the Overtime Rate is used for overtime hours.
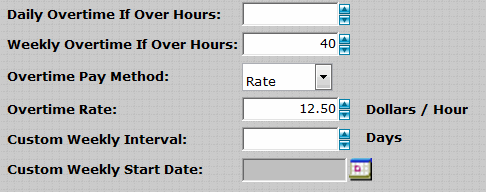
WARNING: The Rate Pay Method is not a multiplier of the employee's wage. Selecting the Rate Pay Method and entering 1.5 as the Overtime Rate will pay the employee $1.50 per hour. Remember, the Employee's default wage is ignored when the Rate Pay Method is selected. The Overtime Rate is entered in dollars per hour and will be used as the employee's overtime wage.
Do you calculate Overtime on a Daily basis?
Yes? – How many hours must an employee work in a single day before they qualify for overtime? Set this value in the Daily Overtime if Over Hours field. (IE: 8) Be sure to set the Overtime Rate Appropriately.
No? – Leave the Daily Overtime if Hours Field Blank. Continue to next question.
Do you calculate Overtime on a Weekly basis?
Yes? – How many hours must an employee work in a week before they qualify for overtime? Set this value in the Weekly Overtime if Over Hours field. (IE: 40) Be sure to set the Overtime Rate Appropriately.
Are employees on this policy paid on a biweekly pay cycle? Many companies with a biweekly pay period pay overtime on a pay period basis. (IE: Employees must work more than 80 hours over two weeks rather than 40 hours in a single week to qualify for weekly overtime.) Does this apply to your company?
Yes? – Set the Custom Weekly Interval to 14 Days.
No? – Set the Custom Weekly Start Date to the start date of the Current Pay Period.
No? – Leave the Weekly Overtime if Over Hours field Blank. Continue to next question.
Using additional overtime buckets (OT 2 – OT 4) makes it possible to pay employees overtime at different rates under various conditions. For example some companies pay Time and a Half after 8 hours in a day and double time after 12 hours in a day. This would require use of OT1 and OT2. Most organizations who require three or four buckets for Overtime Hours track one of the following:
Schedules Hours vs Unscheduled Hours (See Schedule Settings / Rules)
Consecutive Day Overtime
Day Of Week Overtime
Do you require additional overtime buckets?
Yes? – Configure OT2 – OT4 prompting with the preceding questions as needed.
No? – Ignore the OT2 – OT4 tabs and proceed to the next section.

Consecutive Days Worked Before All Time is Overtime: Enter the number of days an employee must work in a row before all time on the next working day will be considered overtime. IE: If this field is set to 5 and the employee has worked the minimum number of hours as detailed below all of their activity on the 6th consecutive day of work will be counted as Overtime. The value entered in this field will be referred to as the ‘number of days required for Consecutive Day OT’ within the context of this document.
Minimum Hours to Get Auto OT: Enter the minimum number of hours which must be worked on the Consecutive Day in order for the employee to qualify for Consecutive Day Overtime. If the employee does not work at least this number of hours then worked hours on the Consecutive Day will not be mapped into Overtime Buckets. This field is required - acceptable values include all whole numbers from 1 to 24 Hours.
IE:
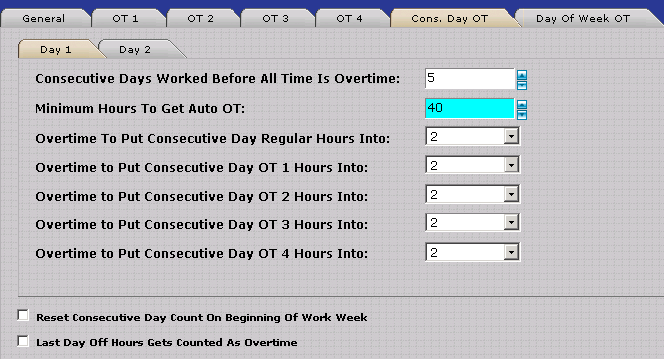
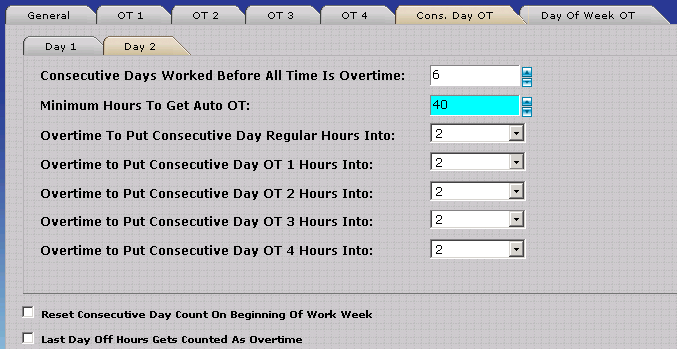
In the example above, Minimum Hours to Get Auto OT is set to 8 for both Day 1 and Day 2. Consecutive Days Worked Before all Time is Overtime is set to 5 for day 1 and 6 for day 2. Employees with less than 8 hours worked on Day 6 or Day 7 will not qualify for Consecutive Day Overtime even if they should work six or seven days in a row.
Overtime to Put Consecutive Day Regular Hours Into: If an employee should work the number of days required for Consecutive Day OT in a row all of their activity will be counted toward overtime. This option makes it possible to map hours that would be considered regular hours in normal circumstances toward a specific Overtime Bucket.
Overtime to Put Consecutive Day Overtime Hours Into: If an employee should work the previously specified number of days in a row all of their activity will be counted toward overtime. This option makes it possible to map hours that would be considered overtime one hours in normal circumstances toward a specific Overtime Bucket. An example follows.
Overtime 1 is paid after 40 hours in a week. Employees with less than 40 worked hours for the week who qualify for Consecutive Day Overtime would normally receive Regular Hours. Until the employee reaches 40 hours total for the week their hours will be mapped to the overtime bucket selected in the Consecutive Day Regular Hours drop down. Once the employee reaches 40 hours for the week any duration worked over 40 hours will be mapped to the overtime bucket selected in the Consecutive Day Overtime Hours drop down.
NOTE: Mapping settings for Consecutive Day Regular and Overtime Hours are set to the same Overtime Bucket in most scenarios. This ensures all consecutive overtime hours are paid at the same rate. Some companies will desire to pay Consecutive Day Regular Hours at a different rate than Consecutive Day Overtime hours. In this scenario it is necessary to separate the hours by mapping them to different overtime buckets.
Reset Consecutive Day Count on Beginning of Work Week - If this option is checked, the Consecutive Day Count will be reset at the beginning of each work week. In this way, it is possible to require employees to work all consecutive days within a single work week to qualify for consecutive day overtime.
Last Day Off Hours Gets Counted as Overtime - If this option is checked, the Consecutive Day Overtime Hours will be paid on the first Unscheduled Day prior to the date on which the employee qualified for Consecutive Day Overtime. Consecutive Day Overtime Hours will not be paid on the Consecutive Day, only standard Overtime 1, Overtime 2, Overtime 3 and Overtime 4 Policy Settings will be applied on the Consecutive Day when this option is checked. This option is primarily intended for customers who differentiate between Scheduled and Unscheduled Hours.
Ask the customer:
Do you pay overtime after employees work a certain number of days in a row? This is often referred to consecutive day overtime.
Yes? – How many days must an employee work consecutively before all hours on the next day will be considered overtime? Type this number in the 'Consecutive Days Worked Before All Time is Overtime’ field. Refer to the example above if needed
Are employees required to work a minimum number of hours in order to qualify for Consecutive Day Overtime?
Yes? – Set the Minimum Hours to Get Auto OT field to this value.
No? – Leave the Minimum Hours to Get Auto OT field blank.
For employees on this policy, does your organization pay the same pay rate for all hours types (IE: Regular Hours, OT1 - OT4 Hours) worked on that qualify for Consecutive Day Overtime?
Yes? - Set all 'Overtime to Put Consecutive Day Hours Type Hours Into' options to the Overtime Bucket you wish to place Consecutive Day Hours into.
No? - Each Hours Type with a different pay rate must be mapped to a different Overtime Bucket.
For example, ABC Company pays hours worked on consecutive days as follows:
Regular Hours Worked on Consecutive Days at 200%
Overtime 1 Hours Worked on Consecutive Days at 250%.
Overtime 2 Hours Worked on Consecutive Days at 300%
ABC Company has configured Overtime One and Overtime Two Hours as follows:
Overtime 1: Weekly OT > 40 Hours. Paid at 150%
Overtime 2: Daily OT > 12 Hours. Paid at 200%.
For consecutive days, ABC Company must map Consecutive Regular Hours to OT2 to pay them at 200%. Additionally, Consecutive Day Overtime 1 and Overtime 2 Hours must be mapped into OT3 which must be configured for 250%
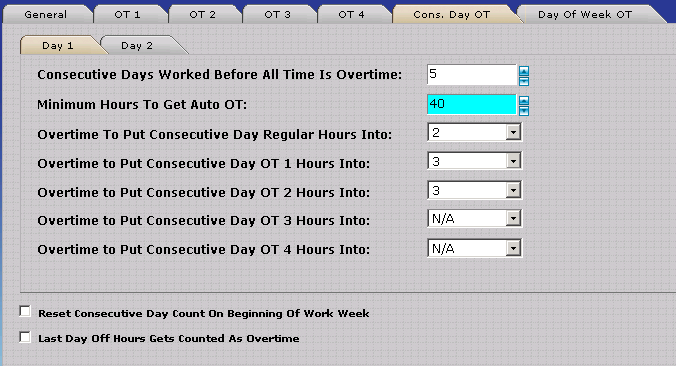
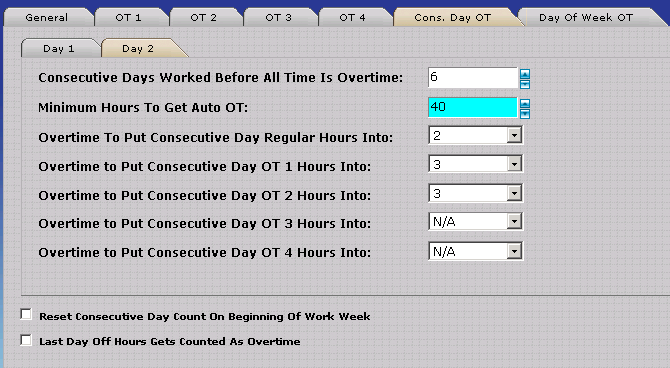
No? – Continue to the next section.
The Day of Week OT Tab makes it possible to separate employee hours worked on specific days of the week for pay at a special rate. For example some companies choose to pay hours worked on Saturday as time and a half. It is important to note that setting these options causes all hours worked on a given week day to be automatically placed in a specific overtime bucket. InfiniTime permits Day of Week Overtime settings to be configured for up to four individual week days.
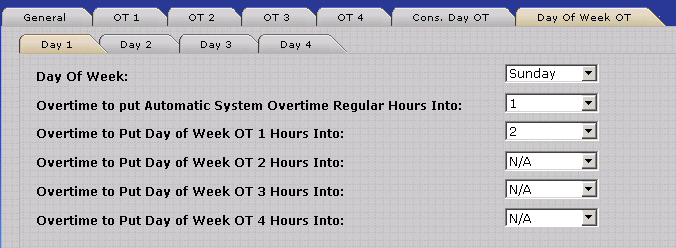
Day of Week: Select the day of week for which worked hours for specific hours types will be paid at a different rate.
Overtime to put Automatic System Overtime Regular Hours Into: If an employee should work on the day indicated by the ‘Day of Week’ setting all of their activity will be counted toward overtime. This option makes it possible to map hours that would be considered regular hours in normal circumstances toward a specific Overtime Bucket.
Overtime to put Day of Week OT 1 Hours Into: If an employee should work on the day indicated by the ‘Day of Week’ setting all of their activity will be counted toward overtime. This option makes it possible to map hours that would be considered overtime one hours in normal circumstances toward a specific Overtime Bucket.
Overtime to put Day of Week OT 2 Hours Into: If an employee should work on the day indicated by the ‘Day of Week’ setting all of their activity will be counted toward overtime. This option makes it possible to map hours that would be considered overtime two hours in normal circumstances toward a specific Overtime Bucket.
Overtime to put Day of Week OT 3 Hours Into: If an employee should work on the day indicated by the ‘Day of Week’ setting all of their activity will be counted toward overtime. This option makes it possible to map hours that would be considered overtime three hours in normal circumstances toward a specific Overtime Bucket.
Overtime to put Day of Week OT 4 Hours Into: If an employee should work on the day indicated by the ‘Day of Week’ setting all of their activity will be counted toward overtime. This option makes it possible to map hours that would be considered overtime four hours in normal circumstances toward a specific Overtime Bucket.
Up to four week days can be configured for automatic overtime using the Day 1 – Day 4 tabs. For Example:
XYZ Corporation pays all hours worked on Saturday or Sunday, or Weekend Hours, at time and a half. The settings below cause all hours worked on Saturday and Sunday to map to Overtime 2. In this way all hours in Overtime 2 are paid as time and a half.
|
Day 1 Tab |
Day 2 Tab |
Day of Week |
Saturday |
Sunday |
OT to Put Regular Hours Into |
2 |
2 |
OT to Put Overtime Hours Into |
2 |
2 |
Do employees on this policy receive a different pay rate for working on specific days of the week?
No? - Day Of Week OT Settings are not required for this policy. Proceed to the next section.
Yes? - Follow the steps below Starting with Day 1, then proceeding to Day 2 etc. for each additional week day:
Employees on this policy are eligible for a different pay rate on what day of the week? Set the 'Day Of Week' drop down to this day.
For hours worked on this day of the week, What Overtime Bucket should Regular Hours on this day of week be mapped to? Set 'Overtime to Put Day of Week Regular Hours Into' to this value.
For hours worked on this day of the week, What Overtime Bucket should Overtime One Hours on this day of week be mapped to? Set 'Overtime to Put Day of Week OT 1 Hours Into' to this value.
For hours worked on this day of the week, What Overtime Bucket should Overtime Two Hours on this day of week be mapped to? Set 'Overtime to Put Day of Week OT 2 Hours Into' to this value.
For hours worked on this day of the week, What Overtime Bucket should Overtime Three Hours on this day of week be mapped to? Set 'Overtime to Put Day of Week OT 3 Hours Into' to this value.
For hours worked on this day of the week, What Overtime Bucket should Overtime Four Hours on this day of week be mapped to? Set 'Overtime to Put Day of Week OT 4 Hours Into' to this value.
If employees on this policy receive different pay rates for more than one Day of Week, follow the steps above with Day 2, Day 3, etc.
Payroll Overrides make it possible to set a limit on employee hours exported to payroll for specific hours types including Regular Hours, Overtime One Hours, Overtime Two Hours, Overtime Three Hours, and Overtime Four Hours. These options are generally only used for salary employees. Up two five different Payroll Overrides can be defined on a single policy– one for regular hours and one for each overtime bucket (OT1 – OT4).
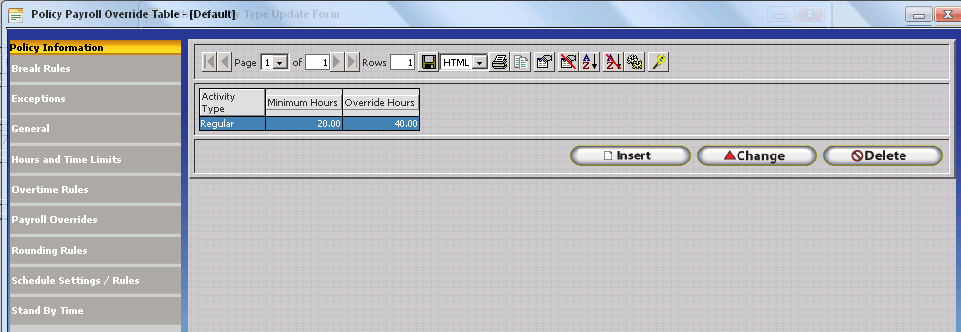
Activity Type– Indicates the activity type for which the payroll override will take effect.
Minimum Hours– Indicates the minimum number of hours an employee must work before the override takes effect.
Override Hours– Indicates the amount of hours to be exported for the chosen activity type.
For example the settings below would cause InfiniTime to export 40 Regular Hours for all employees who worked at least 20 Regular Hours. It should be noted that no matter how many hours the employee works only 40 hours will appear in the payroll export.
Activity Type |
Regular Hours |
Minimum Hours |
20 |
Override Hours |
40 |
Is this policy for hourly employees?
Yes? – Correct me if I’m wrong, as hourly employees these employees are required to punch in and out and are only paid for exactly what they work?
Yes? – Payroll Overrides are not required for this Policy.
No? – Proceed to next question.
No? – Would you like to send a certain number of hours to payroll for all employees on this policy as long as they work a predefined minimum number of hours? This is generally used for salary employees only.
Yes? – Click Insert then Choose the appropriate Activity Type from the Drop Down.
How many hours are employees required to work before the Override takes affect? Enter this number into the Minimum Hours field.
How many hours are to be sent to payroll if the employee works the minimum number of hours specified above? Enter this number into the Override Hours field.
Repeat the above steps for each Hours Type you wish to override.
No? – Payroll Overrides are not required for this Policy.
InfiniTime supports two methods of rounding employee punches including Unscheduled and Scheduled Rounding. Unscheduled Rounding Rules make it possible to round employee punches to the nearest tenth, quarter, or half an hour for the purpose of aesthetically pleasing worked hour totals which always fall on a tenth or quarter hour increment. Rounding rules do not change the time recorded when employees punch in and out. InfiniTime simply calculates hours according to the rounded punch times which affect total hours paid to each employee. In this way InfiniTime retains both the exact punch time for employee punches while also calculating rounded hour totals. Alternatively, Scheduled Rounding permits employee punches to be rounded directly to their scheduled start and / or end time. In this way, total hours paid to employees will match their exact scheduled hours if employees arrive and depart during predefined grace periods.
Unscheduled Rounding rules are applied to any employee punches that are considered unscheduled. Hours are considered unscheduled in the scenarios below. These scenarios are best illustrated by examples as provided below.
An employee punches in or out for a period where a schedule is not defined.
An employee punches in prior to the start of their assigned schedule on any given day. This condition assumes grace periods are not defined.*
An employee punches in prior to the start of their assigned schedule on any given day and outside of the period defined by the Early and On Time Grace Periods.*
An employee punches out after the end of their assigned schedule on any given day. This condition assumes grace periods are not defined.*
An employee punches out after the end of their assigned schedule on any given day and outside of the period defined by the On Time and Late Grace Periods.*
*The image below illustrates the concept of the Early (Shaded in Blue), On Time (Shaded in Bright Green), and Late (Shaded in Dark Green) Grace Periods. When grace periods are configured on the Scheduled Time Tab of the Rounding Rules Section, Employees who punch in outside of the grace periods (Shaded in Red) are considered Unscheduled. If Grace Periods are not defined - Unscheduled Rounding Rules will be applied to all punches.
![]()
Unscheduled rounding rules can be set separately for different punch types such as Clock In, Breaks, or Clock Out punches. In order for Unscheduled Break Rounding Rules to be applied, the Change to Break tab of the Break Rules Policy Section must be configured. Settings for each punch type, as outlined below, have their own tab on the Unscheduled Rounding rules section of the policy.

No Rounding – If this box is checked Employee Punches will not be rounded for the respective punch type. (IE: Clock In, Clock Out, or Break Punches)
Tenth Hour – Employee punches will be rounded to the nearest tenth hour according to the Round Back and Round Forward settings for the respective punch type. (IE: Clock In, Clock Out, or Break Punches)
Quarter Hour – Employee punches will be rounded to the nearest quarter hour according to the Round Back and Round Forward settings for the respective punch type. (IE: Clock In, Clock Out, or Break Punches)
Modified Quarter Hour – Employee punches will be rounded to the nearest quarter hour according to the Round Back and Round Forward settings for the respective punch type. (IE: Clock In, Clock Out, or Break Punches) The only difference between Quarter Hour and Modified Quarter Hour rounding are the default values of the Round Back and Round Forward settings.
Half Hour – Employee punches will be rounded to the nearest half hour according to the Round Back and Round Forward settings for the respective punch type. (IE: Clock In, Clock Out, or Break Punches)
Round Back if Equal to Or Less Than – Sets the threshold used by InfiniTime to determine if a punch should be rounded back. This value is always one minute less than the ‘Round Forward’ setting.
Round Forward if Equal to Or Greater Than – Sets the threshold used by InfiniTime to determine if a punch should be rounded forward. This value is always one minute greater than the ‘Round Back’ setting.
IE: A 7 / 8 Split for Quarter Hour Rounding would Round Back if a punch was within 7 minutes or less of the previous quarter hour. Alternatively the punch would be rounded forward if the punch was within 8 minutes or more of the previous quarter hour. This concept is illustrated by the timeline below. All times in blue would round back to the prior quarter hour. All times in red would round forward to the next quarter hour.

Rounding Method – Indicates how punches are to be rounded to the nearest tenth hour, quarter hour, or half hour. Available options are outlined below. Remember, rounding does not change the actual time of the punch indicated on the Timecard Table. Only the calculation affecting the amount of hours employees are paid for is altered.
Each Punch – Rounds individual punches as indicated by the rounding settings. IE: A 7 / 8 Split is used for Quarter Hour Rounding. The table below shows rounded punch times and total paid hours for specific punch times as an example.
Punch Time |
Rounded Punch Time |
Total Worked Hours |
Total Calculated Hours |
6:52 AM |
6:45 AM |
|
|
11:23 AM |
11:30 AM |
|
|
12:37 PM |
12:30 PM |
|
|
3:53 PM |
4:00 PM |
7.78 |
8.25 |
Net Round Each Punch Pair – Rounds the total duration for each punch pair as indicated by the rounding settings. IE: A 7 / 8 Split is used for Quarter Hour Rounding. The table below shows rounded punch times and total paid hours for specific punch times as an example.
Punch Time |
Punch Pair Duration |
Rounded Duration |
Total Hours Worked |
Total Calculated Hours |
6:52 AM |
|
|
|
|
11:23 AM |
04:31 |
04:30 |
|
|
12:37 PM |
|
|
|
|
3:53 PM |
03:16 |
03:15 |
7.78 |
7.75 |
Net Round Each Day – Rounds the total duration for each day as indicated by the rounding settings. IE: A 7 / 8 Split is used for Quarter Hour Rounding. The table below shows rounded punch times and total paid hours for specific punch times as an example.
Punch Time |
Worked Duration |
Rounded Duration |
Total Hours Worked |
Total Calculated Hours |
6:52 AM |
|
|
|
|
11:23 AM |
|
|
|
|
12:37 PM |
|
|
|
|
3:53 PM |
07:48 |
07:45 |
7.78 |
7.75 |
Choose your desired rounding method from the following:
Each Punch
Net Round Each Punch Pair
Net Round Each Day
Choose your desired rounding setting from the following:
Tenth Hour
Quarter Hour
Modified Quarter Hour
Half Hour
Configure the desired rounding setting and rounding method, as chosen above, for each Punch Type you wish to enable Unscheduled Rounding For. It is strongly recommended that the same Rounding Settings be used for all punch types to avoid confusion. Additionally, configuring Rounding for Break Punches is not recommended unless employees on this policy are subject to fixed break times such as in an assembly line environment. For most organizations, Rounding for Break Punches is not ideal.
Adjust the Round Back / Round Forward settings for each punch type if desired. The Round Back and Round Forward settings may be different for each punch type. For example, may customers choose to set the Round Back / Forward settings as follows:
| Punch Type | Round Back / Round Forward Settings |
| Clock In | Round Back: 14
Round Forward: 15 |
| Clock Out | Round Back: 14
Round Forward: 15 |
Rounding Rules for Scheduled Time are generally used to define grace periods for use with scheduling related exceptions though they can also be configured to round punches directly to an employee’s schedule. Scheduled rounding rules are applied to any employee punches that are considered within the Grace Periods for an employee's schedule. .
Scheduled rounding rules can be set separately for different actions such as Clocking In to work when arriving in the morning, Clocking Out from work when departing for the day, and when punching for breaks. Break rules must be configured correctly in order to ensure InfiniTime will recognize breaks as desired. Settings for each action listed above have their own tab on the Scheduled Rounding rules section of the policy. Rounding options for each tab are outlined below.
Round Clock In to Schedule – If this box is checked employee punches falling within the Early, On Time or Late Grace Periods of the Clock In type will be rounded to the Start Time of an Employee’s Schedule. See below for examples detailing the On Time and Late Grace Periods.
Early Grace Period – Defines the length of the Early Grace Period. The Early Grace Period defines a duration before the On Time Grace Period during which employees will receive the Early Exception. This concept is illustrated on the timeline below.
On Time Grace Period – Defines the length of the On Time Grace Period. The On Time Grace Period defines a duration after the Early Grace Period and before the Scheduled Start Time during which employees are considered On Time. Exceptions do not occur during the On Time Grace Period.
Late Grace Period – Defines the length of the Late Grace Period. The Late Grace Period defines a duration after the Scheduled Start Time during which employees are considered On Time. Exceptions do not occur during the Late Grace Period.
The Early, On Time, and Late Grace Periods are defined by the Early, On Time, and Late Grace Period Settings which are set to a value in minutes. The table below illustrates each grace period in addition to times which would be considered outside of schedule for the following settings:
Field |
Value (Minutes) |
Color |
Early Grace Period |
10 |
Blue |
On Time Grace Period |
10 |
Bright Green |
Late Grace Period |
10 |
Dark Green |
Outside of Schedule (Scheduled Rounding Does Not Apply) |
NA |
Red |
![]()
Remember, Grace Periods are intended for use with the Early, Tardy, and Outside of Schedule exceptions.
Grace Periods – On Time - The On Time Grace Period setting should be set to define the time period during which employees are expected to arrive for work. In this example the On Time Grace Period is set to ten minutes. Remember, the On Time Grace Period defines a time range prior to the start time. Ten minutes before the Scheduled Start Time of 8:00 AM is 7:50 AM. This time range is shaded in bright green below, any employees punching in between 7:50 AM and 8:00 AM would be considered as punching in On Time. Employees do not receive Early, Tardy, or Outside of Schedule exceptions for punching in during the On Time Grace Period.
Grace Periods – Early - The Early Grace Period setting should be set to define the time period during which employees will be marked as Arriving Early. In this example the Early Grace Period is set to ten minutes. Remember, the Early Grace Period defines a time range prior to the On Time Grace Period which starts at 7:50 AM in this example. Ten minutes before the start of the On Time Grace Period at 7:50 AM is 7:40 AM. This time range is shaded in blue below, any employees punching in between 7:40 AM and 7:50 AM would be considered as punching in Early. Employees punching in during the Early Grace Period will receive an early exception.
Grace Periods – Late - The Late Grace Period setting should be set to define the time period during which employees may punch in after their scheduled start time yet still be considered On Time. Many companies consider their employees late if they are not at the site and clocked in before their scheduled start time. In this case the Late Grace Period should be left blank. In the example below the Late Grace Period is set to ten minutes. Remember, the Late Grace period defines a time range after the scheduled start time. Ten minutes after the Scheduled Start Time of 8:00 AM is 8:10 AM. This time range is shaded in dark green below, any employees punching in between 8:00 AM and 8:10 AM would be considered as punching in On Time. Employees do not receive Early, Tardy, or Outside of Schedule exceptions for punching in during the Late Grace Period.
Grace Periods – Outside of Schedule - Employees are considered Outside of Schedule if they punch at a time that does not fall within the Early, On Time, or Late Grace Periods. Times during which an employee would be considered outside of schedule are shaded in red below. Employees punching in outside of the grace periods and after the scheduled start time receive both the Outside of Schedule and Tardy exceptions. Employees punching in outside of the grace periods and before their scheduled start time receive only the Outside of Schedule exception.
Note: If you wish to round break punches for scheduled times it is recommended that you enable rounding for both Clock In and Clock Out punches of the desired break type to avoid confusion.
Prior to configuring rounding for breaks it is important to understand the four types of break punches. It should be noted that rounding is not used for Auto Breaks. Change to Break must be configured to use Break Rounding. An example depicting a typical 8 – 5 shift with an unpaid break is below. The First Change to Break is set to 1.5 and Unpaid Break.
Clock In: 8:00 AM
Clock Out Unpaid Break: 12:00 PM
Clock In Unpaid Break: 1:00 PM
Clock Out: 5:00 PM
In this example the employee arrives for work at 8:00 AM, departs for their lunch break at 12:00 PM, returns to work at 1:00 PM, and departs for the day at 5:00 PM. Notice how the 12:00 PM punch is considered a Clock Out Unpaid Break punch while the 1:00 PM punch is considered a Clock In Unpaid Break Punch. The same concept applies for paid breaks as illustrated below.
Clock In: 8:00 AM
Clock Out Paid Break: 12:00 PM
Clock In Paid Break: 1:00 PM
Clock Out: 5:00 PM
Round Clock In Paid Break to Schedule – If this box is checked employee punches falling within the Early, On Time, or Late Grace Periods of the Clock In Paid Break type will be rounded to the Paid Break End Time on an Employee’s Schedule.
Round Clock Out Paid Break to Schedule – If this box is checked employee punches falling within the Early, On Time, or Late Grace Periods of the Clock Out Paid Break type will be rounded to the Paid Break Start Time on an Employee’s Schedule.
Round Clock In Unpaid Break to Schedule – If this box is checked employee punches falling within the Early, On Time, or Late Grace Periods of the Clock In Unpaid Break type will be rounded to the Unpaid Break End Time on an Employee’s Schedule.
Round Clock Out Unpaid Break to Schedule – If this box is checked employee punches falling within the Early, On Time, or Late Grace Periods of the Clock Out Unpaid Break type will be rounded to the Unpaid Break Start Time on an Employee’s Schedule.
Early Grace Period – Defines the length of the Early Grace Period. The Early Grace Period defines a duration before the On Time Grace Period during which employees will receive the Early Exception. This concept is illustrated on the time line below.
On Time Grace Period – Defines the length of the On Time Grace Period. The On Time Grace Period defines a duration after the Early Grace Period and before the Scheduled Start Time during which employees are considered On Time. Exceptions do not occur during the On Time Grace Period.
Late Grace Period – Defines the length of the Late Grace Period. The Late Grace Period defines a duration after the Scheduled Start Time during which employees are considered On Time. Exceptions do not occur during the Late Grace Period.
Round Clock Out to Schedule – If this box is checked employee punches falling within the Early, On Time or Late Grace Periods of the Clock Out type will be rounded to the End Time of an Employee’s Schedule. See below for examples detailing the Early, On Time, and Late Grace Periods.
Early Grace Period – Defines the length of the Early Grace Period. The Early Grace Period defines a duration before the On Time Grace Period during which employees will receive the Early Departure Exception. This concept is illustrated on the time line below.
On Time Grace Period – Defines the length of the On Time Grace Period. The On Time Grace Period defines a duration after the Early Grace Period and before the Scheduled End Time during which employees are considered leaving on time. Exceptions do not occur during the On Time Grace Period.
Late Grace Period – Defines the length of the Late Grace Period. The Late Grace Period defines a duration after the Scheduled End Time during which employees are considered leaving on time. Exceptions do not occur during the Late Grace Period.
The Early, On Time, and Late Grace Periods are defined by the Early, On Time, and Late Grace Period Settings which are set to a value in minutes. The time line below illustrates each grace period in addition to times which would be considered outside of schedule for the following settings:
Field |
Value (Minutes) |
Color |
Early Grace Period |
10 |
Blue |
On Time Grace Period |
10 |
Bright Green |
Late Grace Period |
10 |
Dark Green |
Remember, Grace Periods are intended for use with the Early Departure, Late Departure, and Outside of Schedule exceptions. It should be noted that many customers have difficulty grasping the concept of an Early Grace Period – for this reason the On Time Grace Period should be introduced first when providing examples for a customer.
Grace Periods – On Time
The On Time Grace Period setting should be set to define the time period during which employees may punch out before their scheduled end time yet still be considered as departing on time. Many companies consider their employees as departing early if they punch out before their scheduled end time for the day. In this case the On Time Grace Period should be left blank. In the example below the On Time Grace Period is set to ten minutes. Remember, the On Time Grace Period defines a time range prior to the end time. Ten minutes before the Scheduled End Time of 5:00 PM is 4:50 PM. This time range is shaded in bright green below, any employees punching out between 4:50 PM and 5:00 PM would be considered as punching out On Time. Employees do not receive Early Departure, Late Departure, or Outside of Schedule exceptions for punching out during the On Time Grace Period.
Grace Periods – Early
The Early Grace Period setting should be set to define the time period during which employees will be marked as departing Early. In this example the Early Grace Period is set to ten minutes. Remember, the Early Grace Period defines a time range prior to the On Time Grace Period which starts at 4:50 PM in this example. Ten minutes before the start of the On Time Grace Period at 4:50 PM is 4:40 PM. This time range is shaded in blue below, any employees punching out between 4:40 PM and 4:50 PM would be considered as Departing Early. Employees punching out during the Early Grace Period will receive an early departure exception.
Grace Periods – Late
The Late Grace Period setting should be set to define the time period during which employees are expected to punch out after their scheduled end time. In the example below the Late Grace Period is set to ten minutes. Remember, the Late Grace period defines a time range after the scheduled end time. Ten minutes after the Scheduled Start Time of 5:00 PM is 5:10 PM. This time range is shaded in dark green below, any employees punching out between 5:00 PM and 5:10 PM would be considered as punching out On Time. Employees do not receive Early Departure, Late Departure, or Outside of Schedule exceptions for punching out during the Late Grace Period.
Grace Periods – Outside of Schedule
Employees are considered Outside of Schedule if they punch at a time that does not fall within the Early, On Time, or Late Grace Periods. Times during which an employee would be considered outside of schedule are shaded in red below. Employees punching out outside of the grace periods and after the scheduled end time receive both the Outside of Schedule and Late Departure exceptions. Employees punching out outside of the grace periods and before their scheduled end time receive only the Outside of Schedule exception.
![]()
Benefits provided by scheduled rounding include:
Ability to round employee punches to schedules.
Rounded Hour Totals (IE: 8.25, 7.75 Hours for the Day etc.)
Ability to track employee performance via Early, Early Departure, Tardy, Late Departure, and Outside of Schedule exceptions.
Ability to prevent employees from punching outside of Scheduled Rounding Grace Periods via Schedule Lockout (See Schedule Settings / Rules)
Will schedules be configured for employees on this policy?
No? – Scheduled Rounding requires schedules. Employee punches cannot be rounded to schedule nor can Grace Periods be configured for use with exceptions without configuring schedules for employees on the policy. If you do not which to configure schedules for employees, skip to the next section.
Yes? – Do you wish to round employee punches to their scheduled start time?
Yes? – Check the round Clock In to Schedule Box on the Clock In Tab. Pay special attention to the grace period settings for the Clock In Punch Type when using Round to Schedule. All employee punches falling within the Early, On Time, and Late Grace Periods will be rounded to the employee's scheduled start time.
No? – Leave the round Clock In to Schedule Box on the Clock In Tab unchecked.
Do you wish to round employee punches to their scheduled end time?
Yes? – Check the round Clock Out to Schedule Box on the Clock Out Tab. Pay special attention to the grace period settings for the Clock Out Punch Type when using Round to Schedule. All employee punches falling within the Early, On Time, and Late Grace Periods will be rounded to schedule the employee's scheduled end time.
No? – Leave the round Clock Out to Schedule Box on the Clock Out Tab unchecked.
Answer the following questions to configure the Clock In Grace Periods:
How long before the scheduled start time can employees punch in and still be considered on time? Enter this value in the On Time Grace Period field.
How long after the scheduled start time can employees punch in and still be considered on time? Enter this value in the Late Grace Period Field. Remember this value may be blank.
Do you wish to mark employees as arriving early with the ‘Early’ exception if they arrive before the On Time Grace period?
Yes? – How long before the On Time Grace Period can an employee punch in and still be considered early? Remember, if an employee punches in before the start of the Early Grace Period they will be considered outside of schedule. Enter this value in the Early Grace Period Field.
No? – Leave the Early Grace Period Blank.
Break Rounding is only utilized under special circumstances. Most companies do not implement break rounding. With Break Rounding Enabled, depending on the break duration and the employee's exact punch times, it is possible for the entire break to be rounded to a duration of 0 minutes.
Answer the following questions to configure Break Scheduled Rounding Rules:
Do Employee Schedules include Breaks?
No? - Scheduled Rounding Rules cannot be configured for breaks if breaks are not scheduled. Breaks should ONLY be scheduled if your organization enforces strict break times such that employees regularly take their break exactly at the scheduled time such as in a facility with assembly lines and / or bells / buzzers. Skip to the next section if Breaks are not scheduled for your employees.
Yes? - If you wish to configure rounding for Breaks, review the questions below and configure Scheduled Rounding Rules on the Breaks tab as appropriate.
Do you wish to round Paid Break Punches to Schedule?
Yes? – Check the Round Clock In Paid Break to Schedule and Round Clock Out Paid Break to Schedule Options. Pay special attention to the grace period settings for Break Punch Types when using Round to Schedule. All break punches falling within the Early, On Time, and Late Grace Periods around Scheduled Paid Breaks will be rounded to schedule the employee's scheduled end time.
No? – Leave the round Clock Out to Schedule Box on the Clock Out Tab unchecked.
Do you wish to round Unpaid Break Punches to Schedule?
Yes? – Check the Round Clock In Unpaid Break to Schedule and Round Clock Out Unpaid Break to Schedule Options. Pay special attention to the grace period settings for Break Punch Types when using Round to Schedule. All break punches falling within the Early, On Time, and Late Grace Periods around Scheduled Paid Breaks will be rounded to schedule the employee's scheduled end time.
No? – Leave the round Clock Out to Schedule Box on the Clock Out Tab unchecked.
Answer the following questions to configure the Break Grace Periods:
How long before the scheduled Break start time can employees punch in and still be considered on time? Enter this value in the On Time Grace Period field.
How long after the scheduled Break start time can employees punch in and still be considered on time? Enter this value in the Late Grace Period Field. Remember this value may be left blank.
Leave the Early Grace Period Blank.
Answer the following questions to configure the Clock Out Grace Periods:
How long before the scheduled end time can employees punch out and still be considered departing on time? Enter this value in the On Time Grace Period field. Remember this value may be left blank.
How long after the scheduled end time can employees punch out and still be considered departing on time? Enter this value in the Late Grace Period Field.
Do you wish to mark employees as departing early with the ‘Early Departure’ exception if they depart before the On Time Grace period?
Yes? – How long before the On Time Grace Period can an employee punch out and still be considered departing early? Remember, if an employee punches out before the start of the Early Grace Period they will be considered outside of schedule. Enter this value in the Early Grace Period Field.
No? – Leave the Early Grace Period Blank.
Remember to configure any exceptions you wish to track:
The following exceptions are used with Grace Periods:
Early
Tardy
Early Departure
Late Departure
Outside Schedule
The following exceptions are used with Scheduled Breaks:
Late Meal Break
Long Break
Missing Break
Short Break
Short Paid Break
Short Unpaid Break
Schedule Settings and Rules are used in conjunction with Hours and Time Limits to automatically punch employees in and out and to automatically punch to changes in an employee’s schedule. Additional options such as associating shift differentials with a policy, setting a default schedule, and mapping unscheduled hours are also configured here. Before attempting to configure shift differentials be sure to review the section below outlining the relationship between Policy Settings and Shift Differentials.

The Punch to Schedule / Lockout options can be used to lock employees out if they arrive outside of the grace periods defined on the Scheduled Rounding Tab. Lockout prevents employees from punching outside of the Early, On Time, and Late Grace periods. It is important to note that Punch to Schedule / Lockout is a strict option. Employees will not be able to punch if lockout is enabled and they are attempting to punch outside of the grace periods. While this may sound like a good idea in theory it may be impractical for some implementations as employees will need to seek out management personnel in order to punch in or out if they are outside of the grace periods defined on their policy. Please review the configuration examples below carefully before deciding to enable Punch to Schedule / Lockout.
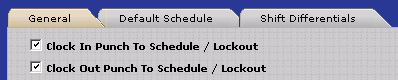
For specific hardware terminals, Employees who attempt to punch outside of the Early, On Time, and Late Grace Periods will receive a warning message. The table below lists specific hardware terminals which support this feature. It is important to note that not all Data Collection Terminals supported by the InfiniTime Software support Punch to Schedule / Lockout Warnings. For data collection terminals which do not support Schedule Lockout Warning Messages, Employee Punches outside of the grace periods will be ignored by the InfiniTime Application but the user will not be alerted.
Terminal |
Requirements for Message Display |
Thor
|
|
| Scout 1000/2000/3000/4000 |
|
Clock In Punch to Schedule / Lockout – If this option is checked employees will be unable to punch in outside of the Early, On Time, and Late Grace Periods defined on the Schedule Rounding Rules Tab. Grace Periods must be defined and Schedules must be configured for employees in order for this option to operate properly.
Clock Out Punch to Schedule / Lockout – If this option is checked employees will be unable to punch out outside of the Early, On Time, and Late Grace Periods defined on the Schedule Rounding Rules Tab. Grace Periods must be defined and Schedules must be configured for employees in order for this option to operate properly.
It is important to note that Punch to Schedule / Lockout functions differently depending on how the Clock In Punch to Schedule / Lockout and Clock Out Punch to Schedule / Lockout options are checked. The table below illustrates available lockout functions.
| Clock In Punch to Schedule / Lockout | Clock Out Punch to Schedule / Lockout | Punch to Schedule / Lockout Function |
| Unchecked | Unchecked | No Lockout. Employees may punch at any time. Employee punches
will then be organized into pairs and totaled in accordance with
employee policy settings.
See Example A Below. |
| Checked | Unchecked | Schedule Lockout Enabled Prior to Clock In Grace Periods Only.
Employees may punch at any time during and after the Clock In
Early, On Time, and Late Grace Periods.
See Example B Below. |
| Unchecked | Checked | Schedule Lockout Enabled Prior to After Clock Out Grace Periods
Only. Employees may punch at any time during and before the Clock
Out Early, On Time, and Late Grace Periods.
See Example C Below. |
| Checked | Checked | Schedule Lockout Enabled at all times outside of the Clock
In and Clock Out Grace Periods. Employees may punch only during
the Clock In and Clock Out Early, On Time, and Late Grace Periods.
See Example D Below. |
Related Settings:
Scheduled Time Grace Periods: Clock In On Time Grace Period: 10 Minutes Clock In Late Time Grace Period: 10 Minutes Clock Out On Time Grace Period: 10 Minutes Clock Out Late Time Grace Period: 10 Minutes |
Punch to Schedule / Lockout:
Employee Schedule: 8:00 AM to 5:00 PM
|
Effective Lockout
Window:
 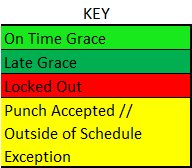
When both 'Clock In Punch to Schedule / Lockout' and 'Clock Out Punch to Schedule / Lockout' are unchecked, Lockout is not enabled. Employees may punch in or out freely throughout the day. Any punches outside of the Clock In / Clock Out Schedule Grace Periods will be marked with the Outside of Schedule Exception and / or other schedule related exceptions such as Early, Tardy, and Early Departure as appropriate. |
|
Related Settings:
Scheduled Time Grace Periods: Clock In On Time Grace Period: 10 Minutes Clock In Late Time Grace Period: 10 Minutes Clock Out On Time Grace Period: 10 Minutes Clock Out Late Time Grace Period: 10 Minutes |
Punch to Schedule / Lockout:
Employee Schedule: 8:00 AM to 5:00 PM
|
Effective Lockout
Window:

When only 'Clock In Punch to Schedule / Lockout' is checked, Lockout is enabled prior to the Clock In Grace Periods only. Employees may punch in or out freely during and after the Clock In Early, On Time, and Late Grace Periods. Any punches outside of the Clock In / Clock Out Schedule Grace Periods will be marked with the Outside of Schedule Exception and / or other schedule related exceptions such as Early, Tardy, and Early Departure as appropriate. |
|
Related Settings:
Scheduled Time Grace Periods: Clock In On Time Grace Period: 10 Minutes Clock In Late Time Grace Period: 10 Minutes Clock Out On Time Grace Period: 10 Minutes Clock Out Late Time Grace Period: 10 Minutes |
Punch to Schedule / Lockout:
Employee Schedule: 8:00 AM to 5:00 PM
|
Effective Lockout
Window:

When only 'Clock Out Punch to Schedule / Lockout' is checked, Lockout is enabled after the Clock Out Grace Periods only. Employees may punch in or out freely before and during the Clock Out Early, On Time, and Late Grace Periods. Any punches outside of the Clock In / Clock Out Schedule Grace Periods will be marked with the Outside of Schedule Exception and / or other schedule related exceptions such as Early, Tardy, and Early Departure as appropriate. |
|
Example D: Clock In & Clock Out Punch to Schedule / Lockout Enabled |
|
Related Settings:
Scheduled Time Grace Periods: Clock In On Time Grace Period: 10 Minutes Clock In Late Time Grace Period: 10 Minutes Clock Out On Time Grace Period: 10 Minutes Clock Out Late Time Grace Period: 10 Minutes |
Punch to Schedule / Lockout:
Employee Schedule: 8:00 AM to 5:00 PM
|
Effective Lockout
Window:

When both 'Clock In Punch to Schedule / Lockout' and 'Clock Out Punch to Schedule / Lockout' are checked, Lockout is enabled at all times outside of the Clock In and Clock Out Grace Periods. Employees may punch in and out only during the Clock In and Clock Out Early, On Time, and Late Grace Periods. |
|
Lockout makes it possible to prevent employees from punching outside of the grace periods defined by their schedule and policy settings. Lockout is a strict feature, as such it is not always practical. Employees arriving or departing during the Lockout Time Period will have to locate a supervisor in order to Punch Outside of definedgrace periods.
Auto Punch settings are used in conjunction with scheduling and the Hours and Time Limits policy settings to automatically punch employees in and out. Refer to the Hours and Time Limits section of this document for information on the recommended settings for configuring auto punch using Minimum Daily Hours. The InfiniTime Housekeeping Service is responsible for inserting automatic punches. The housekeeping service must be running for automatic punches to be inserted as expected.
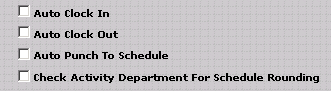
Auto Clock In – If this option is checked InfiniTime will automatically clock employees in at their scheduled start time. An offset can be configured to cause InfiniTime to wait for a certain duration before automatically inserting the punch at the scheduled start time.
Auto Clock Out – If this option is checked InfiniTime will automatically clock employees out at their scheduled end time.
WARNING: Auto Clock In and Auto Clock Out are intended for use with Salary Employees who will not punch in or out manually. Punches generated by Auto Clock In and Auto Clock Out should not be edited. Remember, auto punch inserts punches according to an employee’s schedule. Changing an employee’s schedule and recalculating is the recommended method for altering automatic punches. If an employee was sick or out of the office for a day and it is necessary to remove the automatic punches simply insert an Other Activity Record for the day and the automatic punches will be removed.
Auto Punch to Schedule – If this option is enabled InfiniTime will automatically insert punches according to an employee’s schedule. IE: If breaks are defined in an employees schedule the employee will automatically be clocked in and out for breaks. Alternatively the schedule can also be split across multiple departments using the Gantt Chart. InfiniTime will then switch the employee between departments according to the schedule automatically. Employees must punch in and out manually for this feature to function properly.
Check Activity Department for Schedule Rounding – If this option is enabled InfiniTime will ignore the employee’s schedule and use the schedule assigned to the department the employee is working in for Schedule Rounding. Grace Periods and Round to Schedule will be based upon the Activity Department Schedule rather than the employee’s default schedule.
Auto Punch Configuration Procedure
Is this policy intended for hourly employees who are paid according to the hours they work?
Yes? - The Auto Clock In and Auto Clock Out options will not be required. These are only intended for salary employees who are not required to clock in and out manually.
No? - If the policy is intended for salary employees, and you would like to configure Auto Punch to automatically track Hours for Salary Employees, there are three methods for doing so as outlined below. Select the desired method and configure the Schedule Settings / Rules & Hours & Time Limits as appropriate.
WARNING: Timecards should not be edited manually when automatically generating hours for salary employees. To mark employees as absent when automatically generating hours other activity can be inserted. Create an Other Activity Type titled ‘Absent’ and ensure the ‘Exclude from Payroll’ option is checked. InfiniTime will remove automatic hours if an Other Activity record is inserted for the day.
NOTE: Remember, automatically generated hours are based upon the employee’s schedule. If it is necessary to change punches for an employee simply edit the employee’s schedule to reflect to correct start and end time and recalculate. Do not change the employee’s default schedule. Use the GANNT chart to alter the schedule for a single day.
Auto Punch to Schedule is intended for use with Hourly Employees for automatic tracking of scheduled breaks or Labor Switching according to the employee's schedule. For example, if an employee is scheduled to work in Department A and Job A from 8:00 AM to 10:00 AM, then Department A and Job B from 10:00 AM to 5:00 PM, and the employee punches in at 8:00 AM and out at 5:00 PM, InfiniTime will automatically punch the employee into and out of the Scheduled Departments / Jobs if Auto Punch to Schedule is checked.
Would you like to enable Auto Punch to Schedule?
Yes? Check Auto Punch to Schedule.
Employees assigned to this policy must have schedules defined in order for Auto Punch to Schedule to function.
Auto Punch to Schedule will automatically punch employees in and out for Scheduled Breaks
Auto Punch to Schedule will also automatically transfer employees between Departments / Jobs / Tasks as appropriate based on their schedule
Employees must punch in at the beginning of their work day and punch out at the end of their work day within the Clock In and Clock Out Grace Periods in order for Auto Punch to Schedule to function correctly.
No? Proceed to the next section. Leave Auto Punch to Schedule Blank.
The Unscheduled Hours Mapping options below make it possible to map Unscheduled Working hours to a specific Overtime Bucket. These options are useful for organizations who pay unscheduled hours, or hours worked outside the bounds of an employee's schedule, at a different pay rate.
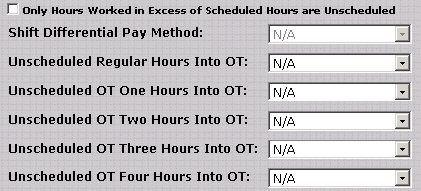
Only Hours Worked in Excess of Scheduled Hours are Unscheduled - When this option is checked, employees must first work a total number of hours equal to their scheduled working hours before hours worked outside the bounds of the employee's schedule will be mapped according to Unscheduled Hours Mapping Settings. For example, if this option is checked and an employee worked from 7:30 AM to 4:30 PM on a day they were scheduled to work from 8:00 AM to 5:00 PM the employee would not receive Unscheduled Hours because they worked exactly the same number of hours as their schedule.
Unscheduled Regular Hours Into OT – If desired, select the Overtime Bucket where Unscheduled Regular Hours will be placed. Unscheduled Regular Hours are Regular Hours which occur outside of the bounds of an employee's schedule. This concept is illustrated below.
Unscheduled OT One Hours Into OT – If desired, select the Overtime Bucket where Unscheduled OT One Hours will be placed. Unscheduled OT One Hours are OT One Hours which occur outside of the bounds of an employee's schedule. This concept is illustrated below.
Unscheduled OT Two Hours Into OT – If desired, select the Overtime Bucket where Unscheduled OT Two Hours will be placed. Unscheduled OT Two Hours are OT Two Hours which occur outside of the bounds of an employee's schedule. This concept is illustrated below.
Unscheduled OT Three Hours Into OT – If desired, select the Overtime Bucket where Unscheduled OT Three Hours will be placed. Unscheduled OT Three Hours are OT Three Hours which occur outside of the bounds of an employee's schedule. This concept is illustrated below.
Unscheduled OT Four Hours Into OT – If desired, select the Overtime Bucket where Unscheduled OT Four Hours will be placed. Unscheduled OT Four Hours are OT Four Hours which occur outside of the bounds of an employee's schedule. This concept is illustrated below.
Related Settings:
Overtime One = > 8 Daily
Employee Schedule = 8:00 AM to 4:00 PM
Unscheduled Regular Hours Into OT = OT2
Unscheduled OT One Hours Into OT = OT2
In the example below, an employee is scheduled to work from 8:00 AM to 4:00 PM. The employee is asked to stay late, arriving on site at 8:00 AM and departing at 5:00 PM. As shown by the number line below, worked hours from 4:00 PM to 5:00 PM are considered unscheduled hours as they fall outside the bounds of the employee's schedule. Daily Overtime Rules are applied resulting in 1 Hour of OT1 from 4:00 PM to 5:00 PM. Unscheduled Hours Mapping Rules are then applied, resulting in OT1 Hour from 4:00 PM to 5:00 PM being mapped from OT1 to OT2.
Schedule and Worked Hours:

Calculated Hour Totals:

The Unscheduled Hours Mapping Options are intended for organizations who pay unscheduled hours, or worked hours outside the bounds of an employee's schedule, at a different pay rate than scheduled hours. Additional details on the configuration and use of Unscheduled Hours Mapping can be found in the Hours Mapping Section of this document.

Earliest Clock In Time – Sets the earliest time employee’s can clock in. Should employees punch in before the time set in this field InfiniTime will calculate hours for the day as if the employee had punched in at the earliest clock in time as shown in the examples provided below.
Earliest Clock In Time |
Punch In |
Punch Out |
Total Calculated Hours |
6:00 AM |
5:30 AM |
2:30 PM |
8.5 |
6:00 AM |
5:00 AM |
2:30 PM |
8.5 |
Notice how InfiniTime calculates employee hours as if they had punched in at the Earliest Clock In Time when employees arrive before 6:00 AM.
Latest Clock Out Time – Sets the latest time employee’s can clock out. Should employees punch out after the time set in this field InfiniTime will calculate hours for the day as if the employee had punched out at the Latest Clock Out time as shown in the examples provided below.
Latest Clock Out Time |
Punch In |
Punch Out |
Total Calculated Hours |
5:00 PM |
9:00 AM |
5:30 PM |
8.0 |
5:00 PM |
9:00 AM |
6:00 PM |
8.0 |
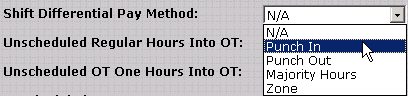
If a Shift Differential is assigned to a policy, a Shift Differential Pay Method must be selected. Remember, within InfiniTime shift differentials are defined as a period during which employees receive an additional premium. It is not uncommon for employees to be eligible for multiple shift differentials. Shift Differential pay methods determine which differential an employee will receive based upon when they are working or when they punched in. This option should only be set if employees on the policy will be eligible for shift differentials. Shift differentials must be assigned to the policy on the Shift Differentials Tab as detailed in the Schedule Settings / Rules – Shift Differentials Tab section below.
NOTE: The Shift Differential Pay Method option is disabled and cannot be altered until one or more shift differentials have been assigned to the policy on the Shift Differentials tab.
Shift Differential Pay Method – The Shift Differential Pay Method determines exactly how employees are awarded shift differential premiums, based on the time they punched in (Punch In), punched out (Punch Out), the time they are working (Zone), or where the majority of their working hours fall for a given date (Majority Hours). A Shift Differential Pay Method must be selected for employees to receive shift premiums. The best method for understanding exactly how each Shift Differential Pay Method functions is to review an example scenario for each available option.
Related Settings:
ABC Medical employs Registered Nurses (RNs) who receive differential pay for working during evening and early morning hours as outlined below.
Differential Name |
Rate |
Start Time |
End Time |
Evening Differential |
$1.00 |
8:00 PM |
12:00 AM |
Morning Differential |
$1.25 |
12:00 AM |
4:00 AM |
Punch In – When the Punch In pay method is chosen employees are paid the premium in effect at the time they punch in. For clarity multiple examples are shown below.
| Scenario Description | Illustrated Break Down of Differentials - Punch In Pay Method |
| An RN arrives at the hospital early and is asked to lend a hand prior to their shift. They clock in at 7PM and work until 4AM. Because the RN clocked in at 7PM, which does not fall within a period eligible for differential pay, the RN will not receive a premium for their hours. | 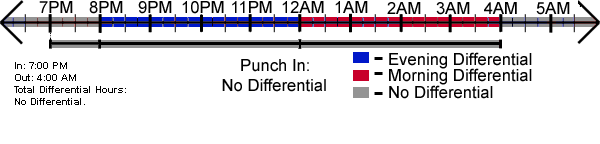 |
| An RN is called in to work from 10PM to 4AM. The employee punches in at 10:00 PM, which is during the period defined by the Evening Differential. All six hours (10PM to 4AM) will be paid at the Evening Differential rate. |  |
Punch Out – When the Punch Out pay method is chosen employees are paid the premium in effect at the time they punch out. For clarity multiple examples are shown below.
| Scenario Description | Illustrated Break Down of Differentials - Punch Out Pay Method |
| The typical RN Day shift is 11 AM to 7PM. Mary Joe is asked to stay for an additional two hours and works from 11AM to 9PM. Because Mary clocked out at 9PM, which falls within the Evening Differential, she will receive the Evening Differential Premium for all ten hours worked. | 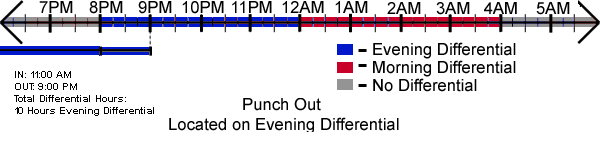 |
| An RN is called in to work from 8PM to 4AM. The employee punches out at 4:15 AM. The employee will not receive a premium for the worked hours because 4:15 AM does not fall within a period defined by a differential. |  |
Majority Hours – The Majority Hours pay method identifies the differential on which employees worked the greatest portion of their hours. The premium associated with that differential is then used for all differential hours for the day as illustrated below. If an employee should work an equal amount of hours across multiple differentials they will be paid the premium associated with the first differential.
| Scenario Description | Illustrated Break Down of Differentials - Majority Hours Pay Method |
| An RN is called in to work from 10:00 PM to 4:00 AM. The majority of the worked hours fall within the Morning Differential. As such the employee receives the Morning Differential premium ($1.25) for all hours worked. | 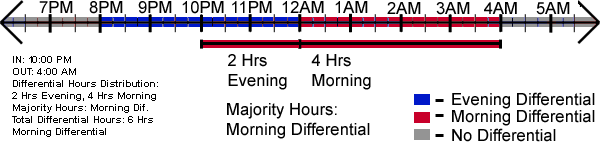 |
Zone – Zone is the most commonly used pay method for shift differentials. Employees will be paid a premium according to the differential they are working on. In this scenario if an RN were to be called in to work from 10:00 PM to 4:00 AM they would receive two hours of Evening Differential Pay and Four Hours of Morning Differential Pay as follows:
| Scenario Description | Illustrated Break Down of Differentials - Zone Pay Method |
An RN is called in to work from 10:00 PM to 4:00 AM. Hours from 10:00 PM to 12:00 AM are associated with the Evening Differential. Hours from 12:00 AM to 4:00 AM are associated with the Morning Differential. The employee is paid as follows:
2 Hours Evening Differential Premium 4 Hours Morning Differential Premium |
 |
The default schedule tab can be used to set a default working schedule for all employees assigned to the policy. It is important to recognize all employees assigned to a policy will receive the schedule defined on this tab unless another schedule with a higher priority is defined for the employee. Additional details regarding using Quick Schedule to create Policy Schedules can be found in the Scheduling Section of this document.
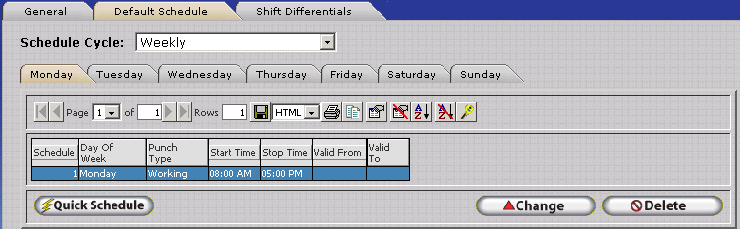
Do you wish to track Schedules for Employees within InfiniTime? Schedules within the InfiniTime application serve several purposes:
No? - Skip to the Shift Differentials Tab Section Below. The Default Schedule Tab of the Policy Update Form does not need to be configured for your organization.
Yes? - InfiniTime offers many methods for defining employees schedules. The best method for creating employee schedules within InfiniTime will depend on how often the exact scheduled periods worked by employees change in your organization, and whether or not individual employees regularly work the same schedule or varying schedules. Policy Schedules are best utilized when all, or most, employees on a given policy work the same repeating schedule. If all employees on the respective policy work the same schedule, then only Policy Schedules are required. If most employees on the respective policy work the same schedule, then a policy schedule can be defined to create a Default Schedule for all employees assigned to the policy. Then an Employee Default Schedule can be defined for each specific employee on the Schedule Information Section of the Employee Update Form as needed for those employees who work different schedules than their peers. Additional details regarding Scheduling can be found in the Scheduling Section of this document. Organizations who schedule employees based on occupancy and / or operational activity may wish to consider Scheduling using the GANNT Chart or Schedule Skeletons.
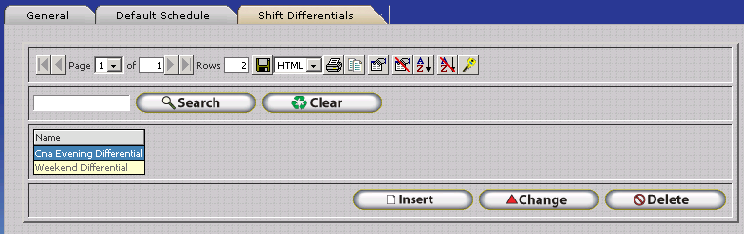
The Shift Differentials Tab is used to assign shift differentials to a specific policy. All employees assigned to the policy will be eligible for premium pay for the periods defined by assigned shift differentials and according to the selected Shift Differential Pay Method. The following key points must be considered when assigning shift differentials to policies:
Shift Differentials must be split at midnight. A shift differential cannot cross midnight. For example, if employees are paid differential hours from 8:00 PM to 4:00 AM, the schedule should be split at midnight as shown below.
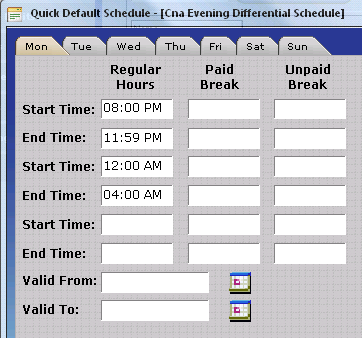
A single policy must not have overlapping shift differentials.
For example ABC Medical pays a $0.50 premium for employees working at any time on the weekend and a $1.00 premium for employees working between 10:00 PM and 4:00 AM. Employees working between 10:00 PM and 4:00 AM on Saturday or Sunday Night should receive a combined premium of $1.50 The tables below illustrate two methods for configuring this scenario.
INCORRECT
Differential Name |
Start Time |
End Time |
Start Day |
End Day |
Differential Premium |
Weekend Differential |
12:00 AM |
11:59 PM |
Saturday |
Sunday |
$0.50 |
Night Differential |
10:00 PM |
4:00 AM |
Saturday |
Sunday |
$1.00 |
CORRECT
Differential Name |
Start Time |
End Time |
Start Day |
End Day |
Differential Premium |
Weekend Differential - Day |
4:00 AM |
10:00 PM |
Saturday |
Sunday |
$0.50 |
Weekend Differential - Night |
10:00 PM |
4:00 AM Next Day |
Saturday |
Sunday |
$1.50 |
Night Differential |
10:00 PM |
4:00 AM Next Day |
Monday |
Friday |
$1.00 |
· NOTE: Pay special attention to the day a differential starts and ends on. The correct schedule for ‘Weekend Differential – Night’ is below. Notice how the Sunday Night Shift crosses into Monday morning. For this reason 12:00 AM to 4:00 AM must be defined on Monday for the Weekend Differential – Night schedule. Similarly the Night Differential on Friday would end at 4:00 AM on Saturday.
Start Time |
End Time |
Day |
10:00 PM |
11:59 PM |
Saturday |
12:00 AM |
4:00 AM |
Sunday |
10:00 PM |
11:59 PM |
Sunday |
12:00 AM |
4:00 AM |
Monday |
From a high level view point there are four main tasks that must be performed to configure Shift Differentials for a given set of employees:
Identify Employee Groups with Different Policy Requirements and Configure desired policy settings for Break Rules, Overtime Calculations, Scheduling Rules, Pay Cycle Configuration, Rounding Rules for each group of employees.
Identify all shift differentials paid by the company in question.
Identify employee groups who are eligible for different differentials.
One policy will be required for each group of employees with different differentials and policy settings. It may be necessary to split employees initially assigned to a single policy into two or more policies with different differential settings.
The best way to explain how policies and shift differentials work together is to provide an example. With this in mind, we will review an example policy configuration for a company with multiple employee groups and shift differentials which we will refer to as XYZ Medical.
NOTE: Within the context of this document a “Shift differential” is a window of time for which eligible employees receive additional pay. A single shift differential is a contiguous block of time paid at a certain rate or premium.
Step 1 – Identify Employee Groups with different Policy Requirements and Configure Desired Policy Settings for Break Rules etc.
XYZ Medical has multiple locations. The company as a whole has two groups of employees with different policy configurations for Break Rules, Overtime, Scheduling Rules, and Rounding Rules as follows:
· Hourly Employees have special break and rounding rules.
· Salary employees are not eligible for overtime and are not required to punch for breaks.
Step 2 – Identify all shift differentials paid by the company in question.
When attempting to identify shift differentials paid by a company it is important to understand that a single shift differential may span multiple shifts. Shift differentials are not used for scheduling purposes. Rather they define a window of time that sits over top of employee schedules. Eligible employees, or employees assigned to the policy whose punches qualify for the differential based on the selected Shift Differential Pay Method as detailed above, will receive benefits in the form of additional pay.
As previously mentioned it is not uncommon for a single shift differential to span multiple shifts. This concept is illustrated below where a $1.00 per hour premium is paid to employees working the Evening Team A shift and the Evening Team B shift. Employees on Team A are permitted to stay as late as 5:00 AM and are eligible for the shift premium. Remember, a shift differential is a contiguous block of time paid at a certain rate or premium. Because of this a single shift differential can be configured for employees on the Evening Team A and Evening Team B Shifts.
Shift Name |
Start Time |
End Time |
Start Day |
End Day |
Shift Premium |
Evening Team A |
7:00 PM |
3:00 AM |
Monday |
Friday |
$1.00 |
Evening Team B |
9:00 PM |
5:00 AM |
Monday |
Friday |
$1.00 |
Differential Name |
Start Time |
End Time |
Start Day |
End Day |
Differential Premium |
Evening Teams |
7:00 PM |
5:00 AM |
Monday |
Friday |
$1.00 |
Shift Differentials paid by XYZ Medical are listed below. Each differential must be configured as a Shift with the ‘Used for Differential’ option enabled.
Differential Name |
Start Time |
End Time |
Start Day |
End Day |
Differential Premium |
Weekend Differential |
12:00 AM |
11:59 PM |
Saturday |
Sunday |
$0.75 |
CNA Evening Differential |
10:00 PM |
6:00 AM |
Monday |
Friday |
$1.00 |
RN Evening Differential |
8:00 PM |
8:00 AM |
Monday |
Friday |
$1.25 |
When configuring shift differentials it is important to recognize the schedule must be split at midnight. Shift differentials are configured under the Shift Table which can be access from Lookups – Scheduling Setup – Shifts. Click Insert to open the Shift Update Form.
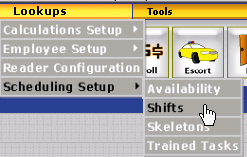
Follow the steps below to configure each differential required by your organization. Additional details on configuring Shift Differentials can be found in the Scheduling - Shift Differentials section of this document.
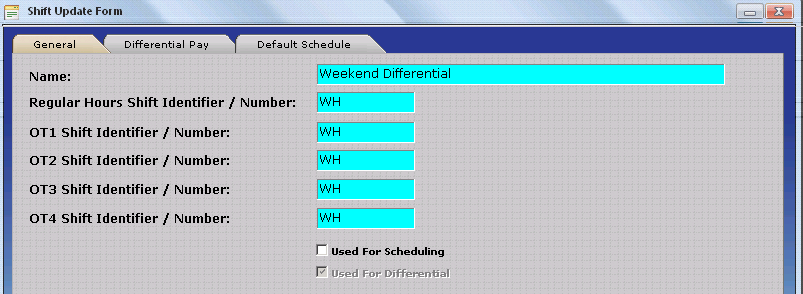
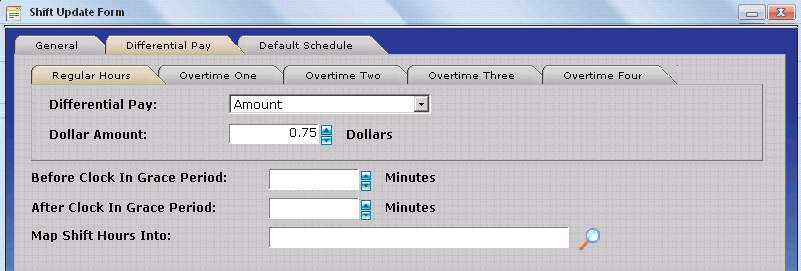
Step 3 – Identify Employee Groups who are eligible for different differentials.
XYZ Medical has multiple groups of employees eligible for different shift differentials as outlined below:
· Corporate Office Employees are not eligible for shift differentials.
· All Hourly and Salary Employees are eligible for Weekend Differentials.
· All Certified Nurse Assistants are eligible for the CNA Evening and Weekend Differentials.
· All Registered Nurses are eligible for the RN Evening and Weekend Differentials.
Step 4 – One Policy will be required for each group of employees with unique Shift Differential Requirements / Policy Settings
The following policies are required to meet the needs of XYZ Medical:
Policy Name |
Unique Policy Settings |
Eligible Shift Differentials |
Corporate Hourly |
Break & Rounding Rules |
None |
Corporate Salary |
Overtime & Break Rules |
None |
Hourly Employees |
Break & Rounding Rules |
Weekend Differential |
Salary Employees |
Overtime & Break Rules |
Weekend Differential |
Certified Nurse Assistants |
None |
Weekend & CNA Night Differentials |
Registered Nurses |
None |
Weekend & RN Night Differentials |
In the above example employees classified as Certified Nurse Assistants and Registered Nurses have identical policy requirements for Break Rules, Overtime Rules, Scheduling etc. within their specific class of employees. If even a single employee within the CAN or RN class had unique policy requirements an additional policy would be required for individuals requiring different policy settings.
Differentials Listed in the ‘Eligible Shift Differentials’ Column of the table above must be assigned to the appropriate policy under Schedule Settings / Rules – Shift Differentials.
Now that we have an understanding of how policies and shift differentials interact use the steps below to help the customer identify their employee groups, shift differentials, and required policies.
Identify employee groups requiring different policy settings for Break Rules, Overtime Calculations, Scheduling Rules, Pay Cycle Configuration, or Rounding Rules.
Identify all shift differentials paid by the company in question.
Identify employee groups who are eligible for different differentials.
One policy will be required for each group of employees with different differentials and policy settings.
Stand by time is intended for use with on call employees. Stand By Time is automatically inserted in the form of Other Hours for all employees assigned to the policy. For example, XYZ Medical requires RNs to be on call for weekends during the evening and morning hours. Individuals on call are paid a premium for each hour of standby time even if they do not come into work. In this scenario stand by time would be configured as shown in the table below.
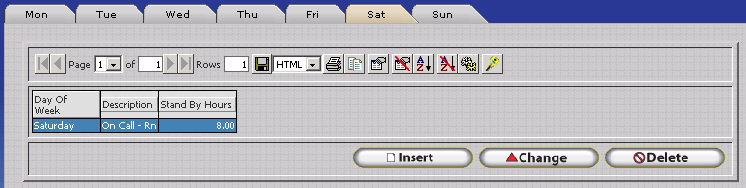
Day of Week |
Other Activity Type |
Minimum Standby Hours |
Saturday |
On Call – RN |
8.00 |
Sunday |
On Call – RN |
8.00 |
Insert - Opens the Policy Stand By Time Update Form as shown below. Used to define Stand By Hours for a given day of the week. InfiniTime will automatically insert Other Activity Hours for the chosen other Activity Type for all employees on the policy on the respective day of week.
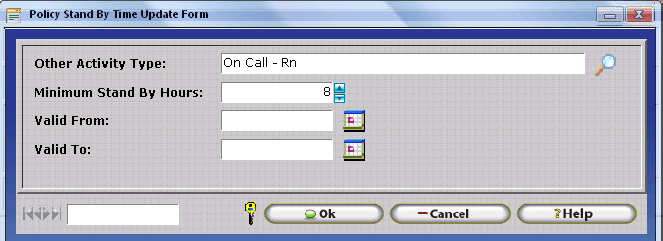
Other Activity Type - Select the Other Activity Type to be used to insert Stand By Hours. InfiniTime will automatically insert the Minimum Stand By Hours value for the specified Other Activity Type for all employees assigned to the policy.
Minimum Stand By Hours - Enter the number of Other Activity Hours to be inserted on the respective day of week.
Valid From - Enter the From Date for which the respective Stand By Time Entry is valid. If this date is filled, InfiniTime will not create any Other Activity Types for the respective Stand By Time Entry prior to this date.
Valid To - Enter the To Date for which the respective Stand By Time Entry is valid. If this date is filled, InfiniTime will not create any Other Activity Types for the respective Stand By Time Entry after this date.
Change - Opens the Policy Stand by Time Update form for the selected Stand By Time entry. The user may then edit the Stand by Time Entry as desired.
Delete - Deletes the selected Stand by Time entry from the respective day of week.
Do Employees on this policy receive Other Activity Hours automatically for specific days of the week?
No? - Stand by Time is not required for this policy. Configuration for this policy is complete.
Yes? - Create a Stand by Time Entry for each day of Week // Other Activity Type combination to award Other Activity Hours as appropriate based on your organization's stand by time rules. Instructions are provided below.
1. Click on the Day of Week Tab for which all employees on the policy should receive a set number of Other Activity Hours.
2. Click on Insert
3. Select the desired Other Activity Type
4. Set the Minimum Stand By Hours. InfiniTime will automatically insert the specified number of hours for the selected Other Activity Type
5. If desired, set the Valid From and Valid To Date for the Stand By Time Entry. As explained above, InfiniTime will not insert Stand By Time before the Valid From Date or After the Valid To Date for employees assigned to the respective policy.
6. Repeat Steps 1 to 5 for each Day of Week for which employees receive Stand By Time.


