Schedules within the InfiniTime application serve several purposes:
If this functionality is not required for a given organization, it is not necessary to configure schedules.
InfiniTime offers a Lockout Feature which can be used when strict adherence to employee schedules is required. Any punches that do not fall within the acceptable clock-in time range, as defined by the Scheduled Rounding Grace Period settings, will simply be ignored. Employees will be unable to clock in and will need to locate a supervisor with the ability to manually insert a punch in the InfiniTime software. Caution should be exercised when enabling the Lockout Feature. Many customers find the lockout feature to be too strict and disable it after having used it for a short period. Employees will not be able to clock in if they arrive outside of the grace periods. A supervisor must be available to speak with and manually insert punches for employees arriving outside of the grace periods.
Choosing an incorrect scheduling type can lead to unnecessary administrative overhead. For this reason it is important to select the type of scheduling that best fits your company’s needs. Before choosing a scheduling type it is important to understand available scheduling types. Schedules can be configured in five different locations within the InfiniTime Software. A company may choose to use only one or multiple scheduling types. In many cases one scheduling type is appropriate for a certain group of employees while another type is appropriate for a different group. Schedules are arranged in a hierarchical fashion within the InfiniTime Application. For this reason schedule entries will take precedence over each other as outlined below:
Priority Schedule Type
1 GANTT Chart Schedule Entries
2 Employee Specific Schedules
3 Shifts
4 Department Default Schedule
5 Policy Default Schedule
For example, at ABC Freight the shipping department has a default schedule of 12:00 PM to 8:00 PM. Unlike the majority of the Shipping Department, Joanna works from 8:00 AM to 5:00 PM. A schedule can be defined in Joanna’s employee record for 8:00 AM to 5:00 PM which will override the Department Default Schedule because the Employee’s Default Schedule has a higher priority than the Department’s Default Schedule.
Policy Default Schedules are best utilized when all, or most, of the employees on a specific policy work a single schedule. When the Policy Schedule is altered the changes are applied to all employees assigned to the Policy who do not have another schedule of higher priority. For individuals who work different hours than the Policy schedule an Employee Specific Schedule can be defined on the employee record. In this way an accurate schedule can be defined for all employees.
Example: All Employees assigned to the Hourly Policy work 8:00 AM to 5:00 PM except during Daylight Savings Time when they all work 7:00 AM to 4:00 PM.
In the example above all employees assigned to the Hourly Policy work the same hours. The schedule changes twice a year. Once when Daylight Savings Time starts and once when Daylight Savings Time ends. It is important to note that when the schedule changes are made they apply to all employees within the department. Employee specific schedules could be defined for any individual employees that work a different schedule.
Department Schedules are best utilized when all, or most, of the employees in a specific department work a single schedule. When the Department Schedule is altered the changes are applied to all employees assigned to the department who do not have another schedule of higher priority. For individuals who work different hours than the department schedule an Employee Specific Schedule can be defined on the employee record. In this way an accurate schedule can be defined for all employees.
Example: All Employees within the Technical Support department work 8:00 AM to 5:00 PM except during Daylight Savings Time when they all work 7:00 AM to 4:00 PM.
In the example above all employees within the department work the same hours. The schedule changes twice a year. Once when Daylight Savings Time starts and once when Daylight Savings Time ends. It is important to note that when the schedule changes are made they apply to all employees within the department. Employee specific schedules could be defined for any individual employees that work a different schedule.
Employee Specific Schedules are best utilized when each individual has a unique schedule. Employee Specific Schedules, found within the employee’s record, make it possible to assign each employee a unique schedule. Editing the Employee Specific Schedule will only change the schedule associated with a single employee. Setting employee specific schedules for each individual employee can be labor intensive if they change on a regular basis. Employee Specific Schedules are generally used to override other schedule types, such as when employees work a different hours than those defined by their Department’s Default Schedule. In some cases Employee Specific Schedules may be used for each employee if there are few employees within the company or if other scheduling methods are not practical for the customer’s requirements.
Example 1 -Joanna works in the Shipping Department. The Default Shipping department schedule is 12:00 PM to 8:00 PM; however, Joanna works 8:00 AM to 5:00 PM. An employee specific schedule can be used to define Joanna’s 8:00 AM to 5:00 PM schedule, as Employee Specific Schedules take precedence over Department Default Schedules.
Example 2 - XYZ Software Company has eight employees. Four Employees are in the Help Desk department, two employees are in programming, and two are in sales. The Employees in each department do not work the same schedule. Since each employee has a unique schedule and there are few employees within the company, Employee Specific Schedules can be effectively utilized for scheduling purposes.
Using Shifts for Scheduling Purposes
Shifts provide a flexible option for defining employee schedules and can be configured to meet the demands of nearly any situation. Shifts are most often used when all employees in a single department do not work the same shift. Rather some employees may work a morning shift, an afternoon shift, or an evening shift. Shifts also make it possible to assign a single employee to multiple schedules at once. Employee hours will be assigned to a specific shift based upon their arrival time for the day.
Example 1: The Production Facility Department and Manufacturing Department have many employees and three shifts. The Morning Shift is from 4:00 AM to 12:00 PM. The Afternoon Shift is from 12:00 PM to 8:00 PM. The Evening Shift is from 8:00 PM to 4:00 AM. The following shifts are needed:
| Shift Name | Shift Start Time | Shift End Time |
| Production Morning | 4:00 AM | 12:00 PM |
| Production Afternoon | 12:00 PM | 8:00 PM |
| Production Evening | 8:00 PM | 4:00 AM |
| Manufacturing Morning | 4:00 AM | 12:00 PM |
| Manufacturing Afternoon | 12:00 PM | 8:00 PM |
| Manufacturing Evening | 8:00 PM | 4:00 AM |
Using the GANNT Chart for Temporary Schedule Changes
Employees will inevitably call in sick and request changes to their schedule or even time off. These requests can be processed easily and quickly by entering temporary schedule changes utilizing the Schedule GANNT Chart. This method of editing schedules is often used in conjunction with Department, Employee, Shifts, or Policy Schedules.
Using the GANNT Chart for Scheduling
The GANNT Chart provides a detailed environment where employee schedules can be viewed and configured on a daily, weekly, or even a monthly basis. The GANNT Chart is best utilized when employee schedules are inconsistent, or where schedules are based on an external factor such as expected customer traffic. Once the software is appropriately configured the GANNT chart can also offers additional features such as the ability to schedule employees based upon tasks employees have been trained to perform, Time Periods during which employees have indicated they are available to work, and through use of Skeletons. Skeletons provide the ability to define scheduling requirements for specific scenarios or events and are often used by restaurants.
Schedule Skeleton & Availability Example - A Restaurant has different staffing requirements based upon their amount of customers at any given time. Schedule skeletons can be used to represent situations with specific staffing requirements and then match available employees to required tasks. For example, evenings from Friday to Sunday are incredibly busy at XYZ Pizzeria & Buffet. A schedule skeleton is defined with slots for three cooks, six waiters, and four bus boys. Each slot is assigned a range of hours as required and employee availability is used to match available employees to positions they are trained for.
Inconsistent Scheduling Example - A company responsible for moving goods to and from major city events keeps a large pool of temporary employees on staff. It is unknown which employees will be available for work until the day before an event. The schedule GANNT chart makes it possible to configure schedules for employees as soon as they are known to be working a given day.
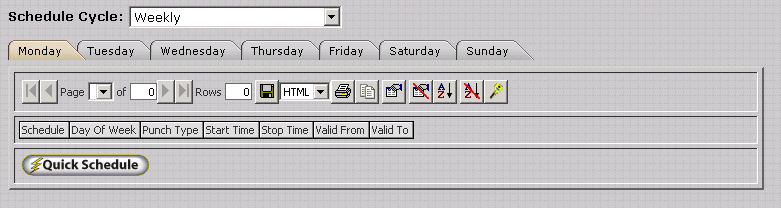
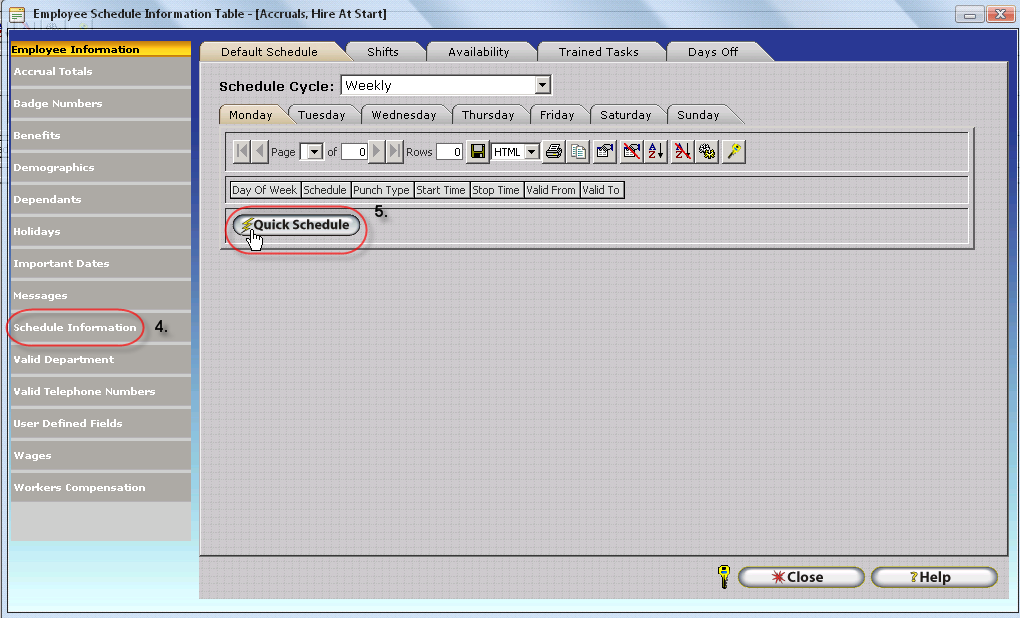
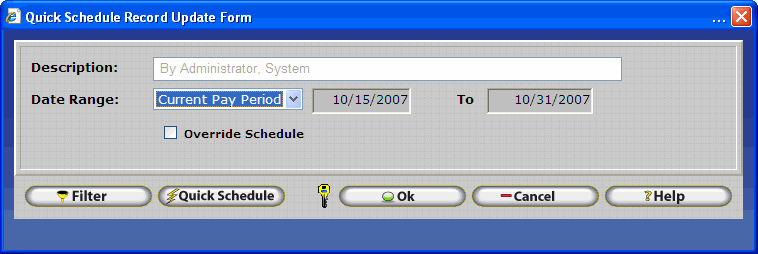
Policy, Department, and Employee Specific Schedules utilize the same interface - the Quick Schedule Tool - to insert and defining schedules even though they are located in different areas of the InfiniTime Application. Quick Schedule offers two options for defining a schedule’s cycle, or how the schedule repeats. Schedules can be created using a Weekly Schedule Cycle with work hours defined for specific week days or on a Custom Cycle which defines a schedule for a specific number of days such as 7 Days, 14 Days, 21 Days and repeats from a specific reference date. A custom schedule cycle is often used in production or manufacturing environments where employees switch shifts on a routine basis.
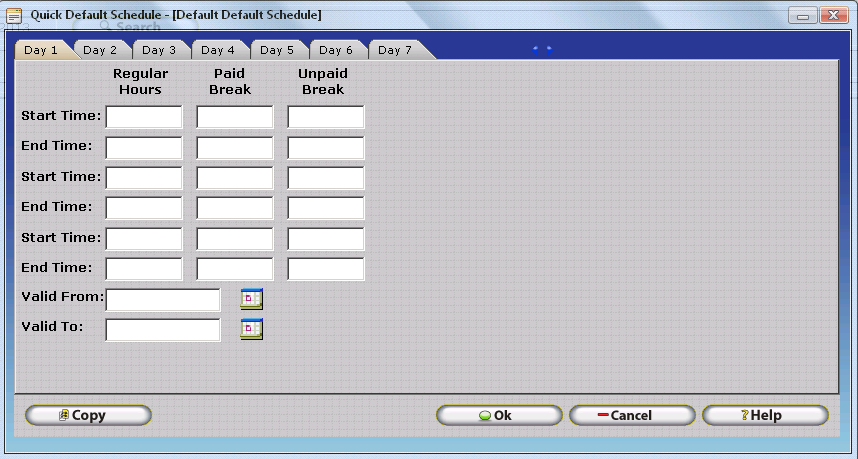
Schedules are defined by directly entering the start and end times for each day. Follow the steps below to define the default schedule. Repeat steps 3 to 7 for each day until the entire schedule has been defined.
Quick Default Schedule - Weekly Schedule Cycle

Quick Default Schedule - Custom Schedule Cycle
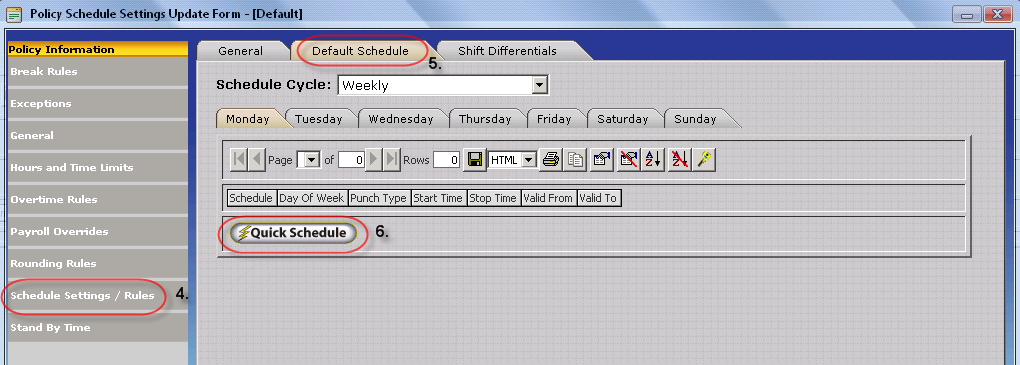
Accessing the Policy Default Schedule
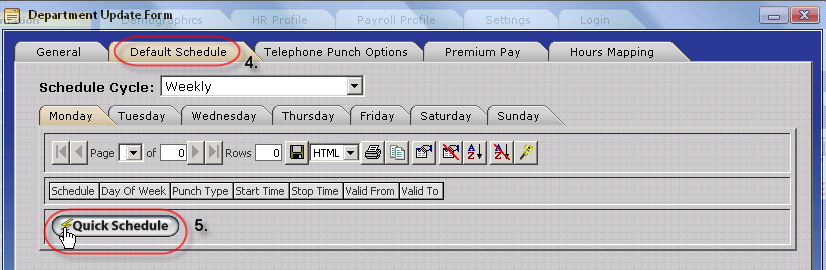
Accessing the Department Default Schedule
Accessing the Employee Specific Default Schedule
Configuring Shifts for Scheduling Purposes
Similar to configuring Department, Policy, and Employee Specific Schedules, Shifts also make use of the Quick Schedule interface for defining employee working hours, though they require additional configuration and planning. When configuring shifts the first step is to identify all shifts required by the company. Human Resources and Manufacturing Supervisors can often help with this task. The Employee Shifts Table, as shown below, can be used to assist with gathering Shift Information. Assist the customer with configuring a set of shifts for one department or group of employees. If the customer has additional shifts Table 3.2.1 should be completed as homework before attempting to continue with shift configuration.
Employee Shifts Table |
|||
| Shift Name | Schedule Cycle
(Weekly or Custom*) |
Start Time | End Time |
| Manufacturing Line A – Rotation 1 | Custom (21 Days) | Days 1 – 7: 4:00 AM Days 8 – 14: 12:00 PM Days 15 – 21: 8:00 PM |
Days 1 – 7: 12:00 PM Days 8 – 14: 8:00 PM Days 15 – 21: 4:00 AM |
| Manufacturing Line A – Rotation 2 | Custom (21 Days) | Days 1 – 7: 12:00 PM Days 8 – 14: 8:00 PM Days 15 – 21: 4:00 AM |
Days 1 – 7: 8:00 PM Days 8 – 14: 4:00 AM Days 15 – 21: 12:00 PM |
| Manufacturing Line A – Rotation 3 | Custom (21 Days) | Days 1 – 7: 8:00 PM Days 8 – 14: 4:00 AM Days 15 – 21: 12:00 PM |
Days 1 – 7: 4:00 AM Days 8 – 14: 12:00 PM Days 15 – 21: 8:00 PM |
*Be sure to Include the number of Days for Schedules with a Custom Cycle as shown.
The example above depicts a manufacturing company with a three week rotation whereby all employees spend one week on the Morning, Afternoon, and Evening Shifts.
Once all required information has been gathered shifts can be easily configured within the InfiniTime Application. Follow the steps below to configure shifts within InfiniTime. Repeat steps 9 to 13 for each day in the schedule cycle.

Quick Default Schedule - Weekly Schedule Cycle View
Quick Default Schedule - Custom Schedule Cycle View
Notice that the Custom Schedule Cycle View
displays seven days at once. The  and
and  VCR Buttons at the top of the form are used
to display additional days on the form as outlined below.
VCR Buttons at the top of the form are used
to display additional days on the form as outlined below.
- Shifts the Day Tabs displayed on the Quick Default Schedule Form up
one day. Used for Custom Schedule Cycles with more than 7 days.
- Shifts the Day Tabs displayed on the Quick Default Schedule Form down
one day. Used for Custom Schedule Cycles with more than 7 days.
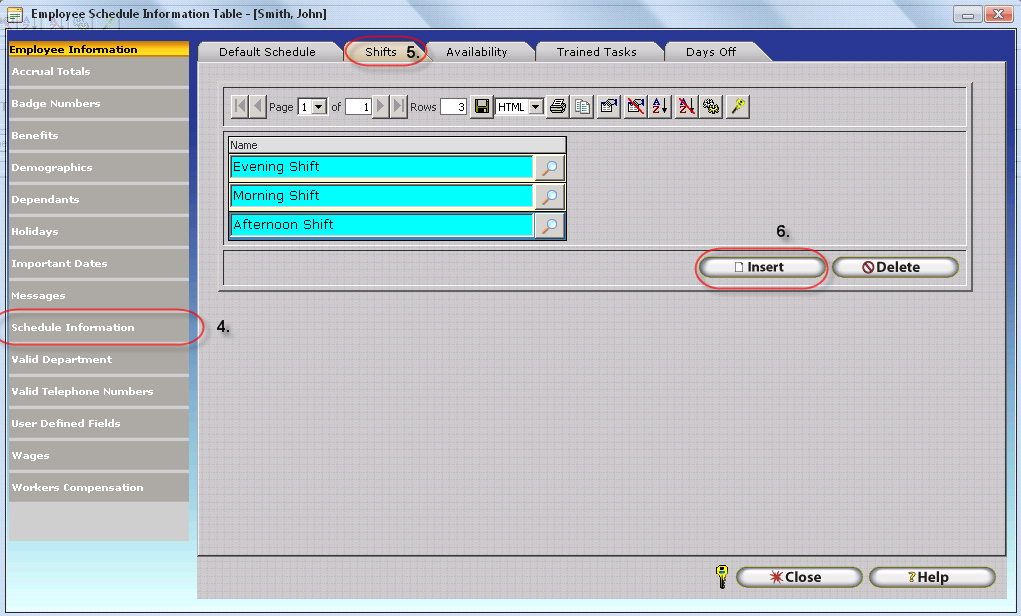
Shifts must be assigned to employees before InfiniTime will use them to calculate employee schedules. A single employee can be assigned to multiple shifts. Follow the steps below to assign shifts to an employee.
InfiniTime uses grace periods to determine what shift employee hours will be associated with. For example if a 10 Minute On Time Grace Period and 10 Minute Late Grace Period have been defined on an employee’s policy their working hours will be associated with a shift according to the Grace Period their Clock In Punch falls within. Grace Periods are configured within the Rounding Rules Section of the Policy Update Form on the Scheduled Time Tab as shown below. Additional Details on configuring Schedule Grace Periods can be found in the Policy Section of this document.

For example, ABC Freight Facility is a 24 Hour Warehouse with trucks arriving and departing around the clock. Employees work across three shifts on a rotating schedule and have the option of switching to a different shift on any given work day with supervisor approval if the request is made ahead of time. For this reason all shifts must be assigned to each employee. With 10 Minute On Time and 10 Minute Late Grace Periods, employee hours will be associated with a specific shift if their clock in punch falls within ten minutes before or after the scheduled start time of a shift. If employees punch in outside of the grace periods for all shifts their schedule for the day will be set as the first shift assigned to the employee.
ABC Freight Facility - Shift Grace Periods |
|||
| Shift Name | Start Time | End Time | Clock In Grace Period |
| Morning | 7:00 AM | 3:00 PM | 6:50 AM - 7:10 AM |
| Day | 3:00 PM | 11:00 PM | 2:50 PM - 3:10 PM |
| Night | 11:00 PM | 7:00 PM | 10:50 PM - 11:10 PM |
InfiniTime defines a Shift Differential as a period of time during which employees receive an additional premium. Shift Differentials include six distinct types of related settings:
Schedule - Required. Describes the period of time during which the Shift Differential Premium is paid by defining specific blocks of time on specific week days. (IE: 11:00 PM to 7:00 AM, Mon through Sun).
Pay Premium Settings - Optional. Defines the exact pay premium, as a percentage increase above and beyond the employee's base rate, an additional dollar amount per hour, or an overriding hourly rate, for worked hours which qualify for Shift Differential Premium. Pay Premium Settings are optional. Many customers choose to configure employee wages and pay premiums within their Payroll Application only. In this scenario, Pay Premium Settings, Employee Default Wages, and Alternate Wages within InfiniTime do not need to be configured. InfiniTime will simply track the number of hours for the differential. Employee Hours and Earnings will then be transferred to payroll using the Payroll Export System or Manual Entry. Alternatively, customers who choose to configure Pay Premium Settings, Employee Default Wages, and Alternate Wages within InfiniTime can take advantage of the Payroll Reports within the Report Library to review Gross Employee Wages prior to running payroll. Additional details on Employee Wages, Alternate Wages, and Job Costing Pay Premiums can be found in the Default Wages, Alternate Wages, and Pay Premiums Sections of this document.
Policy Assignment - Required. Shift Differentials must be assigned to individual policies on the Shift Differentials Tab of the Schedule Settings / Rules Section of the Policy Update Form. Only employees on a policy with one or more Shift Differentials assigned on the Shift Differentials Tab will be eligible to receive Shift Differential Hours.
Pay Method - Required. Controls the method for determining which Shift Differential Schedule is applied to employee hours based on the time an employee worked, punched in, or punched out.
Mapping Options - Optional. Used for Shift Differential Mapping. This topic is covered separately below. InfiniTime Administrators should familiarize themselves with basic Shift Differential settings before reviewing Shift Differential Mapping.
Payroll Export Options Related to Shift Differential - Optional. The Payroll Export Options 'Pay Shift Differential Hours at Differential Pay Only' and 'Override Pay Codes with Shift Pay Codes' alter the way InfiniTime totals and exports Shift Differential Hours. Refer to the Payroll Export Section of this document for more information on the use, functionality and configuration of the InfiniTime Payroll Export System.
The table below provides an outline of Shift Differential Functionality and several guidelines:
| A Shift Differential... | A Shift Differential... |
|
|
|
|
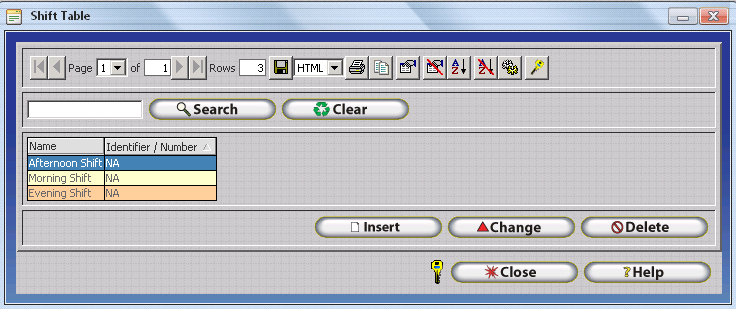
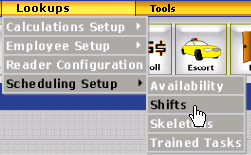
Accessing the Shift Update Form
Login to the Manager Module
Click on Lookups
Click on Scheduling Setup
Click on Shifts
The Shift Table will be displayed.
The Shift Table lists all Shifts, including shifts configured for scheduling and differential purposes.
Insert - Opens the Shift Update Form. Used to create a new shift for either Sheduling or Differential Purposes.
Change - Opens the Shift Update Form for the Selected Shift.
Delete - Deletes the Selected Shift. If a shift configured for Shift Differential and assigned to a Policy is deleted, the Shift will automatically be removed from the Shift Differentials Tab of all policies it was assigned to.
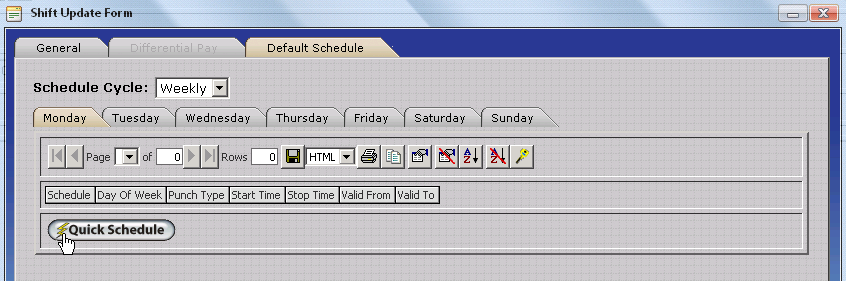
The Shift Update Form is broken into three tabs which include settings for each individual shift. The Default Schedule Tab is used to create the Schedule which describes the period of time during which the Shift Differential Premium is paid by defining specific blocks of time on specific week days. The Differential Pay Tab is used to define Shift Differential Pay Premiums and specific Shift Differential Options. The General Tab includes basic settings as outlined below.
The General Tab of the Shift Update Form includes basic settings such as the Shift Name, Shift Differential Pay Codes, and options which permit the Shift and its respective schedule to be used for either Scheduling or Differential purposes. Shift Differentials should not be confused with Shifts for Scheduling Purposes. While it is possible to use a single Shift for both Scheduling and Differential purposes, most InfiniTime customers choose to configure Shift Differentials independently of employee schedules.
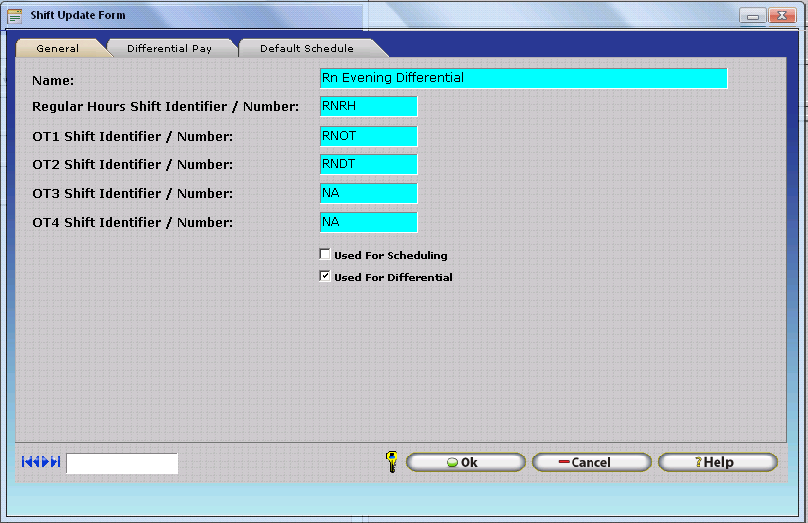
Name - Enter a Name for the Shift. This name will be displayed on Timecard Reports such as the Activity Summary Report to show total Shift Differential Hours and is also used to assign the shift to a policy.
What is a Shift Identifier?
- A shift identifier is similar to a Payroll Code, but instead of representing
a single category of pay tracked by an organization, shift identifiers
function as a modifier for other categories of pay by indicating that
an additional dollar amount, an additional percentage of the pay category’s
base rate, or an alternate hourly rate should be paid. Shift Identifiers
are used by organizations who track Shift Differentials. Only Payroll
Interface Formats which support Shift Differentials utilize Shift Identifiers.
For example, ABC Company pays regular Hours at Payroll Code 'RH' and Daily
Overtime Hours at Payroll Code 'OT'. ABC Company also tracks Night Shift
Differential, for which employees receive an additional $1.00 Per Hour
Worked. ABC Company uses Shift Identifier 'N' for all hours types (Regular,
OT1, OT2, OT3, OT4). Payroll Interfaces with support for Shift Differentials
which include the Shift Code Field will show both 'RH' and 'NS' along
with an Employee ID Number and the total number of hours for Regular Hours
on the Night Shift Differential. Similarly, Overtime Hours worked on the
Night Shift Differential will show both 'OT' and 'NS'. This clearly indicates
to the payroll system that the employee worked Regular Hours and that
the hours are also eligible for the additional $1.00 per hour premium.
Example Records: 'Paychex Preview With
Shift Code' Payroll Interface
1 Administrator, System ADMIN
NERH
0.000 39.00
1 Administrator, System ADMIN
NEOT
0.000 1.00
1 Administrator, System ADMIN
ERH 0.000
1.00
Worked Hours:
39 Regular Hours,
Night Differential
1 Overtime Hour,
Night Differential
1 Regular Hour,
No Differential
NOTE: If the Payroll Export Option
'Override Payroll Codes with Shift Pay Codes' is enabled Shift Identifiers
will be exported directly in place of the Payroll Code for the respective
hours type. This option is intended for use with Payroll Interfaces that
include the 'Activity Type' field without the 'Shift Code' field. Additional
details can be found in the Payroll Export Section of this document under
the following headings:
Payroll
Export Introduction
Payroll
Export Configuration Overview
Payroll
Export Overview & Required Configuration By Feature - Ability to Track
Shift Differentials
Regular Hours Shift Identifier / Number - Enter the Regular Hours Shift Identifier to be used to modify the existing Regular Hours Pay Code for Regular Hours which qualify for Shift Differential Premium Pay based on the chosen Shift Differential Schedule and Pay Method.
OT1 Shift Identifier / Number - Enter the OT1 Hours Shift Identifier to be used to modify the existing OT1 Hours Pay Code for Regular Hours which qualify for Shift Differential Premium Pay based on the chosen Shift Differential Schedule and Pay Method.
OT2 Shift Identifier / Number - Enter the OT2 Hours Shift Identifier to be used to modify the existing OT2 Hours Pay Code for Regular Hours which qualify for Shift Differential Premium Pay based on the chosen Shift Differential Schedule and Pay Method.
OT3 Shift Identifier / Number - Enter the OT3 Hours Shift Identifier to be used to modify the existing OT3 Hours Pay Code for Regular Hours which qualify for Shift Differential Premium Pay based on the chosen Shift Differential Schedule and Pay Method.
OT4 Shift Identifier / Number - Enter the OT4 Hours Shift Identifier to be used to modify the existing OT4 Hours Pay Code for Regular Hours which qualify for Shift Differential Premium Pay based on the chosen Shift Differential Schedule and Pay Method.
Used For Scheduling - This option must be checked in order for the respective Shift to be used for Scheduling Purposes. If this option is unchecked, the respective shift cannot be assigned to employees on the 'Shifts' Tab of the Schedule Information Section of the Employee Update Form.
Used For Differential - This option must be checked in order for the respective Shift to be used for Differential Purposes. If this option is unchecked, the respective shift cannot be assigned to a Policy on the Shift Differentials Tab of the Schedule Settings / Rules Section of the Policy Update Form
The Differential Pay Tab permits InfiniTime Administrators to define Pay Premiums for specific types of Worked Hours which qualify for differential based on the chosen Shift Differential Schedule and Pay Method. Pay Premiums can be set to the same value or different values for each hours type in order to meet your organization's requirements.
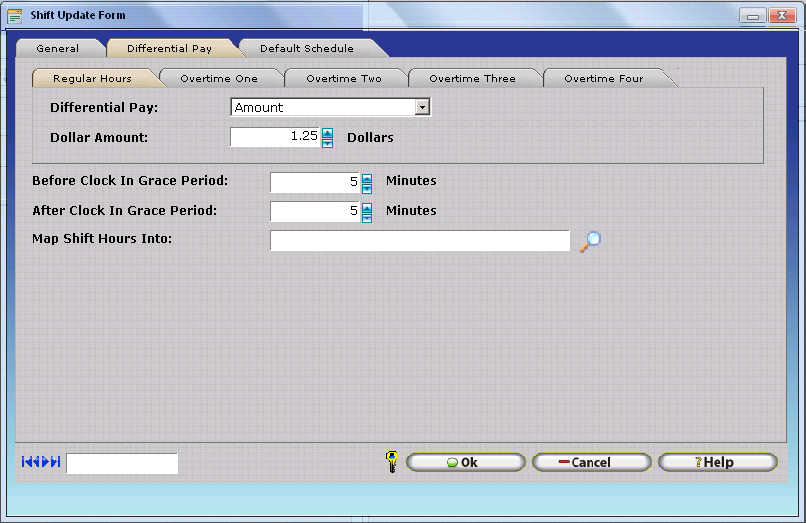
Shift Differential Pay Premium Fields
The Differential Pay and Amount Fields are present on the Regular Hours, Overtime One, Overtime Two, Overtime Three, and Overtime Four Tabs. These options These fields should be set independently to meet your organization's needs. Please note that all Pay Premium Fields are optional. Many customers choose to track employee wages and pay rates exclusively in the Payroll Application.
Differential Pay - This drop down box allows you to select the type of pay for the respective Hours Type. Options include Amount, Percent, and Rate. The
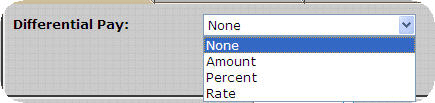
Amount : The Amount Differential Pay Option specifies that the value entered into the differential pay amount field is a dollar value, which will be added to the employee's base wage specified in the employee's record.
Example:
Employee Base Wage: $15.00
Differential Amount: $1.00
Total Hourly Differential Pay Rate: $16.00

Percent: The Percent Differential Pay Option specifies that the value entered into the differential pay amount field is a percentage value, which will be multiplied by the employees base wage to determine the additional amount paid during differential time.
Example:
Employee Base Wage: $10.00
Differential Percent: 20%
Additional Differential Pay Amount: $2.00
Total Hourly Differential Pay Rate: $12.00

Rate: The Rate Differential Pay Option specifies that the value entered into the differential pay amount field is a dollar value, which will be considered the total hourly pay during differential time. The Employees base wage is ignored when a rate is specified. All employees will receive the same pay rate when they qualify for differential time.
Example:
Employee Base Wage: $15.00
Differential Rate: $18.00
Total Hourly Differential Pay Rate: $18.00

Before Shift Grace Differential - Optional. This is the amount of time the employee has before the shift starts to clock in and be considered to be in that shift for differential purposes.
After Shift Grace Period - Optional. This is the amount of time the employee has after the shift has started to clock in and still be considered in that shift for differential purposes.
Map Shift Hours Into - Optional. Used for Shift Differential Mapping. This topic is covered separately below. InfiniTime Administrators should familiarize themselves with basic Shift Differential settings before reviewing Shift Differential Mapping.
The Default Schedule Tab includes the Quick Schedule feature which permits InfiniTime Administrators to define the exact blocks of time for which worked hours will be counted toward the respective Shift Differential.
Quick Schedule - Opens the Quick Default Schedule Form. Used to define a new Schedule for the respective Shift.
Change - Opens the Quick Default Schedule Form for the selected Schedule Record.
Delete - Deletes the selected Schedule Record.
To Define a Schedule for a Shift Differential:
Quick Default Schedule - Weekly Schedule Cycle View
Copy - Copies Scheduled Start and To Times from a given Day of Week to specific Days of Week as selected by the user.
Quick Default Schedule - Custom Schedule Cycle View
Copy - Copies Scheduled Start and To Times from a given Day of the Custom Schedule Cycle to specific Days of the Custom Schedule Cycle as selected by the user.
Notice that the Custom Schedule Cycle View
displays only seven days at once. The and VCR Buttons at the top
of the form are used to display additional days on the form as outlined
below.
- Shifts the Day Tabs displayed on the Quick Default Schedule Form up
one day. Used for Custom Schedule Cycles with more than 7 days.
- Shifts the Day Tabs displayed on the Quick Default Schedule Form down
one day. Used for Custom Schedule Cycles with more than 7 days.
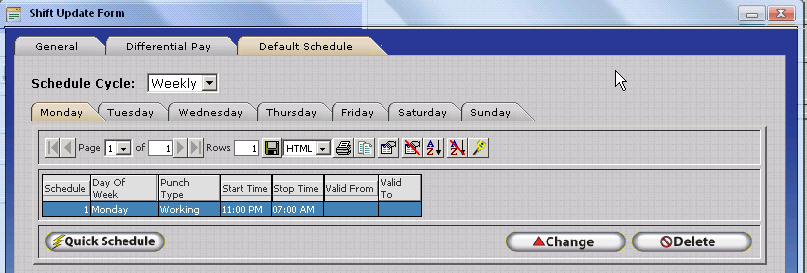
| Sunday | Monday | Tuesday | Wednesday | Thursday | Friday | Saturday | |
| Start Time 1 | 11:00 PM | 12:00 AM | 12:00 AM | 12:00 AM | 12:00 AM | 12:00 AM | 12:00 AM |
| End Time 1 | 11:59 PM | 07:00 AM | 07:00 AM | 07:00 AM | 07:00 AM | 07:00 AM | 07:00 AM |
| Start Time 2 | 11:00 PM | 11:00 PM | 11:00 PM | 11:00 PM | 11:00 PM | ||
| End Time 2 | 11:59 PM | 11:59 PM | 11:59 PM | 11:59 PM | 11:59 PM |
The Paid Break and Unpaid Break Columns should be left blank. These fields are not utilized for Shift Differential Schedules.
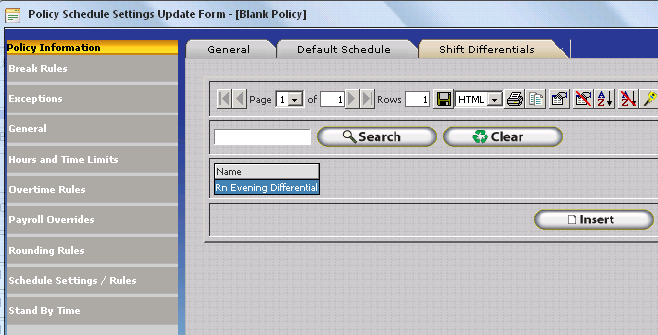
Shift Differentials must be assigned to a policy before InfiniTime will track and allocate worked hours to the Shift Differential. The Policy Pay Method Setting, and the exact Shift Differentials assigned to a respective policy, control which Shift Differential employees receive for working hours.
How to Assign a Differential to a Policy
1. Create the Shift Differential using the Shift Table. Ensure 'Use for Differential' is checked and that a Schedule has been configured.
2. Click on Lookups - Calculations Setup - Policies.
3. The policy table will open. Select the policy you wish to assign Shift Differential(s) to then click on Change.
4. Click on the Schedule Settings / Rules Section.
5. Click on the Shift Differentials Tab.
6. Click Insert.
7. Type the first few characters of the Shift Differential you wish to assign to the policy or use the Lookup Button to select the desired Shift Differential, then click OK.
8. The Shift Differential will be added to the Shift Differentials Tab. Repeat steps 6 and 7 to add additional Shift Differentials to the policy. Remember - a single policy may not have overlapping shift differentials.
It is important to note that Shift Differentials must be assigned to Policies within InfiniTime in order for Shift Differential Hours to be tracked for employees. The best way to explain how policies and shift differentials work together is to provide an example. With this in mind, we will review an example policy configuration for a company with multiple employee groups and shift differentials which we will refer to as XYZ Medical.
Step 1 – Identify Employee Groups with different Policy Requirements
XYZ Medical has multiple locations. The company as a whole has two groups of employees with different policy configurations for Break Rules, Overtime, Scheduling Rules, and Rounding Rules as follows:
Step 2 – Identify all shift differentials paid by the company in question.
When attempting to identify shift differentials paid by a company it is important to understand that a single shift differential may span multiple shifts. Shift differentials are not used for scheduling purposes. Rather they define a window of time that sits over top of employee schedules. Eligible employees working within the time window will receive benefits in the form of additional pay.
As previously mentioned it is not uncommon for a single shift differential to span multiple shifts. In the example below a $1.00 per hour premium is paid to employees working the Evening Team A shift and the Evening Team B shift. Employees on Team A are permitted to stay as late as 5:00 AM and are eligible for the shift premium. Remember, a shift differential is a contiguous block of time paid at a certain rate or premium. Because of this a single shift differential can be configured for employees on the Evening Team A and Evening Team B Shifts.
Shift Name |
Start Time |
End Time |
Start Day |
End Day |
Shift Premium |
Evening Team A |
7:00 PM |
3:00 AM |
Monday |
Friday |
$1.00 |
Evening Team B |
9:00 PM |
5:00 AM |
Monday |
Friday |
$1.00 |
Differential Name |
Start Time |
End Time |
Start Day |
End Day |
Differential Premium |
Evening Teams |
7:00 PM |
5:00 AM |
Monday |
Friday |
$1.00 |
Shift Differentials paid by XYZ Medical are listed below. Each differential must be configured as a Shift with the ‘Used for Differential’ option enabled.
Differential Name |
Start Time |
End Time |
Start Day |
End Day |
Differential Premium |
Weekend Differential |
12:00 AM |
11:59 PM |
Saturday |
Sunday |
$0.75 |
CNA Evening Differential |
10:00 PM |
6:00 AM |
Monday |
Friday |
$1.00 |
RN Evening Differential |
8:00 PM |
8:00 AM |
Monday |
Friday |
$1.25 |
When configuring shift differentials it is important to recognize the schedule must be split at midnight. Shift differentials are configured under the Shift Table which can be access from Lookups – Scheduling Setup – Shifts. Click Insert to open the Shift Update Form.
Follow the steps below to configure each differential required by the customer:
Enter the Premium received by the employees in the Differential Pay Amount field.
Click Quick Schedule on the Default Schedule Tab. Use the schedule to define the period during which employees will receive premium pay. If the schedule should cross midnight it is important to split the schedule. For example a night differential of $0.75 covering 8:00 PM – 4:00 AM would be setup as below:
| Start Time | 8:00 PM |
| End Time | 11:59 PM |
| Start Time | 12:00 AM |
| End Time | 4:00 AM |
Step 3 – Identify Employee Groups who are eligible for different differentials.
XYZ Medical has multiple groups of employees eligible for different shift differentials as outlined below:
Corporate Office Employees are not eligible for shift differentials.
All Hourly and Salary Employees are eligible for Weekend Differentials.
All Certified Nurse Assistants are eligible for the CNA Evening and Weekend Differentials.
All Registered Nurses are eligible for the RN Evening and Weekend Differentials.
The following policies are required to meet the needs of XYZ Medical:
Policy Name |
Unique Policy Settings |
Eligible Shift Differentials |
Corporate Hourly |
Break & Rounding Rules |
None |
Corporate Salary |
Overtime & Break Rules |
None |
Hourly Employees |
Break & Rounding Rules |
Weekend Differential |
Salary Employees |
Overtime & Break Rules |
Weekend Differential |
Certified Nurse Assistants |
None |
Weekend & CNA Night Differentials |
Registered Nurses |
None |
Weekend & RN Night Differentials |
In the above example employees classified as Certified Nurse Assistants and Registered Nurses have identical policy requirements for Break Rules, Overtime Rules, Scheduling etc. within their specific class of employees. If even a single employee within the CNA or RN class had unique policy requirements an additional policy would be required for individuals requiring different policy settings.
Differentials Listed in the ‘Eligible Shift Differentials’ Column of the table above must be assigned to the appropriate policy under Schedule Settings / Rules – Shift Differentials.
Now that we have an understanding of how policies and shift differentials interact use the steps below to help the customer identify their employee groups, shift differentials, and required policies.
1.) Identify employee groups requiring different policy settings for Break Rules, Overtime Calculations, Scheduling Rules, Pay Cycle Configuration, or Rounding Rules.
2.) Identify all shift differentials paid by the company in question.
3.) Identify employee groups who are eligible for different differentials.
4.) One policy will be required for each group of employees with different differentials and policy settings.
Shift Differential Pay Methods
If a Shift Differential is assigned to a policy, a Shift Differential Pay Method must be selected. Remember, within InfiniTime shift differentials are defined as a period during which employees receive an additional premium. It is not uncommon for employees to be eligible for multiple shift differentials. The Shift Differential pay method determine which differential an employee will receive based upon when they are working or when they punched in. The Shift Differential Pay Method is located on the General Tab of the Schedule Settings / Rules section of the Policy Update Form.
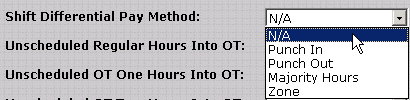
NOTE: The Shift Differential Pay Method option is disabled and cannot be altered until one or more shift differentials have been assigned to the policy on the Shift Differentials tab.
Shift Differential Pay Method – The Shift Differential Pay Method determines exactly how employees are awarded shift differential premiums, based on the time they punched in (Punch In), punched out (Punch Out), the time they are working (Zone), or where the majority of their working hours fall for a given date (Majority Hours). A Shift Differential Pay Method must be selected for employees to receive shift premiums. The best method for understanding exactly how each Shift Differential Pay Method functions is to review an example scenario for each available option.
Related Settings:
ABC Medical employs Registered Nurses (RNs) who receive differential pay for working during evening and early morning hours as outlined below.
Differential Name |
Rate |
Start Time |
End Time |
Evening Differential |
$1.00 |
8:00 PM |
12:00 AM |
Morning Differential |
$1.25 |
12:00 AM |
4:00 AM |
Punch In – When the Punch In pay method is chosen employees are paid the premium in effect at the time they punch in. For clarity multiple examples are shown below.
| Scenario Description | Illustrated Break Down of Differentials - Punch In Pay Method |
| An RN arrives at the hospital early and is asked to lend a hand prior to their shift. They clock in at 7PM and work until 4AM. Because the RN clocked in at 7PM, which does not fall within a period eligible for differential pay, the RN will not receive a premium for their hours. | 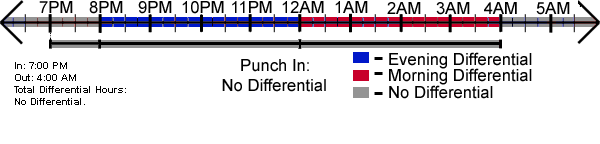 |
| An RN is called in to work from 10PM to 4AM. The employee punches in at 10:00 PM, which is during the period defined by the Evening Differential. All six hours (10PM to 4AM) will be paid at the Evening Differential rate. |  |
Punch Out – When the Punch Out pay method is chosen employees are paid the premium in effect at the time they punch out. For clarity multiple examples are shown below.
| Scenario Description | Illustrated Break Down of Differentials - Punch Out Pay Method |
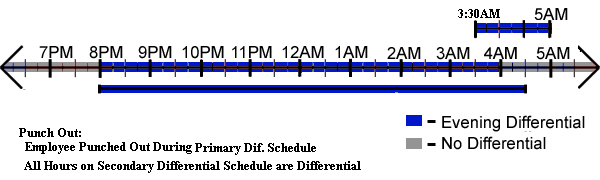
| The typical RN Day shift is 11 AM to 7PM. Mary Joe is asked to stay for an additional two hours and works from 11AM to 9PM. Because Mary clocked out at 9PM, which falls within the Evening Differential, she will receive the Evening Differential Premium for all ten hours worked. | 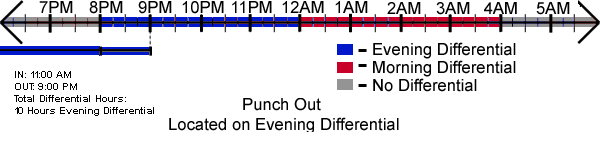 |
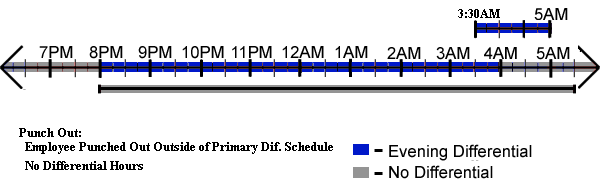
| An RN is called in to work from 8PM to 4AM. The employee punches out at 4:15 AM. The employee will not receive a premium for the worked hours because 4:15 AM does not fall within a period defined by a differential. |  |
Majority Hours – The Majority Hours pay method identifies the differential on which employees worked the greatest portion of their hours. The premium associated with that differential is then used for all differential hours for the day as illustrated below. If an employee should work an equal amount of hours across multiple differentials they will be paid the premium associated with the first differential.
| Scenario Description | Illustrated Break Down of Differentials - Majority Hours Pay Method |
| An RN is called in to work from 10:00 PM to 4:00 AM. The majority of the worked hours fall within the Morning Differential. As such the employee receives the Morning Differential premium ($1.25) for all hours worked. | 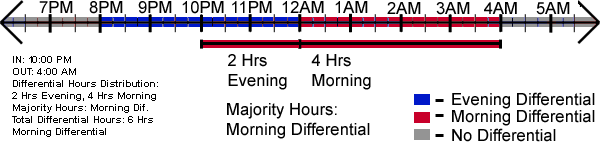 |
Zone – Zone is the most commonly used pay method for shift differentials. Employees will be paid a premium according to the differential they are working on. In this scenario if an RN were to be called in to work from 10:00 PM to 4:00 AM they would receive two hours of Evening Differential Pay and Four Hours of Morning Differential Pay as follows:
| Scenario Description | Illustrated Break Down of Differentials - Zone Pay Method |
An RN is called in to work from 10:00 PM to 4:00 AM. Hours from 10:00 PM to 12:00 AM are associated with the Evening Differential. Hours from 12:00 AM to 4:00 AM are associated with the Morning Differential. The employee is paid as follows:
2 Hours Evening Differential Premium 4 Hours Morning Differential Premium |
 |
All prior Shift Differential Configuration examples have a common element. The Time Period for which worked hours are applied to shift differential, and the time period during which employees may Punch In, Punch Out, or Work to qualify for shift differential based on the selected Pay Method are the same. Shift Differential Mapping permits the time period for which worked hours are applied to shift differential to be separated from the time period during which employees must initially Punch In, Punch Out, or Work to qualify for Shift Differential Benefits. Shift Differential Mapping is configured using the 'Map Shift Hours Into' option on the Differential Pay Tab of the Shift Update Form.
Map Shift Hours To – Permits Shift Differential Mapping which allows versatile shift differential payment rules. Shift Differential mapping makes it possible to trigger Shift Differential Hours based on the Pay Method selected on an employee's policy and the Schedule Defined on a 'Primary Shift Differential' but pay shift differential hours according to the Schedule defined on a Secondary Differential. Shift mapping is subject to the following requirements and conditions:
Two Shifts must be configured for differential. Use for differential must be checked for each shift.
1 Primary Differential Shift
1 Secondary Differential Shift
The Primary Shift Differential must be assigned to a Policy. The secondary Shift Differential should not be assigned to the policy.
The Primary differential shift includes the map to setting, which points to the Secondary Differential Shift.
The employee must Punch In, Punch Out, or Work During the Time Period defined on the Schedule of the Primary Shift Differential in order to qualify for differential payment. Differential hours will be totaled and paid according to Schedule, and Differential Pay Settings defined on the Secondary Differential Shift in addition to the Policy's Pay Method.
Differential Pay and Differential Amount Settings can be left blank on the Primary Differential Shift.
Shift Differential Mapping Examples:
For clarity, an example of Shift Differential Mapping is provided below for the Clock In, Clock Out, and Zone Pay Methods. The Majority Hours pay method is not recommended for use with Shift Differential Mapping. As detailed above, Shift Differential Mapping makes it possible to trigger Shift Differential Hours based on the Pay Method selected on an employee's policy and the Schedule Defined on a 'Primary Shift Differential' but pay shift differential hours according to the Schedule defined on a Secondary Differential.
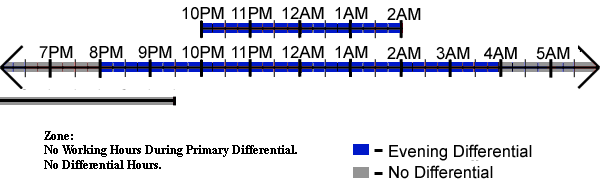
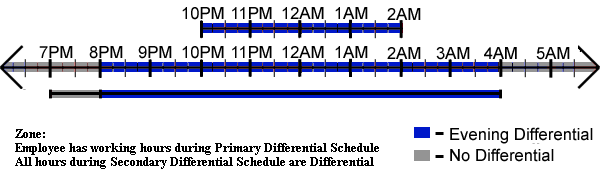
Zone – Zone is the most commonly used pay method for shift differentials. In the scenario below, ABC Medical employs Registered Nurses (RNs) who receive differential pay during between the hours of 8:00 PM and 4:00 AM Monday through Sunday if* they have working hours between the hours of 10:00 PM and 2:00 PM.
Related Settings:
Primary RN Evening Differential - Determines Time Period during which employees must have worked hours to receive Shift Differential. |
|||||||
| Sunday | Monday | Tuesday | Wednesday | Thursday | Friday | Saturday | |
| Start Time 1 | 12:00 AM | 12:00 AM | 12:00 AM | 12:00 AM | 12:00 AM | 12:00 AM | 12:00 AM |
| End Time 1 | 02:00 AM | 02:00 AM | 02:00 AM | 02:00 AM | 02:00 AM | 02:00 AM | 02:00 AM |
| Start Time 2 | 10:00 PM | 10:00 PM | 10:00 PM | 10:00 PM | 10:00 PM | 10:00 PM | 10:00 PM |
| End Time 2 | 11:59 PM | 11:59 PM | 11:59 PM | 11:59 PM | 11:59 PM | 11:59 PM | 11:59 PM |
Secondary RN Evening Differential - Determines Time Period during which worked hours are applied toward Shift Differential. |
|||||||
| Sunday | Monday | Tuesday | Wednesday | Thursday | Friday | Saturday | |
| Start Time 1 | 8:00 PM | 8:00 PM | 8:00 PM | 8:00 PM | 8:00 PM | 8:00 PM | 8:00 PM |
| End Time 1 | 11:59 PM | 11:59 PM | 11:59 PM | 11:59 PM | 11:59 PM | 11:59 PM | 11:59 PM |
| Start Time 2 | 12:00 AM | 12:00 AM | 12:00 AM | 12:00 AM | 12:00 AM | 12:00 AM | 12:00 AM |
| End Time 2 | 4:00 AM | 4:00 AM | 4:00 AM | 4:00 AM | 4:00 AM | 4:00 AM | 4:00 AM |
| Scenario Description | Illustrated Break Down of Differentials - Zone Pay Method |
An RN who usually works the day shift, 8:00 AM to 4:00 PM, is asked to remain on duty due to an influx of patients. The RN stays until 9:30 PM. Even though the Secondary Differential Pays RN Evening Differential benefits from 8:00 PM to 6:00 AM, benefits are only triggered with the Zone Pay Method if an employee works between 10:00 PM and 2:00 AM. In this scenario, the employee would be paid as follows:
8 Regular Hours - No Differential 5.5 OT1 Hours - No Differential |
 |
An RN who usually work the night shift, 8:00 PM to 4:00 AM, is asked to report for duty an hour early. The RN works from 7:00 PM to 4:00 AM. Since the employee has working hours during the 10:00 PM to 2:00 AM period, the employee will receive differential for all hours which fall within 8:00 PM to 4:00 AM as follows:
1 Regular Hours - No Differential 7 Regular Hours - Evening Differential 1 OT1 Hour - Evening Differential
|
 |
Punch In – In the scenario below, ABC Medical employs Registered Nurses (RNs) who receive differential pay during between the hours of 8:00 PM and 4:00 AM Monday through Sunday if* they punch in between the hours of 7:00 PM and 9:00 PM.
Related Settings:
Primary RN Evening Differential - Determines Time Period during which employees must have worked hours to receive Shift Differential. |
|||||||
| Sunday | Monday | Tuesday | Wednesday | Thursday | Friday | Saturday | |
| Start Time 1 | 7:00 PM | 7:00 PM | 7:00 PM | 7:00 PM | 7:00 PM | 7:00 PM | 7:00 PM |
| End Time 1 | 9:00 PM | 9:00 PM | 9:00 PM | 9:00 PM | 9:00 PM | 9:00 PM | 9:00 PM |
Secondary RN Evening Differential - Determines Time Period during which worked hours are applied toward Shift Differential. |
|||||||
| Sunday | Monday | Tuesday | Wednesday | Thursday | Friday | Saturday | |
| Start Time 1 | 8:00 PM | 8:00 PM | 8:00 PM | 8:00 PM | 8:00 PM | 8:00 PM | 8:00 PM |
| End Time 1 | 11:59 PM | 11:59 PM | 11:59 PM | 11:59 PM | 11:59 PM | 11:59 PM | 11:59 PM |
| Start Time 2 | 12:00 AM | 12:00 AM | 12:00 AM | 12:00 AM | 12:00 AM | 12:00 AM | 12:00 AM |
| End Time 2 | 4:00 AM | 4:00 AM | 4:00 AM | 4:00 AM | 4:00 AM | 4:00 AM | 4:00 AM |
| Scenario Description | Illustrated Break Down of Differentials - Punch In Pay Method |
| An RN is called in to work the last half of the Evening Shift and the first half of the Morning Shift. They clock in at 12:00 AM and work until 8:00 AM. Because the RN clocked in at 12:00 PM, which does not fall within the Primary Differential a period eligible for differential pay, the RN will not receive a premium for their hours. | 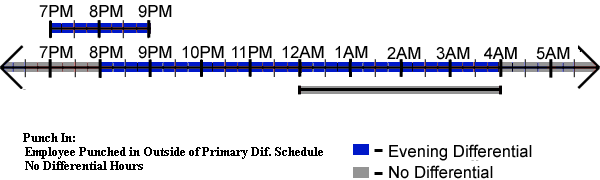 |
| An RN arrives at the hospital early and is asked to lend a hand before the start of their shift. They clock in at 7:30 PM and work until 4:00 AM. Because the RN clocked in at 7:30 PM, which falls within the Primary RN Evening Differential of 7:00 PM to 9:00 PM, the employee will receive differential for all hours worked which fall within 8:00 PM to 4:00 AM. | 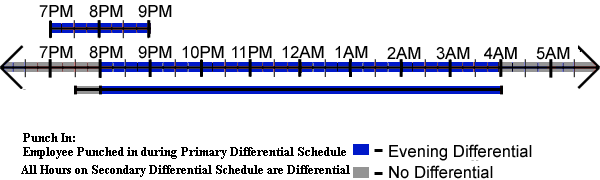 |
Punch Out – In the scenario below, ABC Medical employs Registered Nurses (RNs) who receive differential pay during between the hours of 8:00 PM and 4:00 AM Monday through Sunday if* they punch out between the hours of 3:30 AM and 5:00 AM.
Related Settings:
Primary RN Evening Differential - Determines Time Period during which employees must have worked hours to receive Shift Differential. |
|||||||
| Sunday | Monday | Tuesday | Wednesday | Thursday | Friday | Saturday | |
| Start Time 1 | 3:30 AM | 3:30 AM | 3:30 AM | 3:30 AM | 3:30 AM | 3:30 AM | 3:30 AM |
| End Time 1 | 5:00 AM | 5:00 AM | 5:00 AM | 5:00 AM | 5:00 AM | 5:00 AM | 5:00 AM |
Secondary RN Evening Differential - Determines Time Period during which worked hours are applied toward Shift Differential. |
|||||||
| Sunday | Monday | Tuesday | Wednesday | Thursday | Friday | Saturday | |
| Start Time 1 | 8:00 PM | 8:00 PM | 8:00 PM | 8:00 PM | 8:00 PM | 8:00 PM | 8:00 PM |
| End Time 1 | 11:59 PM | 11:59 PM | 11:59 PM | 11:59 PM | 11:59 PM | 11:59 PM | 11:59 PM |
| Start Time 2 | 12:00 AM | 12:00 AM | 12:00 AM | 12:00 AM | 12:00 AM | 12:00 AM | 12:00 AM |
| End Time 2 | 4:00 AM | 4:00 AM | 4:00 AM | 4:00 AM | 4:00 AM | 4:00 AM | 4:00 AM |
| Scenario Description | Illustrated Break Down of Differentials - Punch Out Pay Method |
| An RN works their normal 8:00 PM to 4:00 AM shift, and is asked
to stay late. They clock out at 5:30 AM. Because the RN clocked
out at 5:30 AM, which does not fall within the Primary RN Evening
Differential of 3:30 AM to 5:00 AM, the employee will not receive
differential hours. The employee is paid as follows:
8 Regular Hours - No Differential 1.5 OT1 Hours - No Differential |
 |
| An RN works their normal 8:00 PM to 4:00 AM shift, running
over by 30 minutes. They clock out at 4:30 AM. Because the RN
clocked out at 4:30 AM, which falls withiin the Primary RN Evening
Differential of 3:30 AM to 5:00 AM, the employee will receive
differential for all hours worked which fall within the Secondary
Differential Schedule (IE: 8:00 PM to 4:00 AM). The employee is
paid as follows:
8 Regular Hours - Evening Differential 0.5 OT1 Hours - Evening Differential |
 |
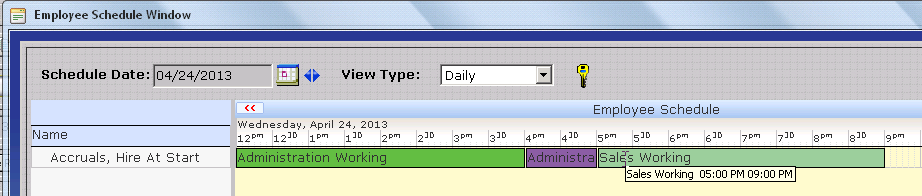
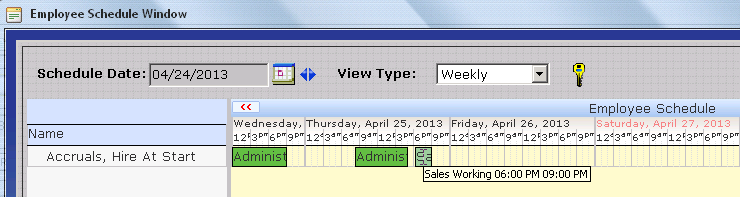
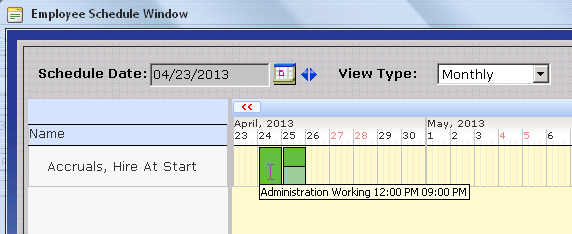
The Employee Schedule Window, as accessed from the Schedule Button on the InfiniTime Main Toolbar, displays effective employee schedules on a Daily, Weekly, or Monthly Basis according to the selected View Type. InfiniTime Administrators may use the Employee Schedule Window, also referred to as the GANNT Chart, to view the final schedule applied to individual employees for a given date according to the Schedule Hierarchy and schedules configured throughout the InfiniTime Software such as Policy Default Schedules, Department Default Schedules, Employee Default Schedules, or temporary schedule records created from the GANNT Chart. With appropriate configuration, the Schedule GANNT Chart can also be used to quickly find available employees to fill a specific role (See Find Available) or to schedule several employees according to a predefined staffing scenario. (See Schedule Skeletons.)
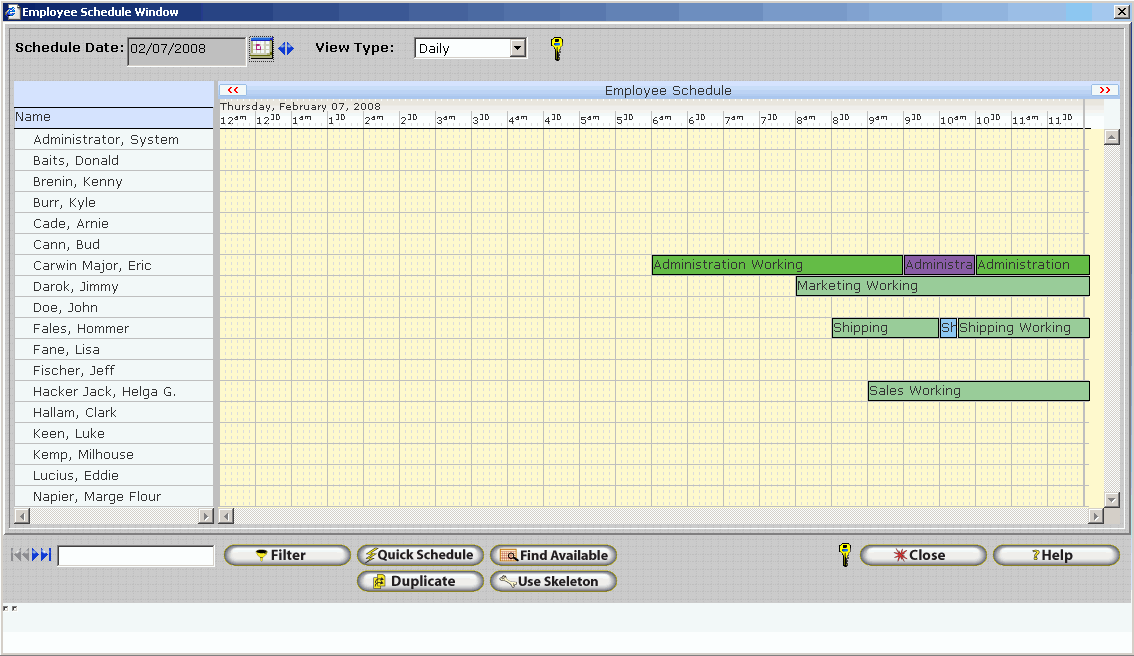
Schedule Date - Determines the date(s) to be displayed in the Schedule GANNT Chart Grid. The number of days displayed in the Shcedule GANNT Chart Grid depends on the selected View Type. For example, the Daily View Type will display schedules only for the date set on the Schedule Date field. The Weekly View Type will display seven days on the Schedule GANNT Chart starting with the Schedule Date. The Monthly View Type will display 31 days on the Schedule GANNT Chart starting with the Schedule Date.
View Type - Determines both the number of days displayed on the Schedule GANNT Chart Grid in addition to the exact method for displaying schedules. Available View Types are outlined below.
Daily - Displays a single day, as specified by the Schedule Date, on the Schedule GANNT Chart for all employees included in the Filter. In the Daily View, the Schedule GANNT Chart is split by 5 minute increments for detailed scheduling purposes. Individual working periods and break periods, including Job Costing Details, are displayed on the daily view.
Weekly - Displays seven days, starting with the Schedule Date, on the Schedule GANNT Chart for all employees included in the Filter. In the Weekly View, the Schedule GANNT Chart is split by one hour increments to show the distribution of employee schedules across individual days. Employee schedules for consecutive schedule blocks - regardless of type - are displayed as a single bar on the Weekly View Type. Consecutive Blocks display the Job Costing Details matching the first block on the day when hovered over by the mouse. Employee Schedules for non-consecutive blocks are displayed as separate bars with appropriate Job Costing Details. Users may hover the mouse over individual schedule blocks to view the full Job Costing assignment (Department, Job, and Task) associated with the schedule in addition to the Start and End Time for the block.
Monthly - Displays 31 days, starting with the Schedule Date, on the Schedule GANNT Chart for all employees included in the Filter. In the Monthly View, the Schedule GANNT Chart is not split by specific increments. It is not possible to discern the exact time of individual schedule blocks on the Monthly Schedule View. However, it is possible to quickly determine which days have no schedules. Employee schedules for consecutive schedule blocks - regardless of type - are displayed as a single block on the Monthly View Type. Consecutive Blocks display the Job Costing Details matching the first block on the day when hovered over by the mouse. Employee Schedules for non-consecutive blocks are displayed as separately with appropriate Job Costing Details. Users may hover the mouse over individual schedule blocks to view the full Job Costing assignment (Department, Job, and Task) associated with the schedule in addition to the Start and End Time for the block.
Filter - Permits selection of specific employees, departments, groups etc. for display on the Schedule GANNT Chart.
Quick Schedule - Permits creation of schedules for multiple employees for one or more days using the Quick Schedule Interface.
Override Schedule - If this box is checked existing schedules will be overwritten with the schedule specified by the Quick Scheduler. If this box is unchecked existing schedules will not be altered.
The Quick Schedule Button opens the Quick Default Schedule Tool allows you create a schedule by directly typing in the start and end times. To create the default schedule, start by clicking on the tab for the day of the week. In the Start Time field under the Regular Hours column, type in the starting time. Next, in the End Time field, enter the time that this Regular working period ends (ie ends before a lunch break, or the end of the day.) Continue the process until the entire shift has been completed.
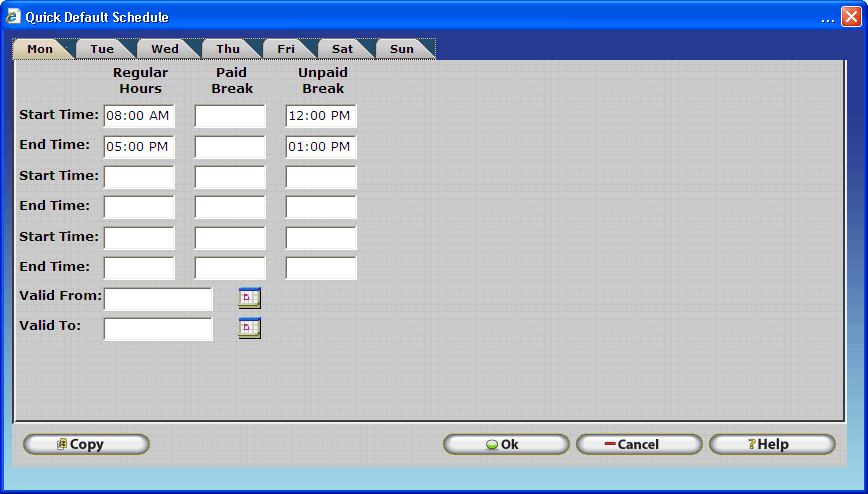
Start Time - In this field you can enter the start time for the Regular Hours, Paid Break, and Unpaid Break.
End Time - In this field you can enter the end time for the Regular Hours, Paid Break, and Unpaid Break.
NOTE: It is often difficult to schedule breaks. Scheduling is very rigid, exceptions will be generated if employees do not take breaks as scheduled. It is generally only recommended to schedule breaks if they must be taken at a specific time.
Valid From - Is the date in which the schedule will start to be valid.
Valid To - Is the date in which the schedule will end being valid.
NOTE: The Valid From and Valid To fields are not required, if the fields are blank then the schedule will always be valid.
Copy Button - The copy button will copy the schedule from a particular weekday to other weekdays.
To copy the schedule from day to day, click the copy button to bring up the following form:
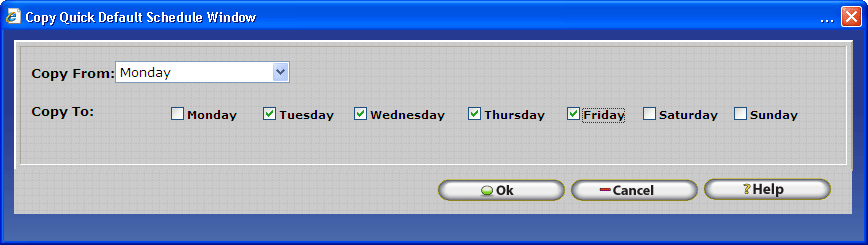
Copy From - Use the pull down menu to select the day that you wish to use as your template.
Copy To - Place a check in each box that you wish to copy the schedule to.
Duplicate - Opens the Schedule Duplicate Items Time Window which permits schedules to be duplicated as follows:
Schedules for a specific employee for a specific date range can be copied to one or more employees for a second specific date range.
Schedules for a set of employees, as specified by the Filter, for a specific date range can be copied to a second specific date range for the same set of employees. Schedules for each employee during the 'Copy From' Date Range will be copied to the 'Copy To' Date Range.
Schedules can be copied and matched by day of week or day by day
Schedules can be copied to all days during the 'Copy To Date Range' overriding default schedules OR only to days with no schedule.
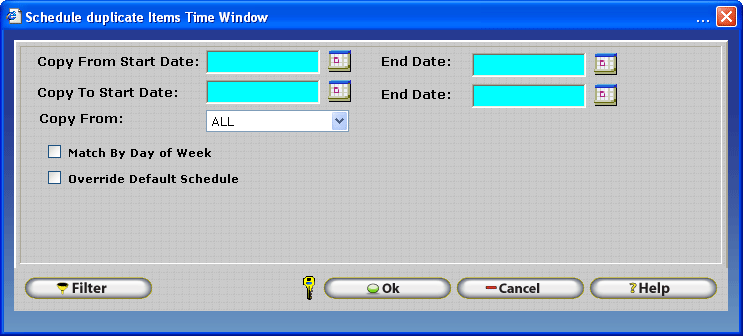
Copy from: Specify the start date and end date of the period for which you would like to copy schedule information from. All schedule information within the selected period will be copied.
Copy To: Specify the start and end date of the period for which you would like to copy schedule information to. This period should be the same length as the copy from period.
Copy From: Select the employees from which you would like to copy schedule information.
Match By Day of Week: Check this box to match schedule information to the appropriate day of week. This option is useful for copying a month of schedule information from one month to another month, which may not necessarily start or end on the same day.
Override Default Schedule: Checking this box will cause the copied schedule to override default schedule information for destination employees. If box is not checked then it will not override existing schedules it will only put a schedule where there is none scheduled.
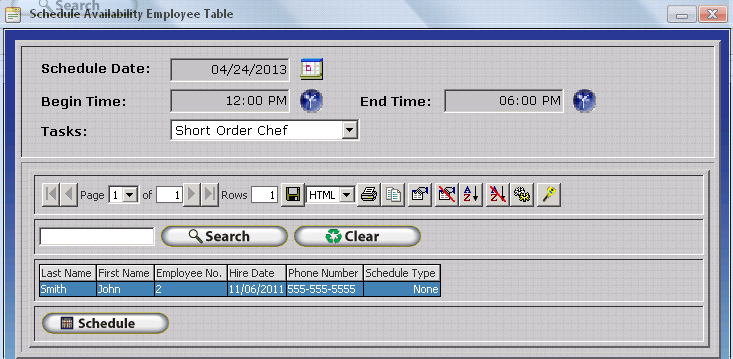
Find Available - Permits supervisors and InfiniTime Administrators to schedule employees for a specific time slot based on the times and days of week the employee has indicated they are available. Use of Find Available requires specific configuration as outlined in the Availability Section of this document.
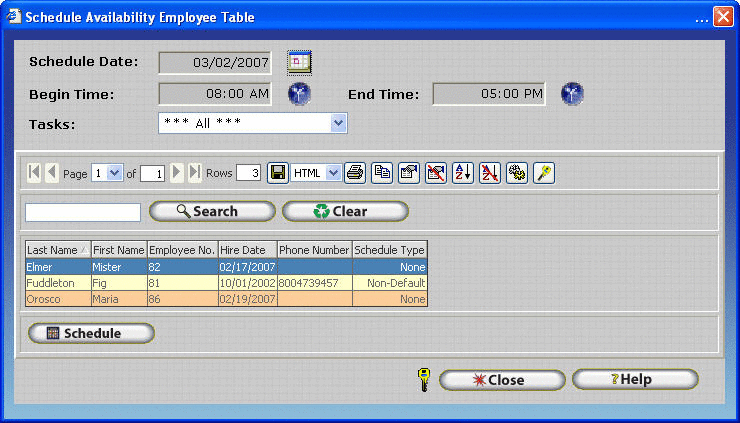
Employees who are available for the selected Time Slot, as determined by the Begin Time, End Time, and Task Selection will be displayed in the lower grid as shown above. Employees will not be displayed as available if:
They are already scheduled for work hours on the selected date.
They are not available as determined by their availability schedule.
They are not trained for the selected task(s).
Schedule Date: Select the date to schedule using employee availability.
Begin Time: Select the start time for the period you wish to schedule.
End Time: Select the end time for the period you wish to schedule.
Tasks: Select the task you want to schedule. Employees will only be listed if they are trained for the selected task. If all tasks are selected employees trained for any task will be listed if they are available during the selected period.
Schedule: Schedules the selected employee for the time specified. The Schedule GANNT chart will be updated with this information after the Schedule Availability Employee table is closed.
Note: The begin and end times define the period that will be scheduled. Employees must be available during this period according to their availability schedule, otherwise no one will be displayed. Refer to the Availability section of this document for more information about setting up Availability schedules.
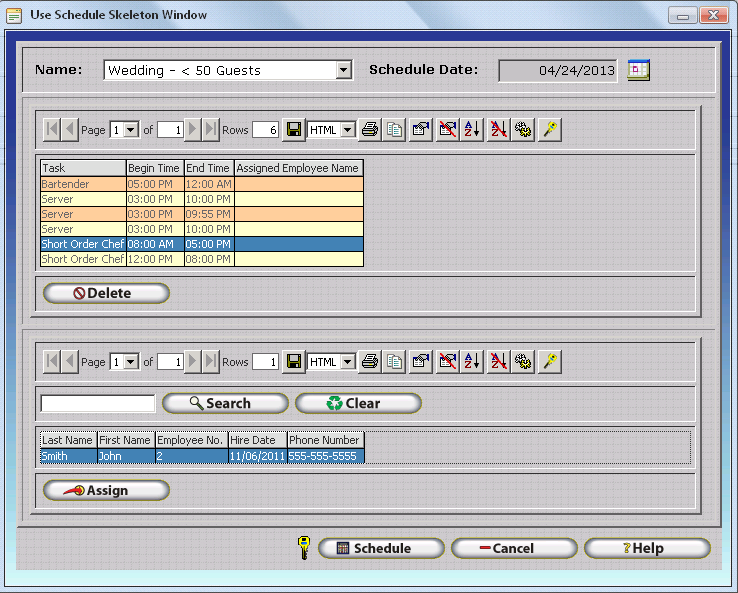
Use Skeleton - Opens the Use Schedule Skeleton Window which permits employee schedules to be created from a previously defined template. Specific configuration within InfiniTime is required before the Use Skeleton Button will be displayed on the Schedule GANNT Chart.
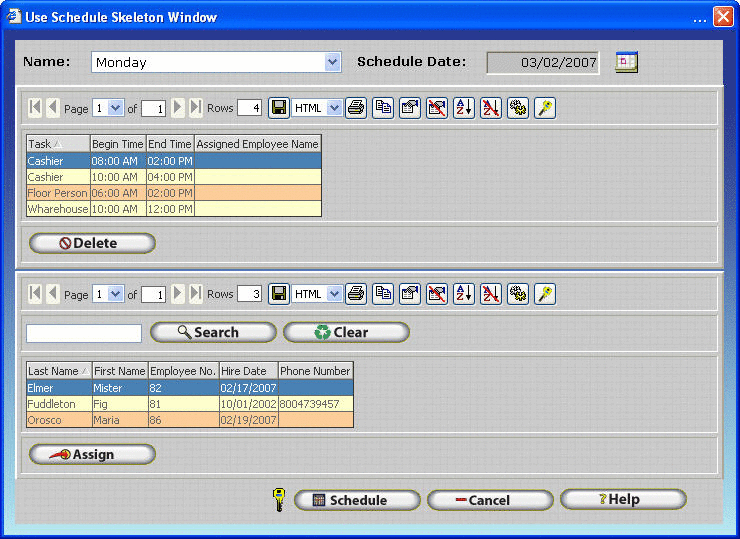
Name: Select the Skeleton you wish to use for scheduling purposes.
Schedule Date: Select the date to schedule using skeletons.
Delete: Removes the employee assigned to the specified task and time period.
Search: Select the Skeleton Slot for which you wish to view available employees and click on this button. The lower grid will be populated with employees that meet the criteria defined by the skeleton slot. Employees will not be displayed as available if:
They are already scheduled for work hours on the selected date.
They are not available as determined by their availability schedule.
They are not trained for the selected task(s).
Assign: Used to assign the selected employee to the task and schedule highlighted in the Skeleton Task Grid.
Schedule: Schedules the assigned employees for the task and time period specified by the Skeleton Task Grid. The Schedule GANNT chart will be updated with this information after the Schedule Skeleton window is closed.
Employee VCR Buttons - If the Filter includes more than 18 employees, multiple pages will be displayed on the Schedule GANNT Chart. The Employee VCR Buttons at the lower left corner of the form can be used to move between pages.
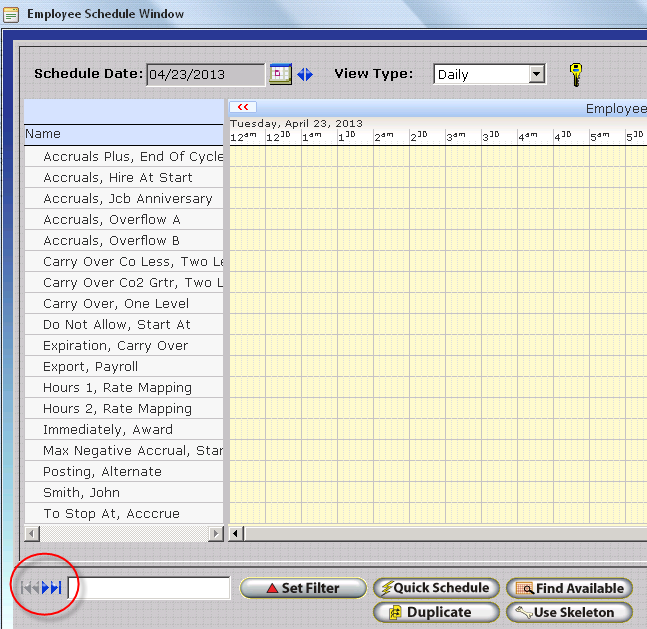
 - First Page - Displays the first 18 employees in the Schedule Gannt
Chart Filter.
- First Page - Displays the first 18 employees in the Schedule Gannt
Chart Filter.
 - Previous Record - Moved backward through employees in the Schedule Gannt
Chart Filter, one employee at a time.
- Previous Record - Moved backward through employees in the Schedule Gannt
Chart Filter, one employee at a time.
 - Next Record - Moved forward through employees in the Schedule Gannt
Chart Filter, one employee at a time.
- Next Record - Moved forward through employees in the Schedule Gannt
Chart Filter, one employee at a time.
 - Last Page - Displays the last 18 employees in the Schedule Gannt Chart
Filter.
- Last Page - Displays the last 18 employees in the Schedule Gannt Chart
Filter.
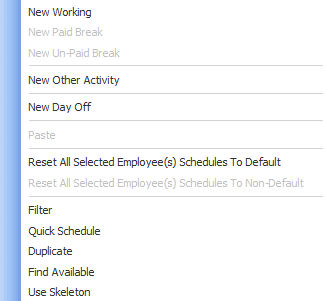
The Schedule GANNT Chart Right Click Menu permits access to the individual Buttons present on the Schedule GANNT Chart such as Filter, Quick Schedule etc. Additionally, the following actions can be performed using the right click menu:
New Working - Inserts a scheduled block of working hours.
New Paid Break - Inserts a schedule block of paid break time.
New Un-Paid Break - Inserts a schedule block of un-paid break time.
New Other Activity - Inserts a schedule block of other activity such as vacation, sick time, personal time, etc.
New Day Off - Opens the Schedule Day off Update Form Days which allows the user to schedule an employee to be absent for a day. When a day off is scheduled employees will not receive exceptions on the Scheduled Day Off. Days Off are a useful feature for companies who utilize the Points System and wish to ensure employees who are approved for an absence will not be penalized.
Copy - Displayed on the right click menu only when right clicking on an existing Schedule Block. Copies the respective schedule block. The block can then be pasted to another employee or day by right clicking on the time at which you want the block to start and then clicking paste.
Cut - Displayed on the right click menu only when right clicking on an existing Schedule Block. Copies the respective schedule block. The block can then be moved to another employee or day by right clicking on the time at which you want the block to start and then clicking paste. The original block will then be removed.
Paste - Pastes the previously copied schedule block. The pasted block will have the same Job Costing Details and duration as the original schedule block, though it will be pasted at the
New Working - Scheduling Regular Work Hours
1.) Right click in the schedule grid as detailed above and click on the new working option. The Schedule Item Time Window will open as shown.
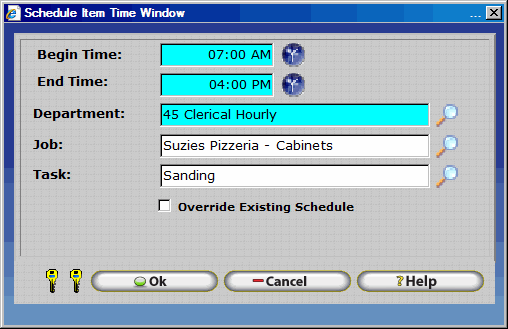
2.) Enter a start and end time for the schedule block. The start and end times represent when the employee is expected to clock in and clock out for the day.
3.) Specify a department, job, and task for the scheduled period as applicable. Jobs and Tasks are not required whereas a department must be selected.
4.) Check the Override Existing Schedule box if the employee already has a schedule for the day. When the Override Existing Schedule box is checked InfiniTime will ignore any current schedules and indicate a block of hours for the time period specified. If the Override Existing Schedule box is unchecked and a schedule exists during the specified time period the new schedule will not be inserted.
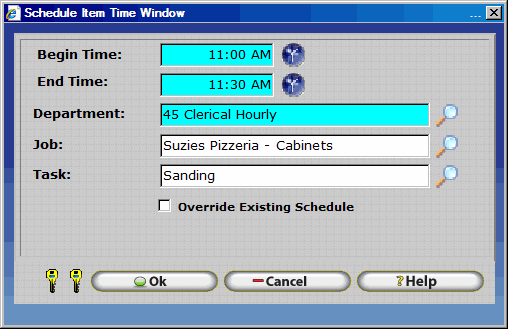
New Paid Break - Scheduling a Paid break
1.) Right click in the schedule grid as detailed above and click on the New Paid Break option.. The Schedule Item Time Window will open as shown.

2.) Enter a start and end time for the schedule block. The start and end times represent when the employee is expected to clock in and clock out for the day.
3.) Specify a department, job, and task for the scheduled period as applicable. Jobs and Tasks are not required whereas a department must be selected.
4.) Check the Override Existing Schedule box if the employee already has a schedule for the day. When the Override Existing Schedule box is checked InfiniTime will ignore any current schedules and indicate a block of hours for the time period specified. If the Override Existing Schedule box is unchecked and a schedule exists during the specified time period the new schedule will not be inserted.
New Un-Paid Break - Scheduling an Unpaid Break
1.) Right click in the schedule grid as detailed above and click on the New Un-Paid Break Option. The Schedule Item Time Window will open as shown.
2.) Enter a start and end time for the schedule block. The start and end times represent when the employee is expected to clock in and clock out for the day.
3.) Specify a department, job, and task for the scheduled period as applicable. Jobs and Tasks are not required whereas a department must be selected.
4.) Check the Override Existing Schedule box if the employee already has a schedule for the day. When the Override Existing Schedule box is checked InfiniTime will ignore any current schedules and indicate a block of hours for the time period specified. If the Override Existing Schedule box is unchecked and a schedule exists during the specified time period the new schedule will not be inserted.
New Other Activity - Scheduling an Other Activity such as Vacation
1.) Right click in the schedule grid as detailed above and click on the New Other Activity option. The Schedule Item Time Window will open as shown.
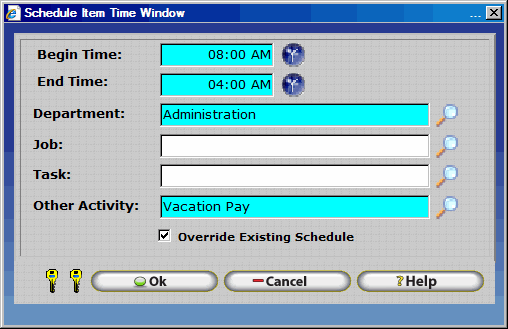
2.) Enter a start and end time for the schedule block. The start and end times represent when the employee is expected to clock in and clock out for the day.
3.) Specify a department, job, and task for the scheduled period as applicable. Jobs and Tasks are not required whereas a department must be selected.
4.) Check the Override Existing Schedule box if the employee already has a schedule for the day. When the Override Existing Schedule box is checked InfiniTime will ignore any current schedules and indicate a block of hours for the time period specified. If the Override Existing Schedule box is unchecked and a schedule exists during the specified time period for an employee the new schedule will not be inserted for the respective employee.
New Day Off - Scheduling a Day Off
Click Insert.
![]()
Enter the date you wish to add a day off for by typing in the Schedule Date Field or using the Calendar Button.
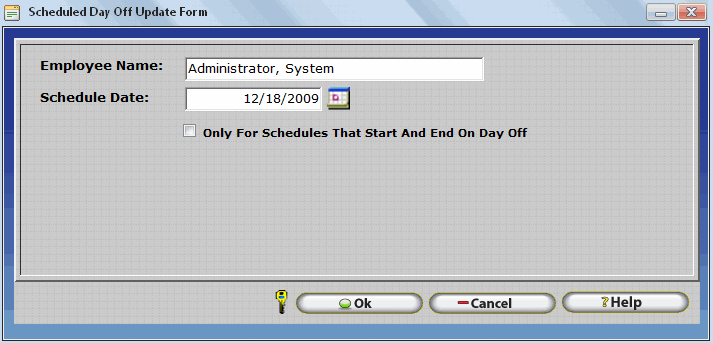
If the employee's default schedule is a Day Time Schedule that does not cross midnight then check 'Only for Schedules that Start and End on Day Off.' If the employee's default schedule crosses midnight, do not check 'Only for Schedules that Start and End on Day Off. The table below lists examples of employee schedules and shows whether the 'Only For Schedules that Start and End on Day Off' button should be checked.
Employee Default Schedule for Date of Schedule Day Off |
Status of 'Only For Schedules that Start and nd on Day off' option. |
6:00 AM - 3:00 PM |
Checked |
8:00 AM - 5:00 PM |
Checked |
12:00 PM - 8:00 PM |
Checked |
3:00 PM - 11:00 PM |
Checked |
5:00 PM - 2:00 AM |
Unchecked |
6:00 PM - 3:00 AM |
Unchecked |
7:00 PM - 4:00 AM |
Unchecked |
11:00 PM - 7:00 AM |
Unchecked |
Note: Remember, it is important that the 'Only for Schedules That Start and End on Day Off' option be checked if the employee's schedule does not cross midnight for the Schedule Date! This option is used by InfiniTime to differentiate between Schedules that cross midnight and those that do not.
Employees will eventually call in sick and request changes to their schedule or time off. These requests can be processed by entering temporary schedule changes from the Schedule GANNT Chart. This method of editing schedules is often used in conjunction with Department, Employee, Shifts, or Policy Schedules. The Department, Employee, Shift, and / or Policy Schedules are used to define a default schedule which repeats according to a regular cycle. Employee schedules can then be altered from within the GANNT Chart on a day by day basis without affecting the original schedule.
Remember, one of the main benefits provided by scheduling is the ability to track employee performance through exceptions such as Absent, Tardy, Late Departure, Early Departure, etc. Some companies utilize a point system based to easily track employee performance and to aid in decision making when promotions or lay offs are necessary. For this reason it is important for schedules to accurately reflect the hours worked by employees in order to avoid false exceptions. Common reasons and methods for making temporary changes to employee schedules and eliminating undesired exceptions are listed below:
In some cases employees may request an alternate schedule for special events such as a child’s birthday or family trip. Follow the steps below to change the schedule for an employee for a specific day:
In some cases it may be necessary for employees to leave the office during the work day for a family emergency or a doctor’s visit. In this scenario it is often best to change the schedule to match exactly what the employee punched in order to avoid exceptions. Follow the steps below to set the schedule appropriately to avoid undesired exceptions:
In some cases employees may call in Sick. Employees may receive paid or unpaid sick time if they do not arrive for work. If employees do not punch in or out on a day they are scheduled to work they will receive an absent exception. The best way to remove the exception is to insert an Other Activity Entry such as ‘Paid Sick Time’, ‘Unpaid Sick Time’, or 'Personal Time' for the day from the Timecard Table using Quick Punch. In order to remove the Absent Exception, the Other Activity Type must be set to 'Count as Day Worked' as shown below.
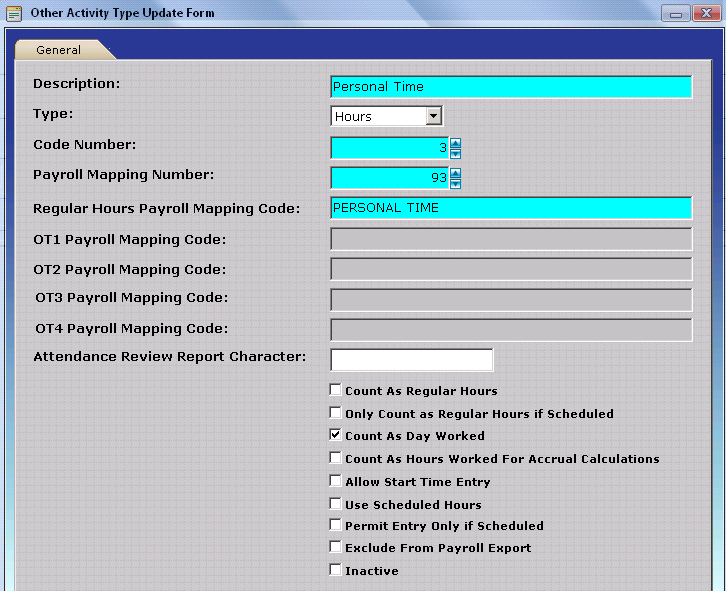
In some cases employees may be authorized to work off site with a customer or from home where they are unable to punch in. If employees do not punch in or out on a day they are scheduled to work they will receive an absent exception. The best way to remove the exception is to insert punches manually to match their working hours or insert other activity from the Timecard Table. The best way to remove the exception is to insert an Other Activity Entry such as ‘Paid Sick Time’, ‘Unpaid Sick Time’, or 'Personal Time' for the day from the Timecard Table using Quick Punch. In order to remove the Absent Exception, the Other Activity Type must be set to 'Count as Day Worked' as shown above.
Availability Types make it possible to define hours during which employees are available to work. In this way the ‘Find Available’ feature can be used to identify employees who are available during a specific time period. For example, if a Restaurant Manager needed additional staff on a busy Friday evening the ‘Find Available’ feature could be used to quickly identify employees who have indicated they are available during the evening hours on Friday. Steps for configuring Employee Availability Types are outlined below.
|
Employee Name |
John Smith | |
| Weekday | Start Time | End Time |
| Monday | 6:00 AM | 10:00 PM |
| Tuesday | 6:00 AM | 5:00 PM |
| Wednesday | 6:00 AM | 10:00 PM |
| Thursday | 6:00 AM | 5:00 PM |
| Friday | 6:00 AM | 10:00 PM |
| Saturday | 6:00 AM | 10:00 PM |
| Sunday | 2:00 PM | 10:00 PM |
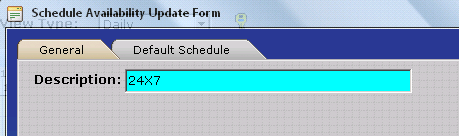
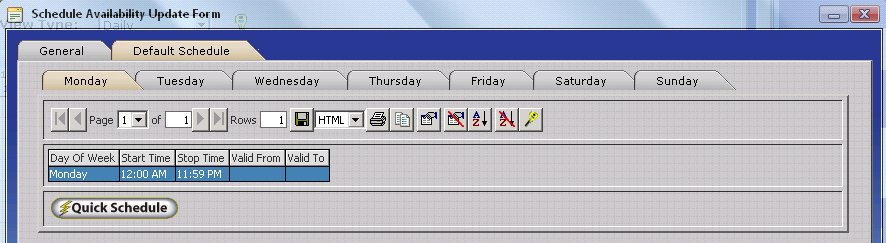
If multiple employees are available during the same hours a single availability type can be used to represent the all of the employees. To Configure an Availability Type:
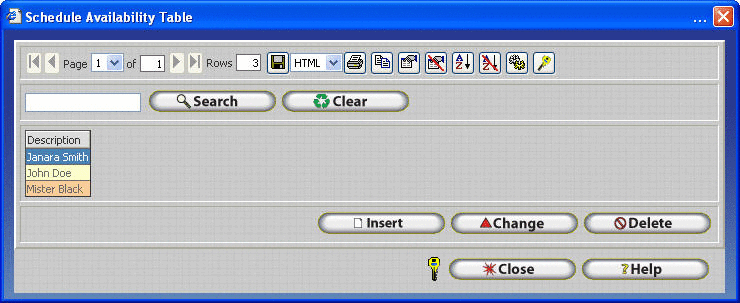
Description - This is the name given to an Availability Schedule, as entered on the Schedule Availability Update form.
Insert - Opens the Schedule Availability Update form so you can create a new availability template.
Change - Opens the Schedule Availability Update Form of the record selected so you can edit the availability template.
Delete - Deletes the selected record from the Schedule availability Table. Schedule availability templates cannot be deleted if they are assigned to an employee. If an availability record should be deleted it cannot be restored.

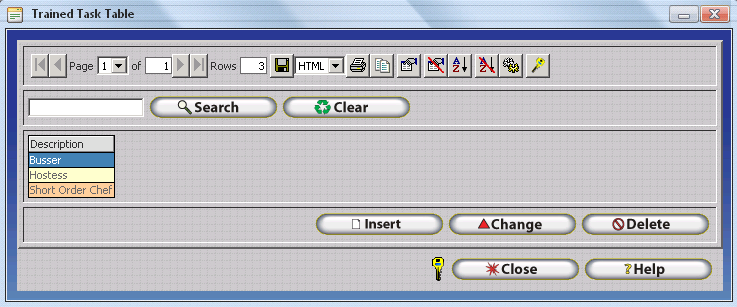
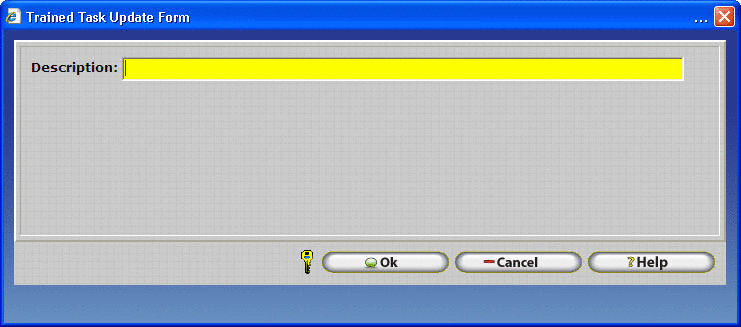
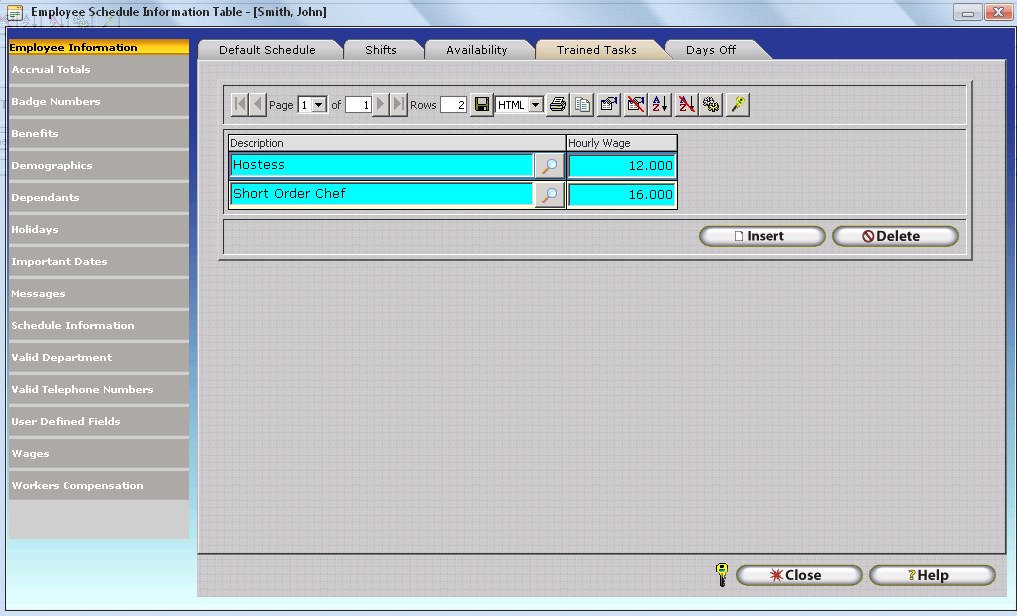
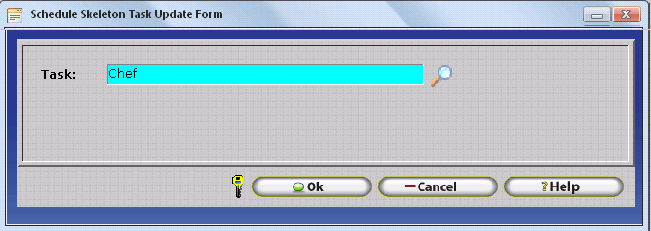
Trained Tasks make it possible to define tasks regularly performed within your organization and indicate which employees have been trained for each task. Through use of availability and Trained Tasks managers can search for employees who are available and trained for the specific position they need to fill.
The Find Available Button on the GANNT Chart can be used to quickly identify employees available to work during a time period who are trained for specific tasks. Find available is best suited to environments where scheduling is based on current activity levels such as a restaurant or where personnel are often called in on short notice. Find available schedules employees for a selected time range one day at a time. Use of the Find Available feature requires the following:
After these items have been configured Find Available can be used to identify employees who are available to work during a given time period and who are assigned to indicated tasks. Employees who are already scheduled for the time period and date selected will not be shown in the list of available employees.
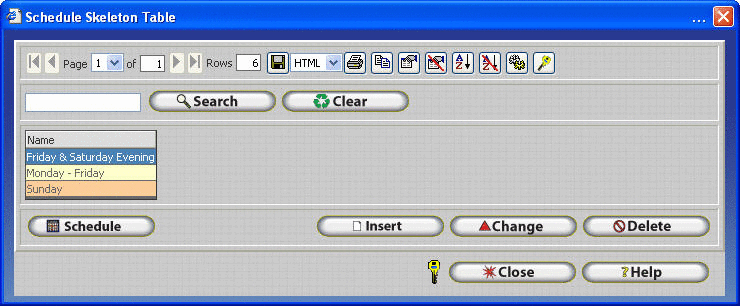
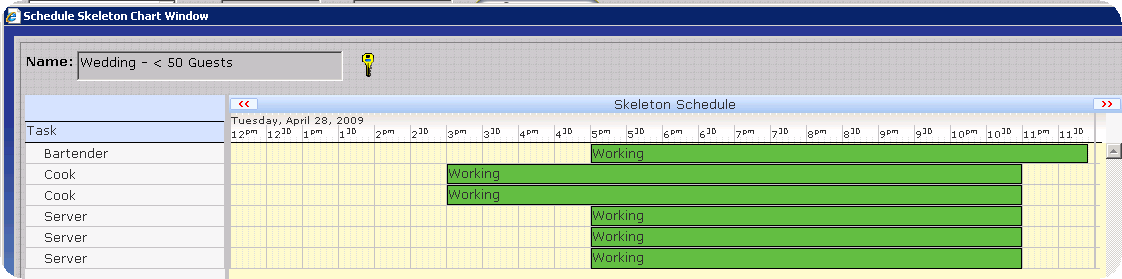
Schedule - Opens the Schedule Skeleton Chart Window, which is used to assign trained tasks and schedule slots to the skeleton.
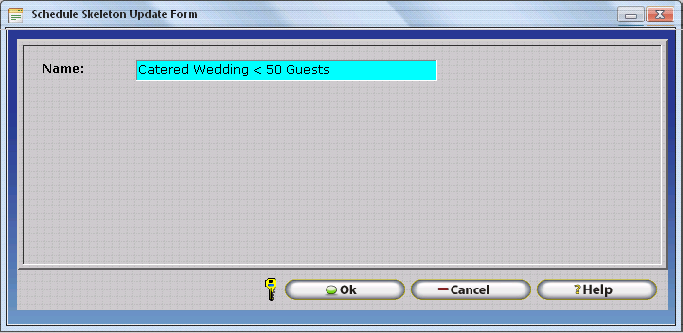
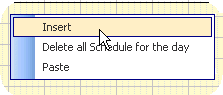
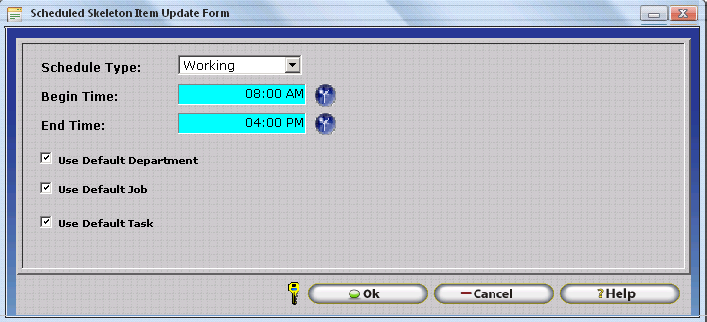
Insert - Opens the Schedule Skeleton Update Form, used to create a new Schedule Skeleton. Trained Tasks and Schedule Slots must then be assigned to the skeleton before it can be used to schedule employees.
Change - Opens the Schedule Skeleton Update Form for the selected skeleton. The user may then edit the Schedule Skeleton Description as desired.
Delete - Deletes the selected Schedule Skeleton. If a Skeleton is deleted, it will no longer be available for scheduling purposes.
Schedule Skeletons can be used to create a basic scheduling template which matches the requirements of your organization. Skeletons are designed to represent a specific day or scenario, listing all positions to be filled and the hours which they are required. After skeletons and related requirements have been configured they can be used to quickly configure schedules on a day to day basis according to anticipated staffing requirements. The following tasks must be performed before attempting to configure Skeletons:
ABC Catering makes staff available to weddings, birthdays, and other events based upon the number of people in attendance. ABC Catering has configured skeletons to describe the following scenarios:
| Number of Guests | Labor Requirements |
| < 50 Guests | 3 Servers, 2 Cooks, 1 Bartender |
| 50 - 100 Guests | 8 Servers, 3 Cooks, 1 Bartender |
| 100 - 250 Guests | 12 Servers, 4 Cooks, 2 Bartenders |
| 250 - 500 Guests | 20 Servers, 5 Cooks, 3 Bartenders |
NOTE: It is important to keep in mind Skeletons do not support schedules that cross midnight. Schedules that cross midnight must be inserted directly into the Schedule Gannt Chart using Quick Schedule.
Once Skeletons, Trained Tasks, and Availability Types have been configured appropriately the Use Skeleton feature will be displayed on the Schedule GANNT Chart. Scheduling by Skeletons involves four general steps as outlined below.
When scheduling employees using Skeletons you may find an employee you wish to schedule does not show up in the lower pane. The following requirements must be met for an employee to be displayed as available: