InfiniTime 7.08 includes several tools and utilities for use by Software Administrators for typical tasks such as:
Restoring all InfiniTime Time & Attendance Data from a Single File Backup Created by the InfiniTime Software
Undoing Accidental or Unintentional User Actions
Reviewing Raw Punch Data as collected from Time & Attendance Hardware Devices
Upon completion of the Installshield Wizard, the 'InfiniTime 7.0' and 'Client Shortcuts' folders will be created on the desktop of the InfiniTime Server. The InfiniTime 7.0 Folder includes shortcuts to the InfiniTime Modules for use from the InfiniTime Server while the 'Client Shortcuts' folder includes shortcuts to the InfiniTime Modules for use from client machines on the Local Area Network.
As a web application accessed through a Web Browser, no installation is required for workstations to access the InfiniTime Software from the Local Area Network. To provide users with access to InfiniTime, simply copy the 'Client Shortcuts' folder from the InfiniTime Server's desktop to all workstations which require access to the InfiniTime Software.
| Related Links |
| InfiniTime Deployment Options |
| InfiniTime Modules |
| Providing Client Machine Access to InfiniTime |
InfiniTime 7.0 includes a complete backup and restore system designed to minimize downtime should hardware or software failures occur. Inception Technologies recommends use of the automatic backup feature in order to keep your InfiniTime Database backed up on a routine basis. Third Party System Backup utilities are not recommended as a substitute for the InfiniTime Backup as Oracle Database files cannot be backed up in a reliable fashion unless specific Oracle Utilities are utilized. It should also be noted that InfiniTime backup files can only be created and restored on the InfiniTime Server.
For this reason, simply copying the main program file location (C:\Inception\ by default) is not a substitute for the internal InfiniTime backup system. An Oracle Database cannot be restored from the program files alone.
The directory where the backup (*.ITB) file is created is “C:\Inception\InfiniTime\InfiniTime7\Backup” assuming the default directories were used during installation. This directory should be routinely copied to removable storage in order to safeguard your data.
Open the Manager module on the InfiniTime server and hover your mouse over “File”
Click on “Backup / Restore”.
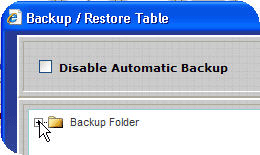
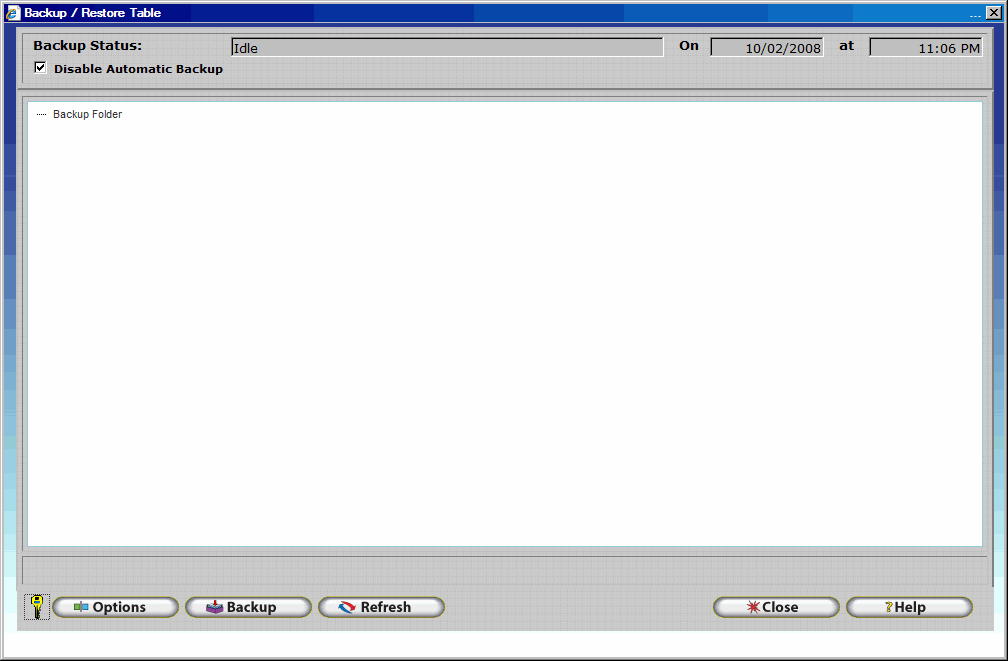
A new window as pictured below entitled “Backup/Restore Table” will open. Click on the “Backup” button at the bottom as shown to start the backup.
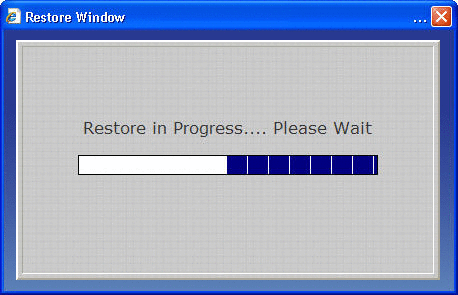
When you click on “Backup” the process begins and you’re screen will look like the picture below.
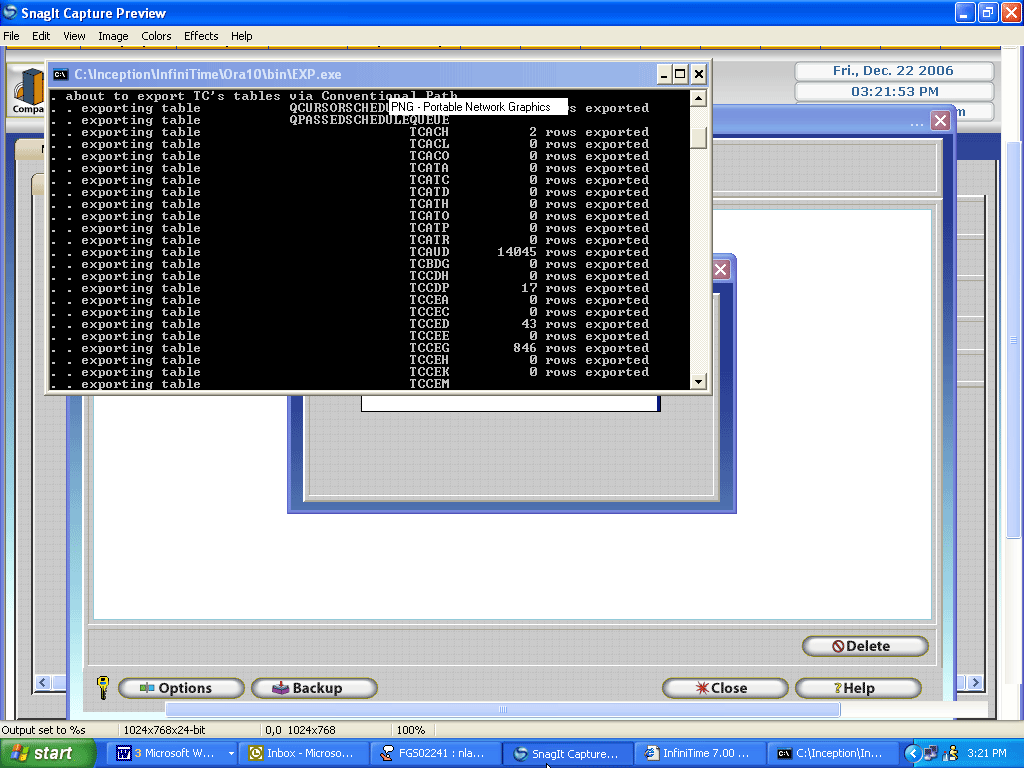
After the DOS window is terminated, the “Creating Backup” window will remain until the backup is complete.
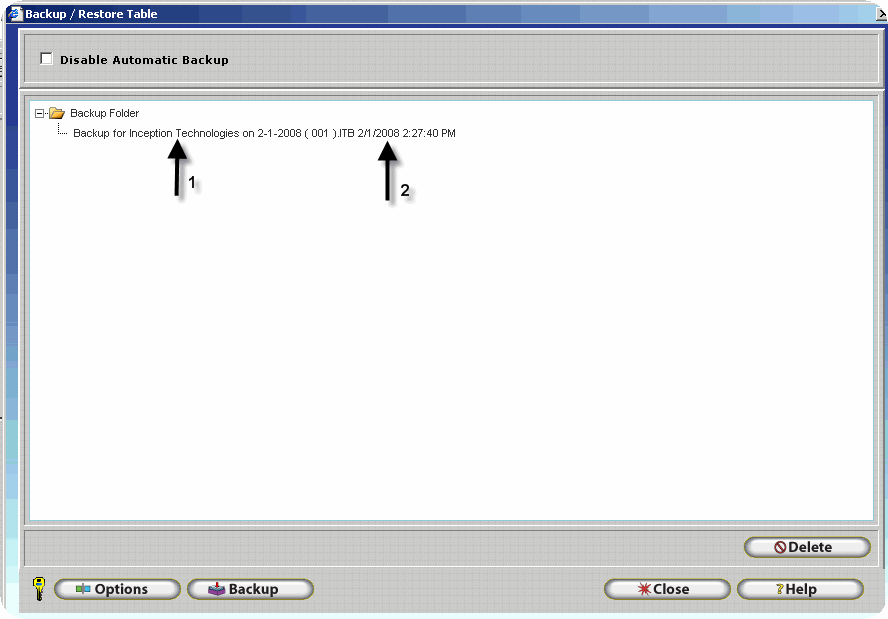
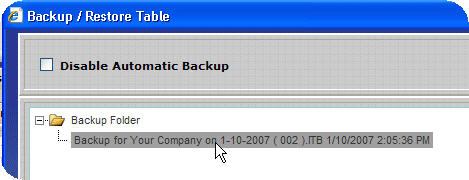
After the backup finishes the “Backup / Restore Table” will come back on top. You will now see a folder titled “Backup Folder” in the window. There will also be a file under the folder, this file is the backup file. In the picture below, the number 1 arrow shows you’re companies name and the number 2 will show you the date and time the backup was created. Should you ever need to restore your database, you will know which one to choose by date and time. Now you can click the close button and continue with program usage.
InfiniTime Backup includes four options that can be used to configure the automatic backup procedure. Details are provided below.
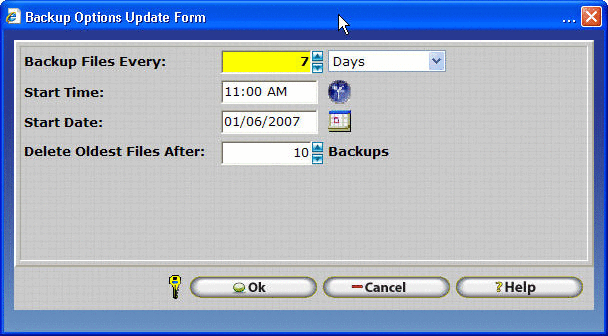
Backup Files Every – Specify the amount of days between backups. InfiniTime will perform the first automatic backup on the start date. Subsequent backups will be performed after a certain period of time specified by this quantity. The drop down box allows the user to specify between days or weeks.
Start Time – If enabled, Automatic backup will execute at time set in this box.
Start Date –Automatic backups will begin on this date, at the time specified in the Start Time field.
Delete Oldest Files After – InfiniTime will continue creating backup files according to the defined schedule until the number of backups reach the amount specified in this field. The oldest backup will then be deleted as a new file is created.


InfiniTime Backup files can be removed from the InfiniTime Backup folder by selecting them from the backup list and clicking the delete button.


InfiniTime Backup files can be e-mailed from the backup window itself by clicking on the Email button while a backup is highlighted. Follow the instructions below.

![]()

| Related Links |
| InfiniTime Server SMTP Email Configuration and Troubleshooting |
InfiniTime provides for initiating a backup of the InfiniTime database from a client machine which eliminates the need to access the InfiniTime Server.
To Create a Backup from a Client Machine:
Open the Manager module on the server and click on File.
Click on Backup / Restore.
The Backup / Restore Table will be displayed. When viewed from a client machine a Backup Status Indicator is displayed on the top of the window as shown. Click on Backup to start a backup.
The Last Backup Date and Time will be cleared which instructs the InfiniTime Housekeeping Service to begin taking a backup.

Clicking Refresh at the bottom of the Backup / Restore Table will display the current backup status. The Backup Status will return to Idle and the Last Backup Date and Time fields will be filled when the backup is complete.
Client Initiated Backup In Progress:

Client Initiated Backup Complete:

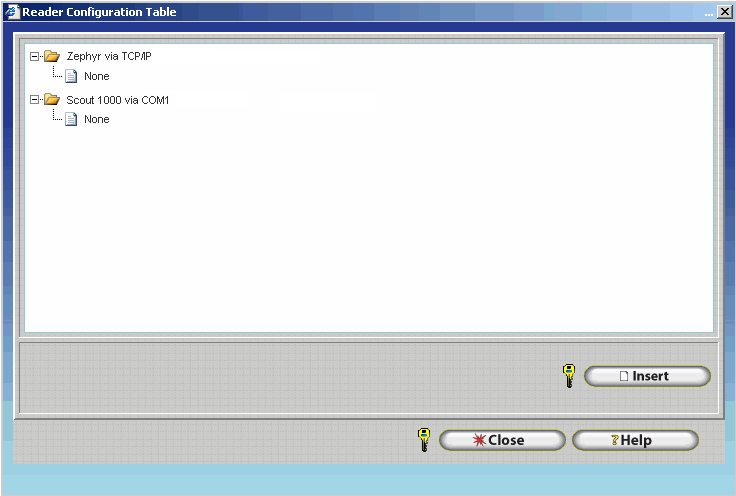
The reader configuration table lists all devices that are connected to the InfiniTime software. The reader configuration table provides a convenient location for testing device connectivity, updating reader programming, and updating employee data contained in a reader’s database. Before a clock can be used to poll timecard activity, the clock must be configured. Detailed configuration and installation instructions are available for each InfiniTime compatible time collection device.
Accessing the Reader Configuration Table
Click on Lookups
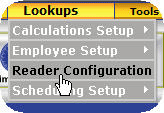
Click on Reader Configuration
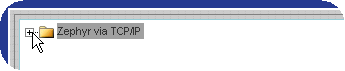
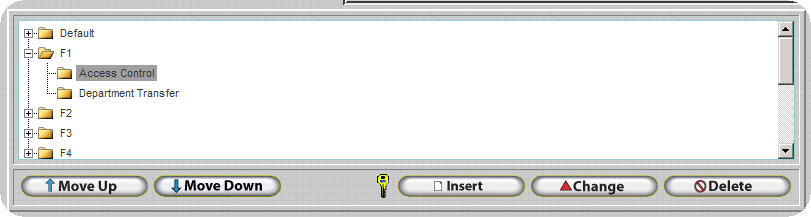
The Reader Configuration Table will open. The reader configuration table is organized in a tree structure similar to that used by Windows Explorer. A separate folder, or reader type entry, is displayed for each hardware model according to its connection type. In this way readers of the same model and connection type are grouped together. There are two steps to configuring a reader within the InfiniTime Application. First the Reader Type entry must be defined. By default, clicking insert will open the reader configuration update form, making it possible for the user to specify the type and connection method for their readers. When this information is saved the reader type entry is created. Two examples of reader entry types are shown below.
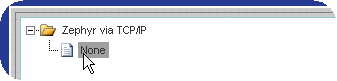
After a reader entry type has been created a reader address entry must be defined. To insert a reader address entry follow the steps below.
1.) Expand the Reader Type Entry by clicking on the plus sign.
2.) Click on None and Click Insert to open the Reader Configuration Update Form.
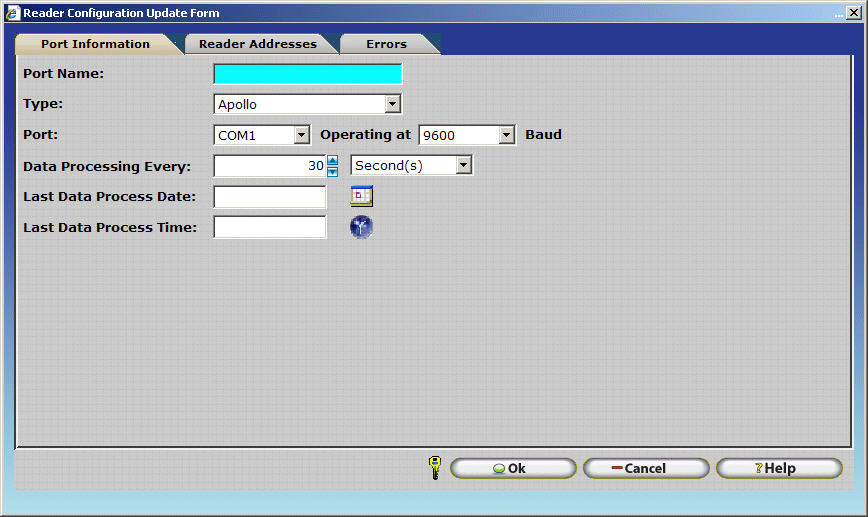
Port Name: Enter a name for your clock. This name should be recognizable and descriptive, as it will be displayed in the Reader Configuration Table representing the record for your clock.
![]()
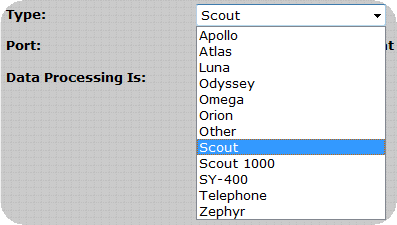
Type: Select your Clock Model from the models in the list. NOTE: A scout 1000 requires a different configuration than other Scout Models. Select the Scout 1000 type if you have a Scout 1000.
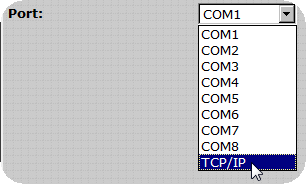
Port: Select the port that corresponds to your reader. Select TCP/IP if you are using an Ethernet connection to communicate with your clock.
Poll From File: Some readers such as the Luna and Zephyr support the Poll From File Feature. Using the menu at the clock punches can be downloaded to a USB Thumb drive and transferred to a PC. This is especially useful for sites without a network or internet access. Refer to Hardware Documentation Zephyr or Hardware Documentation Luna for additional information on configuring and using poll from file.
Baud Rate: Select the communication baud rate that corresponds to your reader. The same Baud Rate must be set on the reader and the software in order for the device to communicate successfully. Refer to the section of this document that corresponds to your specific timeclock model for more information.
Default Baud Rate
Older Synel Readers |
9600 |
New Synel Readers |
19200 |
Direct Connect Scout* Hand Readers |
9600 |
Scout* Hand Readers (Modem) |
9600 |
*Refers to All Scout Models (1000 - 4000)
Data Processing Every: Here you can decide how often you want the data to be processed. The automatic setting will process and post employee activity as soon as it is retrieved from the reader. If you want to process the data according to a specific time interval you can select an increment of time in which to process the data. If you select an increment of time the data that is polled will not be processed until the time selected. The data is stored in the polled information and then once the time comes to process the data is then when it will show in the activity of the employee.
Note: Automatic is generally the preferred setting for Data Processing. In this way employee timecard activity is automatically processed when it is polled from the reader.
Last Data Process Date: Displays the date on which data was last processed.
Last Data Process Time: Displays the time at which data was last processed.
The Reader Address Update form, as shown when inserting a new reader configuration or changing an existing reader configuration, is connection method and clock specific. The information available for configuration on the Reader Address Update form changes according to the clock type and connection method selected. This setup eliminates unnecessary information within the Reader Address Update form and assists users with configuring options specific to their chosen clock model and connection type. The following tables show which configuration settings are available according to connection and clock type.
Reader Type |
Apollo |
Atlas |
Odyssey |
Omega |
Orion |
Plus |
Scout |
Scout 1000 |
SY-400 |
Connection Method |
Direct |
Direct |
Direct |
Direct |
Direct |
Direct |
Direct |
Direct |
Direct |
Access Control Settings |
X |
X |
X |
X |
X |
|
X♦ |
|
X |
Bell Schedules |
X |
X |
X |
X |
X |
|
X♦ |
|
X |
Communication Errors |
X |
X |
X |
X |
X |
|
X |
X |
X |
General - TCP/IP Tab |
|
|
|
|
|
|
|
|
|
Synel Options |
X |
X |
X |
X |
X |
|
|
|
X |
Scout Options |
|
|
|
|
|
|
X |
X |
|
♦Scout 2000 is not compatible with access control or bells.
Reader Type |
Apollo |
Atlas |
Odyssey |
Omega |
Orion |
Scout |
Scout 1000 |
SY-400 |
Connection Method |
Modem |
Modem |
Modem |
Modem |
Modem |
Modem |
Modem |
Modem |
Access Control Settings |
X |
X |
X |
X |
X |
X♦ |
|
X |
Bell Schedules |
X |
X |
X |
X |
X |
X♦ |
|
X |
Communication Errors |
X |
X |
X |
X |
X |
X |
X |
X |
General - TCP/IP Tab |
|
|
|
|
|
|
|
|
Synel Options |
X |
X |
X |
X |
X |
|
|
X |
Scout Options |
|
|
|
|
|
X |
X |
|
♦Scout 2000 is not compatible with access control or bells.
Reader Type |
Apollo |
Atlas |
Odyssey |
Omega |
Orion |
Scout |
Scout 1000 |
SY-400 |
Connection Method |
TCP/IP |
TCP/IP |
TCP/IP |
TCP/IP |
TCP/IP |
TCP/IP |
TCP/IP |
TCP/IP |
Access Control Settings |
|
X |
X |
|
X |
X♦ |
|
X |
Bell Schedules |
|
X |
X |
|
X |
X♦ |
|
X |
Communication Errors |
X |
X |
X |
X |
X |
X |
X |
X |
General - TCP/IP Tab |
X |
X |
X |
X |
X |
X |
X |
X |
Synel Options |
X |
X |
X |
X |
X |
|
|
X |
Scout Options |
|
|
|
|
|
X |
X |
|
♦Scout 2000 is not compatible with access control or bells.
General Reader setup differs depending on the clock model and connection type. For this reason, two explanations of General Reader setup are provided. One for the TCP/IP Communication Method and one for the Direct and Modem Connection Communication Methods.
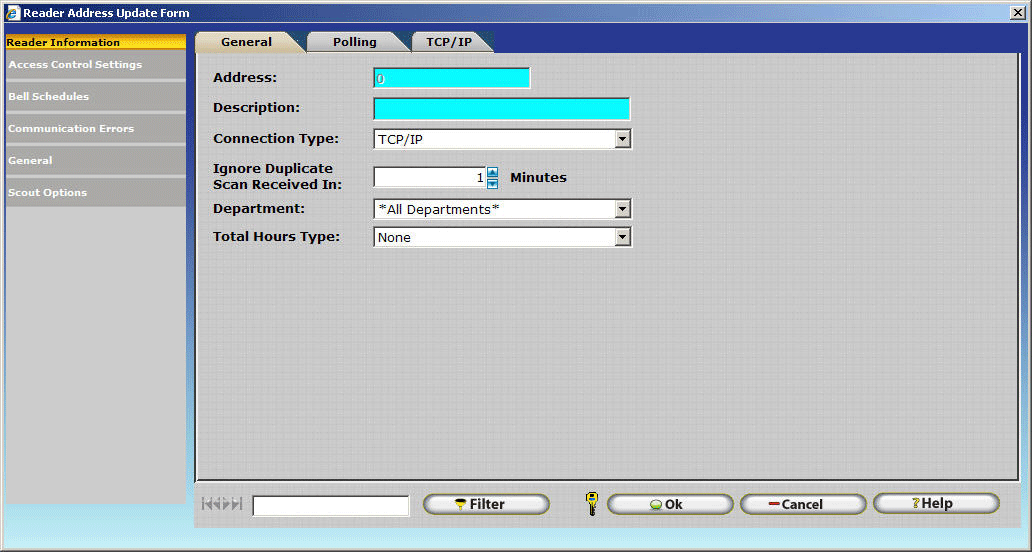
Address: Enter the Reader Address assigned to the clock during setup. Refer to the section of this document that corresponds to your specific timeclock model for setup instructions.
Description: Enter a name for your clock. This name should be recognizable and descriptive in nature. It will be displayed in the Reader Address Configuration Table representing the Reader Address Configuration Record for your clock. It is important to note that each clock will generally have only one Reader Address entry unless they are arranged in a daisy chain configuration with multiple readers on one communications port.
Connection Type: TCP/IP is the only option available in this drop down as TCP/IP was previously specified as the connection type.
Ignore Duplicate Scans Received: InfiniTime can ignore multiple scans for a single employee within a specific time window. Enter the time window, in minutes, for duplicate scans should be ignored.
Department: Many companies purchase multiple readers and locate them throughout their facility for use with a single department. Selecting a specific department from this drop-down menu will cause InfiniTime to associate all punches from this reader to the selected department. All Departments are selected by default. Timecard Activity is automatically associated to an employees default department when All Departments is selected.
Total Hours Type: Specify the Total hours type that will be displayed for viewing on the reader.
NOTE: Selecting Weekly or Pay Period can quickly fill the memory on most timeclock models. It is important to poll employee timecard activity often if either of these settings is selected.: Enter the Reader Address assigned to the clock during setup. Refer to the section of this document that corresponds to your specific timeclock model for setup instructions.
** Synel Badge Readers Only **
The following items will only be displayed if the clock type you have selected is a Synel Badge Reader. (Apollo/Atlas/Odyssey/Omega/Orion/Plus/SY 400)
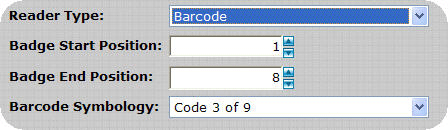
Reader Type: Select the appropriate badge reader type that corresponds to the type of badge reader installed in your Synel clock. Choices are Barcode, Magstripe, or Proximity depending on reader model.
Barcode Badges: Barcode badges are recognizable by the large barcode symbol on the front of the card.
Magstripe Badges: Magstripe badges are recognizable by the magnetic strip on the back of the card, similar to the strip found on the back of a credit card.
Proximity Badges: Proximity badges have no identifiable external markings. To clock in or out they are simply passed in front of a compatible terminal.
Badge Start Position: Defaults to 1. Choose the appropriate starting position for use with your badges. This setting generally does not need to be altered for Magstripe or Barcode Badges.
Badge End Position: Defaults to 8. Choose the appropriate end position for use with your badges. This setting generally does not need to be altered for Magstripe or Barcode Badges.
Barcode Symbology: Choose the appropriate barcode symbology for use with your badges. All badges sold by Inception Technologies use the default barcode symbology Code 3 of 9. Some customers have distributed badges to their employees using a different barcode symbology. In many cases, depending on badge size and make, this setting allows these badges to be utilized with the InfiniTime system.
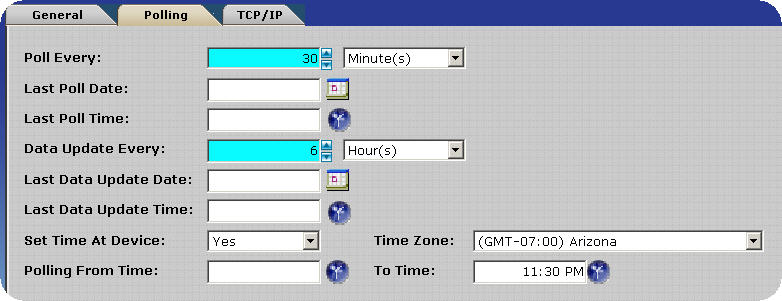
Polling Interval: Choose how often you would like to poll timecard activity from your reader. Minimum polling times are displayed below according to clock model.
Reader Type |
Apollo |
Atlas |
Odyssey |
Omega |
Orion |
Plus |
Scout |
Scout 1000 |
SY-400 |
Minimum Polling Interval |
30 Seconds |
30 Seconds |
30 Seconds |
30 Seconds |
30 Seconds |
N/A |
5 Seconds |
5 Seconds |
30 Seconds |
Reader Type |
Athena |
Juno |
Luna |
Thor |
Zephyr |
Minimum Polling Interval |
5 Seconds |
5 Seconds |
5 Seconds |
5 Seconds |
5 Seconds |
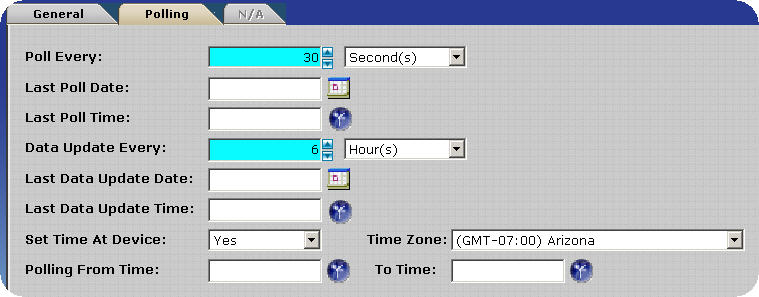
Last Poll Date: Displays the date on which the clock was last polled.
Last Poll Time: Displays the time at which the clock was last polled.
Data Update Interval: Choose how often you would like to update employee data to the clock. Employee data includes new employees, employee ids, and changes in employee badges as well as hour totals. This process can take as much as ten minutes, during which employees will not be able to punch. Generally this is only required once at the beginning or end of the work day according to user preference. During software setup users may wish to manually update their clocks in order to test employee information rather than waiting for the clock to automatically update.
Last Data Update Date: Displays the date on which the clock was last updated.
Last Data Update Time: Displays the time at which the clock was last updated.
Set Time At Device: Causes the InfiniTime software to update the time on the reader according to the system clock. Selecting no disables this feature.
Time Zone: This setting is used to set the time at the reader. Ensure time zone chosen corresponds to the time zone where the clock is located. This is often used for TCP/IP or modem clocks in a remote location relative to the InfiniTime server.
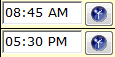
Polling From Time: This field is used in conjunction with the ‘Polling To Time’ field in order to specify a time range for polling. The reader will start polling at the Polling from time, and continue to poll according to the specified polling interval until the Polling To Time is reached. Enter the time at which the reader should start polling in this field.
Polling To Time: See Polling From Time for a detailed explanation. Enter the time at which the reader should stop polling in this field.
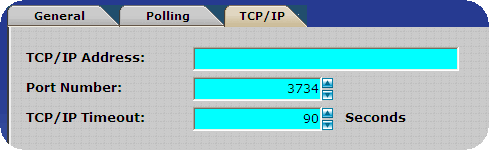
TCP/IP Address: Enter the IP address assigned to your reader. This must be a static address. Refer to the section of this document that corresponds to your specific timeclock model for more information on configuring this address within the reader.
Port Number: Enter the network communications port used to communicate with your clock. Generally, this only needs to be altered if you are positive the default port is in use by another application on your network. The same port must be set in the InfiniTimesoftware and on the reader in order for communication to be successful. Refer to the section of this document that corresponds to your specific timeclock model for more information.
TCP/IP Timeout: Specify the amount of seconds to wait before the TCP/IP connection with the reader times out. Ninety seconds is the recommended value.

Address: Enter the Reader Address assigned to the clock during setup. Refer to the section of this document that corresponds to your specific timeclock model for setup instructions.
Description: Enter a name for your clock. This name should be recognizable and descriptive in nature. It will be displayed in the Reader Address Configuration Table representing the Reader Address Configuration Record for your clock. It is important to note that each clock will generally have only one Reader Address entry unless they are arranged in a daisy chain configuration with multiple readers on one communication port.
Connection Type: When a COM port is selected on the Port Information Screen in the Reader Configuration Update form two options are available in this field. Specify whether the communications port connects directly to the clock (Direct), or if the communications port is connected to a modem, which will be used to connect to a remote clock (Modem). If Modem is selected the modem tab, as outlined below, will become available.
Note: More than one Modem clock can be polled using the same communications port and modem. A complete reader entry is required for each clock. Do not attempt to add additional Reader Address Entries to a single reader entry for each remote clock.
Department: Many companies purchase multiple readers and locate them throughout their facility for use with a single department. Selecting a specific department from this drop-down menu will cause InfiniTime to associate all punches from this reader to the selected department. All Departments are selected by default. Timecard Activity is automatically associated to an employees default department when All Departments is selected.
Total Hours Type: Specify the Total hours type that will be displayed for viewing on the reader.
NOTE: Selecting Weekly or Pay Period can quickly fill the memory on most timeclock models. It is important to poll employee timecard activity often if either of these settings is selected.: Enter the Reader Address assigned to the clock during setup. Refer to the section of this document that corresponds to your specific timeclock model for setup instructions.
** Synel Badge Readers Only **
The following items will only be displayed if the clock type you have selected is a Synel Badge Reader. (Apollo/Atlas/Odyssey/Omega/Orion/Plus/SY 400)
Reader Type: Select the appropriate badge reader type that corresponds to the type of badge reader installed in your Synel clock. Choices are Barcode, Magstripe, or Proximity depending on reader model.
Barcode Badges: Barcode badges are recognizable by the large barcode symbol on the front of the card.
Magstripe Badges: Magstripe badges are recognizable by the magnetic strip on the back of the card, similar to the strip found on the back of a credit card.
Proximity Badges: Proximity badges have no identifiable external markings. To clock in or out they are simply passed in front of a compatible terminal.
Badge Start Position: Defaults to 1. Choose the appropriate starting position for use with your badges. This setting generally does not need to be altered for Magstripe or Barcode Badges.
Badge End Position: Defaults to 8. Choose the appropriate end position for use with your badges. This setting generally does not need to be altered for Magstripe or Barcode Badges.
Barcode Symbology: Choose the appropriate barcode symbology for use with your badges. All badges sold by Inception Technologies use the default barcode symbology Code 3 of 9. Some customers have distributed badges to their employees using a different barcode symbology. In many cases, depending on badge size and make, this setting allows these badges to be utilized with the InfiniTime system.
Polling Interval: Choose how often you would like to poll timecard activity from your reader. Minimum polling times are displayed below according to clock model.
Reader Type |
Apollo |
Atlas |
Odyssey |
Omega |
Orion |
Plus |
Scout |
Scout 1000 |
SY-400 |
Minimum Polling Interval♦ |
30 Seconds |
30 Seconds |
30 Seconds |
30 Seconds |
30 Seconds |
N/A |
5 Seconds |
5 Seconds |
30 Seconds |
♦Readers using the modem connection method should not be polled more often than 4 hours.
Last Poll Date: Displays the date on which the clock was last polled.
Last Poll Time: Displays the time at which the clock was last polled.
Data Update Interval: Choose how often you would like to update employee data to the clock. Employee data includes new employees, employee ids, and changes in employee badges as well as hour totals. This process can take as much as ten minutes, during which employees will not be able to punch. Generally this is only required once at the beginning or end of the work day according to user preference. During software setup users may wish to manually update their clocks in order to test employee information rather than waiting for the clock to automatically update.
Last Data Update Date: Displays the date on which the clock was last updated.
Last Data Update Time: Displays the time at which the clock was last updated.
Set Time At Device: Causes the InfiniTime software to update the time on the reader according to the system clock. Selecting no disables this feature.
Time Zone: This setting is used to set the time at the reader. Ensure time zone chosen corresponds to the time zone where the clock is located. This is often used for TCP/IP or modem clocks in a remote location relative to the InfiniTime server.
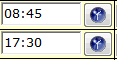
Polling From Time: This field is used in conjunction with the ‘Polling To Time’ field in order to specify a time range for polling. The reader will start polling at the Polling from time, and continue to poll according to the specified polling interval until the Polling To Time is reached. Enter the time at which the reader should start polling in this field.
Polling To Time: See Polling From Time for a detailed explanation. Enter the time at which the reader should stop polling in this field.
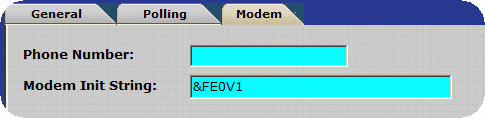
Phone Numbers: Enter the phone number, just as it would be dialed from a regular phone. Include country and area code when appropriate.
Modem Init String: A string of characters used to initialize the modem and begin a call. The default string, &FE0V1, should be sufficient in most cases.
InfiniTime™ allows you to switch departments at the reader itself, in this screen you can select which departments are allowed.
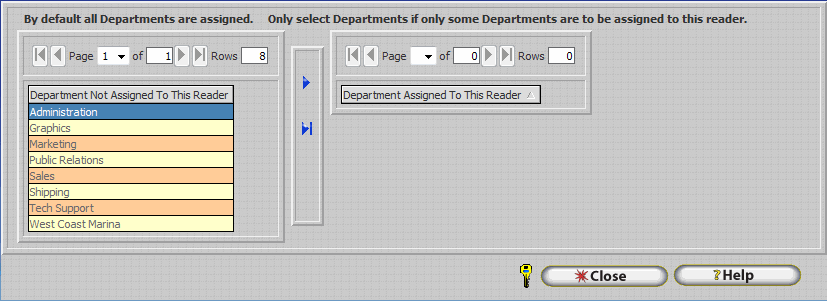
By default, all of the departments are in the left hand side and all departments are allowed to be used for transfer at the reader. If you want to assign only a few departments then you need to move those departments to the right hand side by using the arrow buttons.
If you have any departments on the right hand side assigned to the reader and you enter new ones on the software by default they will not be assigned to the reader you will have to manually assign them by moving them to the right.
InfiniTime™ allows you to enter other activity at the reader itself, in this screen you can select which activity is allowed to be entered.
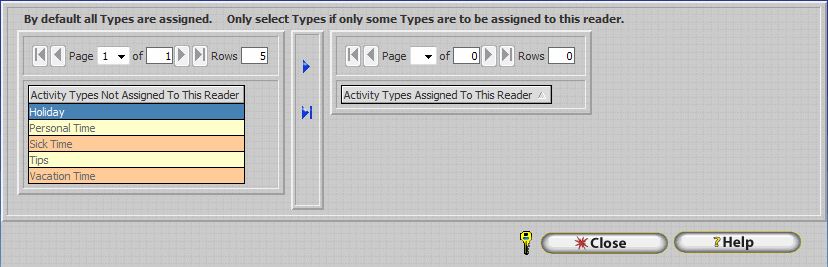
By default, if all of the activities are in the left hand side then all activities are allowed to be entered at the reader. If you want to assign only a few activities then you need to move those activities to the right hand side by using the arrow buttons.
If you have any activities on the right hand side assigned to the reader and you enter new ones on the software by default they will not be assigned to the reader you will have to manually assign them by moving them to the right.
Many InfiniTime compatible timeclocks can be used for access control purposes in order to unlock a door when authorized employees punch. Access control settings are configured in the Reader Address Table for each specific clock and are outlined below. Refer to the section of this document that corresponds to your specific timeclock model for more information about access control wiring and setup.
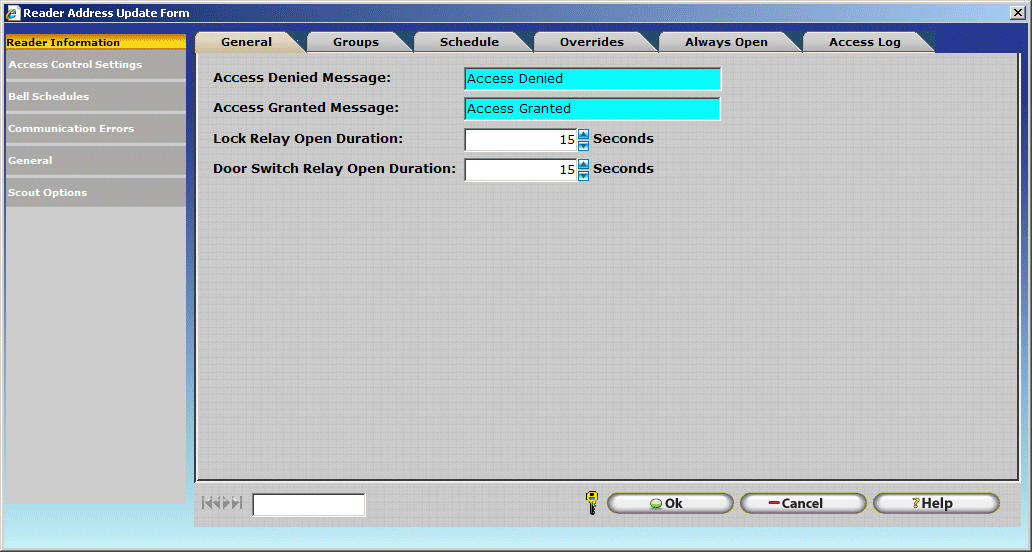
Access Denied Message: Type the message to be displayed on the clock should an employee be denied access. Access would be denied under the following conditions:
Access Granted Message: Type the message to be displayed on the clock should an employee be granted access. Access will only be granted if both of the following conditions are met:
Lock Relay Open Duration: Set the duration an attached lock relay will remain unlocked after access is granted.
Door Switch Relay Open Duration: Set the duration an attached lock relay will remain unlocked if an attached door switch is pressed.
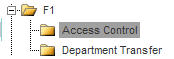
The Groups Tab is used to control what employees will be able to utilize the reader to gain access to connected entry ways.
All access control groups that have been configured will be displayed in the left side grid on the Groups Tab. No additional configuration is necessary if all groups are to be assigned to a reader. Groups should be assigned to a reader if only specific groups are authorized to access the door controlled by the reader.
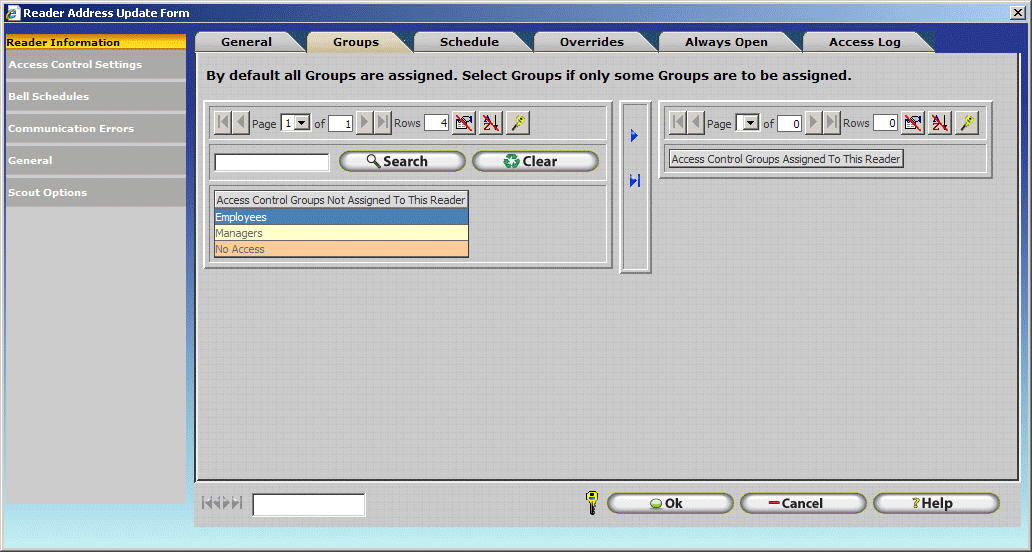
To Assign Specific Groups to a Reader:
Select the group you wish to assign to the reader. Use the controls in the center of the screen to assign a specific group to the reader as outlined below.
![]() – Assigns the selected group to the reader. You will notice that the group
will be removed from the left grid and displayed in the right grid.
– Assigns the selected group to the reader. You will notice that the group
will be removed from the left grid and displayed in the right grid.
![]() – Assigns all available groups to the reader. You will notice that all
groups will be removed from the left grid and displayed in the right grid.
– Assigns all available groups to the reader. You will notice that all
groups will be removed from the left grid and displayed in the right grid.
![]() – Removes the selected group from the reader. You will notice that the
group will be removed from the right grid and displayed in the left grid.
– Removes the selected group from the reader. You will notice that the
group will be removed from the right grid and displayed in the left grid.
![]() – Removes all selected groups from the reader. You will notice that all
groups will be removed from the right grid and displayed in the left grid.
– Removes all selected groups from the reader. You will notice that all
groups will be removed from the right grid and displayed in the left grid.
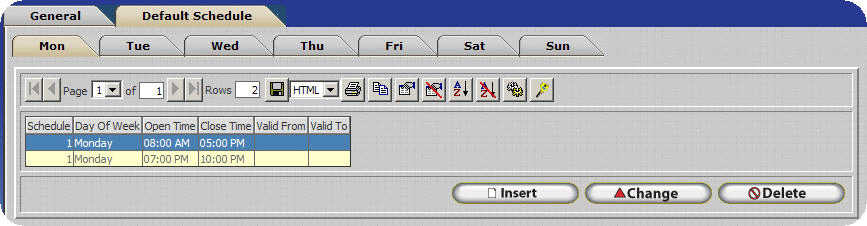
The Schedule tab can be used to specify an access control schedule specific to the reader. Schedules configured within the Reader Configuration Update form take precedence over default Access Control Group Schedules. If this schedule is configured employees will only be able to access the entryway connected to the reader during the scheduled times specified in the Reader Configuration Update form. The schedule configured in the Access Control Group Update form will be ignored.
Click Insert to configure the schedule. The employees specified, as explained later in this section, will be able to pass through the access control doorway by using the access control hardware while access is considered Open. When access is closed the specified employees will be locked out.
.gif)
Open: Enter a time to consider access to the associated doorway Open.
Close: Enter a time to consider access to the associated doorway Closed.
Valid From: Optional. Specifies the date that the schedule takes effect. Leave this field blank if you wish the schedule to take effect immediately.
Valid To: Optional. Specifies the date that the schedule expires. Leave this field blank if you do not wish the schedule to expire.
Copy: Use this button to copy schedule information entered on one day to another.
.gif)
The example above shows schedule information being copied from Monday to Tuesday, Wednesday, Thursday, and Friday. Clicking OK would copy the information.
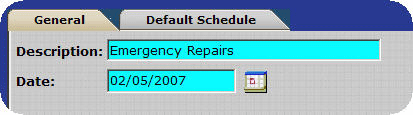
The schedule override tab permits additional schedule entries for a specific date. Keep in mind override entries will take precedence over the default schedule for that date. Refer to the section above for instructions on inserting an access control schedule.
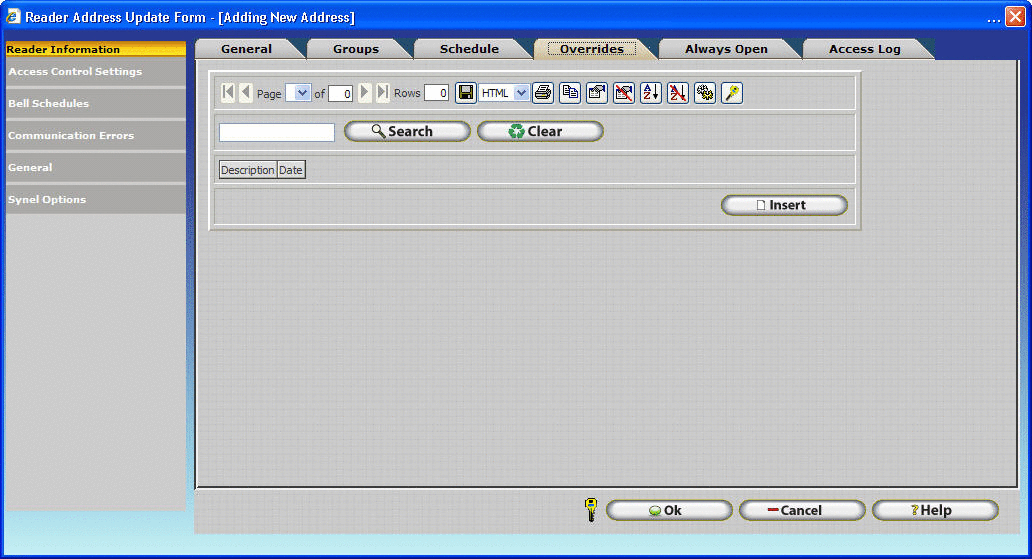
Override Example:
An access control schedule is configured to grant access for authorized employees from 8:00 AM to 5:00 PM on 2-5-07. Employees will be working in the evening from 7:00 to 10:00 pm in order to perform emergency repairs. The InfiniTime software administrator must add a schedule override with the schedule shown below in order for employees to be granted access to the warehouse entryway. Remember, the default schedule for the day will be overridden. Be sure to include the times for the default schedule and any necessary changes in the override entry.
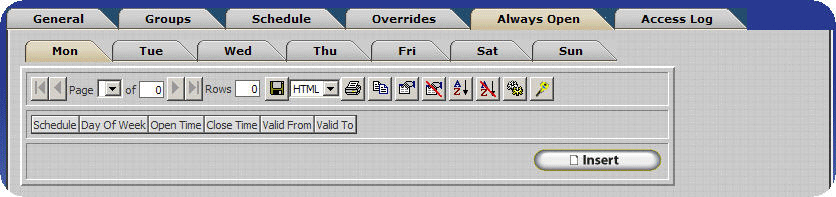
The Always Open Tab is used to configure time windows for which the connected entryway is always open. During these hours the entryway will be unlocked and authentication will not be required in order to gain entry. Depending on security requirements it may be a good idea to unlock the entryway during peak hours using this feature. Refer to the Schedule tab section of this document for information on configuring access control schedules.
Technical Note: This feature is only supported by Scout Terminals.

The Access Log Tab keeps a record of each attempt to access the attached entryway and whether access was granted or denied. Only employees assigned to the administrator security role can purge the access control log.
Bell schedules are used to control a buzzer or system of bells attached to a reader. The bells will ring at each time configured in the schedule for the specified duration.
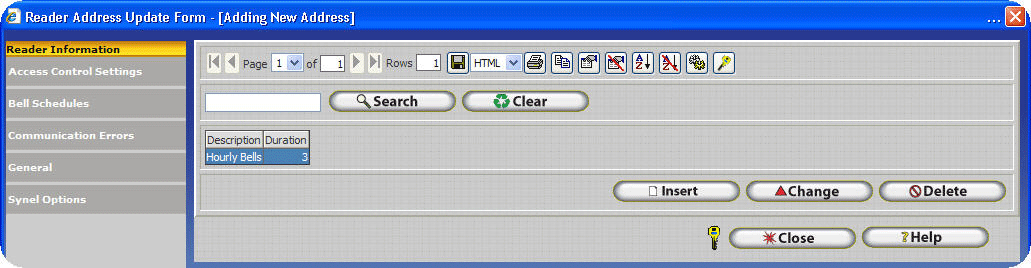
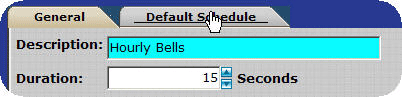
Configuring Bell Schedules
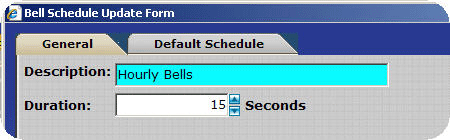

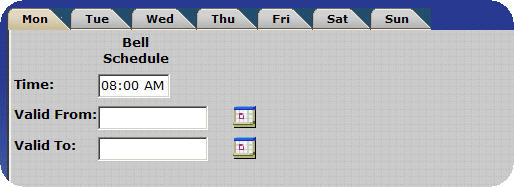
Note: Only one activation time can be configured per entry. Additional entries must be inserted to add successive bell activation times.
Valid From: Optional. Specifies the date that the bell schedule takes effect. Leave this field blank if you want the bell schedule to take effect immediately.
Valid To: Optional. Specifies the date that the bell schedule expires. Leave this field blank if you do not wish the bell schedule to expire.
Copy: Use this button to copy schedule information entered on one day to another.
The example above shows schedule information being copied from Monday to Tuesday, Wednesday, Thursday, and Friday. Clicking OK would copy the information.
The Communication errors table keeps a record of any errors encountered when communicating with the clock.
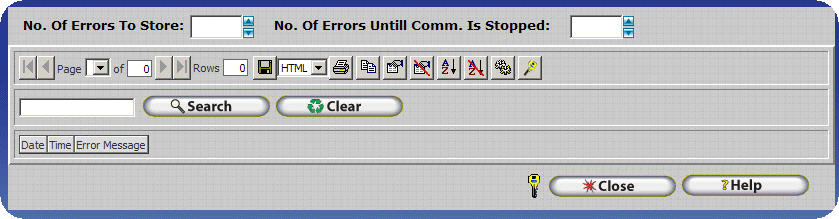
Communication Error Table Related Options
No. of Errors to Store: Enter the maximum amount of errors to store in the Communication Error Table. When the maximum number is reached the oldest errors will be removed from the list as new errors occur. Leave this blank to keep record of all errors that occur. Errors will not be removed from this table unless they are deleted manually if this field is left blank.
No. of Errors Until Comm. Is Stopped: Specify the amount of errors that can occur before the software will stop communicating with the reader. Leaving this blank will ensure communication is not automatically stopped.
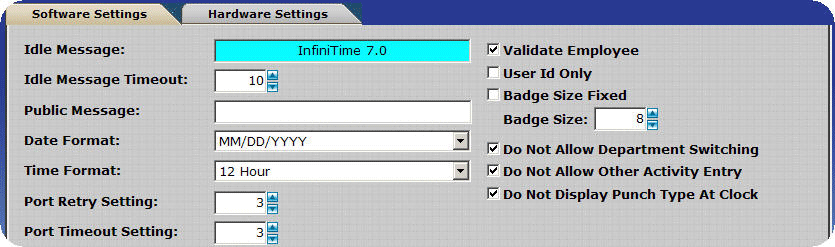
Idle Message: Enter the message that will be displayed on the reader while the reader is in the idle state.
Idle Message Timeout: Specify a duration, in seconds, for the clock to wait after an action before returning to the idle state.
Public Message: The public message is displayed after an employee successfully swipes or punches in. Specify the message, if any, that you would like to display.
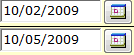
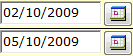
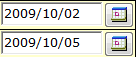
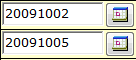
Date Format: Choose a format for the date displayed on the reader.
Time Format: Choose a format for the time displayed on the reader.
Port Retry Setting: Specify the amount of times InfiniTime should attempt to connect to the clock using the specified COM or TCP/IP port before aborting.
Port Timeout Setting: Specify the duration, in seconds, InfiniTime should wait for an acknowledgement from the clock before the connection attempt is considered a failure.
Note: The Port Retry and Port Timeout settings may need to be increased to 5 tries and 25-90 seconds respectively for use with modem clocks due to increased response times.
Modem Answer Timeout: Specify the duration, in seconds, InfiniTime should wait for the modem to answer.
Modem Connect Timeout: Specify the duration, in seconds, InfiniTime should wait for data transfer to begin before considering the connection attempt a failure.
Note: The Modem Answer Timeout and Modem Connect Timeout settings may need to be increased to 25 and 45-90 seconds respectively for use with modem clocks due to increased response times
Validate Employee: If this option is checked employee badge numbers will be compared to employees within the InfiniTime database. If no match is found the punch will not be accepted. If a match is found the employee’s name will be displayed on the clock. Should this option be unchecked the badge number read from the card will simply be displayed. Disabling this option is useful for troubleshooting badges.
Note: Access Control Requires Employee Validation. Validate Employee must be checked for use with access control systems
User ID Only: If this option is checked the reader will permit clocking in using only the employee’s user ID. The password is not required.
Badge Size Fixed: Check this option to enable a fixed badge length according to the integer entered in the Badge Size Field. Synel readers always return eight digits when a badge is swiped. If a badge size of 32 is used the last eight digits will be returned to the software. (12345678) If a badge size of 4 is used, the last four digits will be read and four leading zeroes will be returned to the software. (0001234)
Badge Size: Specify the fixed badge length you wish to use. Only integer values may be used. (IE 1,2,3…)
Do Not Allow Department Switching: Disables department switching at the clock.
Do Not Allow Other Activity Entry: Disables other activity entry at the clock.
Do Not Display Punch Type At Clock: Disables the display of Clock In or Clock out when a punch is successfully validated.
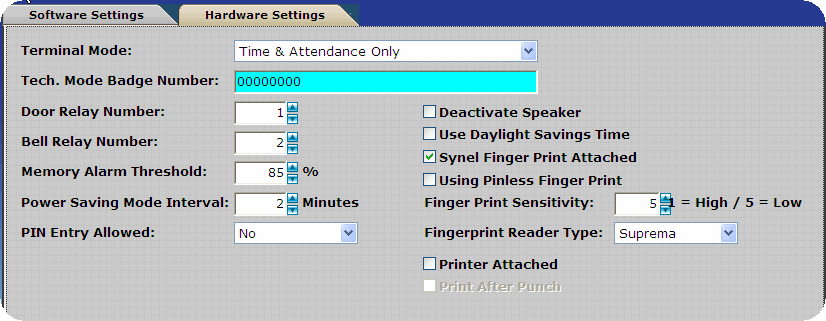
Terminal Mode: Select the mode for use with your reader. The corresponding program will be updated to the reader when the next program update occurs. It is important to understand how these settings alter the behavior of the clock. The function of the default punch method, as outlined below, changes according to the selected terminal mode.
Synel Readers
Press Enter
Enter Employee ID
Enter Password
Users may wish to manually update the reader after altering these settings in order for them to take effect immediately. Refer to the section of this document that corresponds to your specific timeclock model for more information.
Time & Attendance Only
Configures the Reader for Time & Attendance usage only. In this mode the reader cannot control entry ways or bells and can only be used for time and attendance purposes.
Time & Attendance and Access Control
Configures the Reader for Time & Attendance and Access Control. This mode is used to configure Time & Attendance as the primary purpose of the reader while still allowing access control functionality. Employees will be able to clock in & out using the default punch method, while function keys must be used for access control purposes.
Access Control Only
Configures the reader for Access Control Only. Employees punching in or swiping at this clock will be validated against the InfiniTime database, though timecard activity will not be recorded for the punches. Employees are able to access attached entry ways according to Access Control Group Schedule Configuration. Bells can also be used under this mode.
Access Control and Time & Attendance
Configures the Reader for Time & Attendance and Access Control. This mode is used to configure Access Control as the primary purpose of the reader while still allowing Time & Attendance functionality. Employees will be able to access entry ways with the default punch method, while function keys must be used for Time & Attendance purposes.
Dual Time & Attendance and Access Control
Configures the Reader to run Time & Attendance and Access Control in dual-purpose mode. This enables employees to clock in to work and unlock an entryway with a single punch.
Tech. Mode Badge Number: Enter a technician mode badge number. When a badge with this number is swiped the reader will automatically enter technician mode. Technician Mode is used to configure reader communication settings as well as other options depending on clock model.
Door Relay Number: If a door is attached to this reader, specify which relay it is connected to.
Bell Relay Number: If a bell or bell system is attached to this reader specify which relay it is connected to.
Note: Only the Odyssey (SY-780) has interchangeable relays where each relay can be used for bells or access control. All other Synel Readers can support a maximum of one relay, which can be used for bells or access control. If you do not have an Odyssey, be sure to set Door Relay Number to 1 if you are using access control. If you are using bells, be sure to set the Bell Relay Number to 1. Only the Odyssey can be used for both bells and access control.
Memory Alarm Threshold: Specify the percentage of total memory that can be filled before the Memory Alarm triggers.
Power Saving Mode Interval: Specify the number of minutes the reader will stay in normal operation before returning to power saving mode while backup battery power is in use.
PIN Entry Allowed: Sets the reader to allow ID entry only. This disables the use of badges.
Deactivate Speaker: Check this option to deactivate the reader’s internal speaker. The reader will no longer beep when keys are pressed.
Use Daylight Savings Time: Check this box to automatically alter the time at the reader according to Daylight Savings Time.
Synel Fingerprint Attached: Check this box if the reader is equipped with a fingerprint unit. This option is only available on the Odyssey .
Using Pinless Finger Print: Check this box if you want to use the pinless option of the terminal, This option will only work if your Odyssey terminal is equipped with a suprema reader. Once you have selected this option and the employees have been enrolled the templates will not be useful if you decide not to use the pinless functionality all employees must be re-enrolled.
Finger Print Sensitivity: You can set how sensitive you want the fingerprint unit to be. The lower the number the higher the sensitivity it is.
Fingerprint Reader Type: There are two types of fingerprint readers the Suprema and Bioscript readers. Only the Suprema reader can be used as pinless.
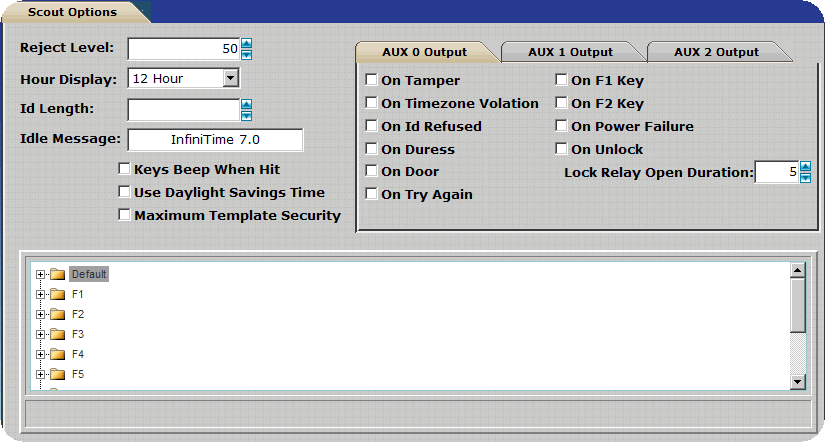
Reject Level: Controls clock sensitivity when comparing electronic hand templates to actual hand measurements taken when an employee attempts to punch. The lower the number the more sensitive the reader is to changes in employee hand geometry. Increase this setting if your employees are having issues with hand verification
Hour Display: Choose a format for the time displayed on the reader.
ID Length: Used to force a specific ID length. This option will pad the ID received from the clock with zeros until the specified number of digits is reached. For example, if an employee’s ID is 54 and the ID length is set to 4, the software will search for an employee with 0054 assigned as their employee ID. If there is no employee with 0054 as his or her employee ID the punch will be considered unassigned. Generally this option can be left blank.
Idle Message: Enter the message that will be displayed on the reader while the reader is in the idle state.
Keys Beep When Hit: Checking this box will cause the reader to beep when a key is pressed.
Use Daylight Savings Time: Check this box to automatically alter the time at the reader according to Daylight Savings Time.
Maximum Template Security: Checking this box greatly reduces the length of time required to update the Scout Reader. Hand templates for employees assigned to the clock will be updated to the Scout Clock. Any other templates stored in the scout clock will be removed.
Note: Any employees with hand templates on the clock that are not setup within the InfiniTime software will not be able to punch in if this option is enabled. It is important to ensure all employees have a record in the InfiniTime Application before enabling this option. Otherwise the employee will have to be enrolled again.
Auxiliary Output Configuration
Certain Scout models have auxiliary outputs available for various purposes. Auxiliary outputs can be used to activate a buzzer, sign or any other low voltage item.
Note: The options below only apply to the Scout 3000 and 4000 Models.
On Tamper: An internal mercury sensor detects excessive vibration or tampering with the clock housing. Checking this option enables the auxiliary output and turns on an external device, in this case most likely an alarm, when tampering is detected.
On Time Zone Violation: Checking this option enables the auxiliary output when internal RSI Time zone schedules are violated. Refer to the section of this document that corresponds to your specific reader type for more information about RSI Time Zone configuration.
On ID Refused: Checking this option enables the corresponding auxiliary output when an employee enters an ID that is not recognized by the system.
On Duress: Checking this option enables the corresponding auxiliary output when an employee presses the attached Duress Button. Refer to the section of this document that corresponds to your specific reader type for more information about wiring a Duress Button.
On Door: Checking this option enables the corresponding auxiliary output when the attached Door Button is pressed. Refer to the section of this document that corresponds to your specific reader type for more information about wiring a Door Button.
On Try Again: Checking this option enables the corresponding auxiliary output when the reader fails to properly compare a hand to an electronic template.
On F1 Key: Checking this option enables the corresponding auxiliary output when the F1 Key is pressed.
On F2 Key: Checking this option enables the corresponding auxiliary output when the F2 Key is pressed.
On Power Failure: Checking this option enables the corresponding auxiliary output in the event of power failure. The clock must have a backup battery installed in order to use this option. Without a backup battery the clock would simply lose power.
On Unlock: Checking this option enables the corresponding auxiliary output when the attached door is unlocked.
Lock Relay Open Duration: Specify the duration for the auxiliary output to remain enabled if she specified conditions should be met.
Scout 2000, 3000, and 4000 models have programmable function keys on the keypad the can be used for a broad range of purposes. Each function key can be configured with multiple functions according to user preference.
Note: All function keys are not available on each Scout Model. See the table below for available function keys according to Scout Model.
Reader Model |
Scout 1000 |
Scout 2000 |
Scout 3000 |
Scout 4000 |
Available Function Keys |
None |
F1 - F2 |
F1 - F2 |
F1 - F10 |
Unlike Synel Terminals, Scout Readers do not have preset configuration settings such as Time & Attendance Only or Access Control Only. Instead the Default action and function keys are configured to perform specific actions. The Default action, as shown below, is originally set to Time and Attendance and must be changed in order to specify Access Control as the primary purpose of the reader.
Note: Scout Readers cannot operate in Dual Time & Attendance and Access Control mode.
![]()
Available Function Key Functions
Time & Attendance Punch: Used to punch in or out of work. When this action is performed the current time and date are recorded in the Scout’s Memory. This information is sent to the InfiniTime software when the Scout is polled, where the information is entered into the Timecard Activity Table.
Department Transfer: Used to switch departments. When this action is performed employees can choose which department they would like to transfer to. Employees will automatically be clocked out of their current department and clocked into the selected department at the current time and date. These activity entries will be entered into the Timecard Activity Table when the Scout is next polled.
Other Activity Entry: Provides the ability to enter other activity entries for a specific employee at the clock.
Supervisor Override w/o Verification: Only a supervisor can perform this action. If an employee attempts to clock in to work outside of their defined schedule with lockout configured they will be unable to clock in. This feature allows a supervisor to override the last punch where a schedule lockout occurred. The employee’s hand is not required. The employee’s punch will automatically be entered into the Timecard Activity Table when the reader is next polled.
One Button Enrollment: Only a supervisor can perform this action. Provides single button enrollment, avoiding the need to use Technical Mode to access the Enrollment menu. Supervisors must place their hand, enter the new employee’s id and then have the employee place their hand in order to create an electronic hand template.
View Accrual Totals: Shows accrual totals for the employee specified. Employees must enter their ID and hand after selecting this option.
View Last Punch: Shows the last punch for the employee specified.
View In/Out Board: Displays the In and Out Board one employee at a time. Used to view employee status at the clock.
Cancel View/Review: When viewing the In and Out board or Reviewing an Employee’s Timecard the only options available are next or previous until the last line of the In and Out Board or Timecard Report is reached. This function can be used to exit the In and Out Board or Timecard Review immediately and return to the main screen.
Supervisor Override w/ Verification: Only a supervisor can perform this action. If an employee attempts to clock in to work outside of their defined schedule with lockout configured they will be unable to clock in. This feature allows a supervisor to override the last punch where a schedule lockout occurred. The employee’s hand is required. The employee’s punch will automatically be entered into the
Timecard Activity Table when the reader is next polled.
View Hour Totals: Displays hourly totals for the employee specified. An Hourly Totals type must be selected on the General Tab of the Reader Address Configuration Form in order to use this option.
Review Timecard: Shows the timecard report line by line. The Cancel View/Review function can be used to exit review mode. In order to use this option the Total Hours Type must be configured in the General Tab of the Reader Address Configuration Tab.
Print Timecard: Prints the timecard report for the specified employee on the attached printer. Only the Scout 3000 and Scout 4000 are compatible with this option.
Access Control: Used to access an attached entryway. When this action is performed the current time and date are recorded in the Scout’s Memory. This information is sent to the InfiniTime software when the Scout is polled, where the information is entered into the Timecard Activity Table.
You can place an unlimited amount of options in one function key. When you have more than two functions assigned to a key they will appear in sub directories of the key. Take a look at the example below.
When you Hit the 2 button
This chain will continue depending on how many options you have chosen for this function key.
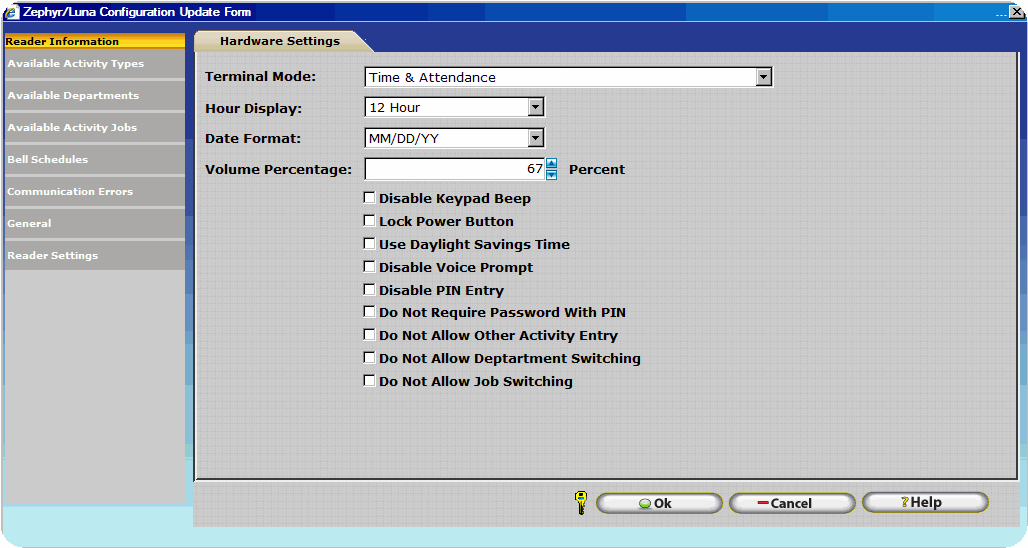
Terminal Mode: Specifies the default operation on the terminal. The Zephyr, Juno, and Luna Terminals supports only Time and Attendance.
Hour Display: Select the desired time format for display at the clock. The terminal can display time in a 12 or 24 hour format.
Date Format: Select the desired date format for display at the clock.
Volume Percentage: Specify the desired volume level for the terminal. Valid Values are 0 to 100.
Disable Keypad Beep: If this box is checked the keys on the terminal will no longer beep when pressed.
Lock Power Button: Disables the power button. Users will not be able to turn the Zephyr Terminal off using the power button.
Use Daylight Savings Time: Enables daylight savings time on the clock.
Disable Voice Prompt: Turns off all voice messages at the clock.
Disable PIN Entry - If this option is checked the password will be randomized when employee information is sent to the clock. If an employee attempts to punch in or out using the PIN Entry feature they will not be able to punch in or out as the password is a randomly generated value. This essentially locks employees out from using the PIN Entry feature. Employees will be required to punch in and out using their fingerprint.
Do Not Require Password With PIN - If this option is checked the terminal will not prompt employees for their password when using the PIN Entry feature. Employees will still be able to punch in and out using their fingerprint if desired.
Do Not Allow Other Activity Entry: Disables other activity entry at the clock.
Do Not Allow Department Switching: Disables department switching at the clock.
Do Not Allow Job Switching - If this option is checked Job information will not be sent to the Zephyr Terminal. Employees will not be able to switch between jobs.
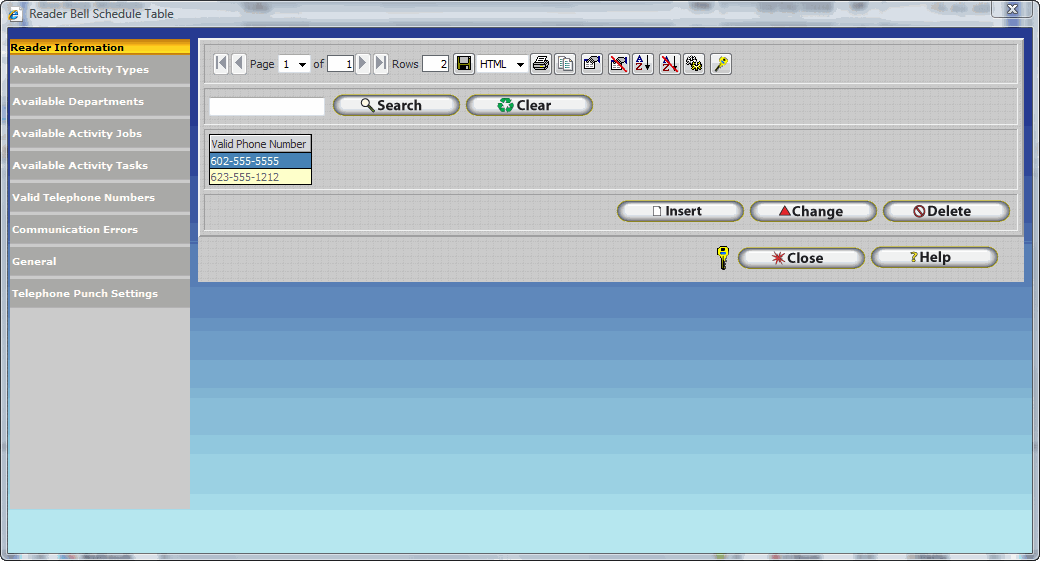
In the Valid Telephone Numbers section of the Telephone Punch Update form you can input telephone numbers that the employee can call from to clock in or out using the InfiniTime Telephone Punch. The Telephone punch system will use caller Id to see if the employee is calling from a valid telephone number, if that number is not in the list then the system will not allow the employee to clock in or out.
To insert a valid telephone number click on insert and type in the telephone number the employee can use to call in, you can input several telephone numbers here.
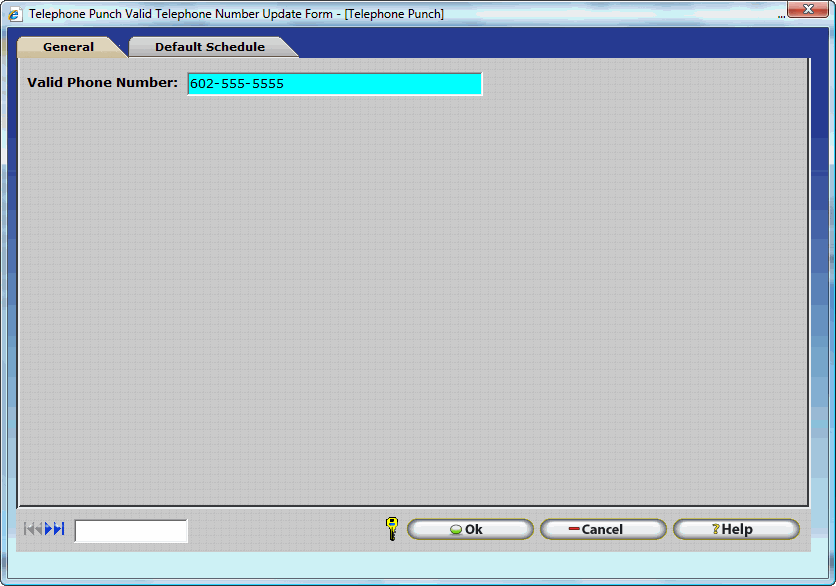
Also you can set a schedule of when an employee can call in to punch, if the employee tries to call outside of schedule the software will not accept the transaction. To set a default schedule for a particular telephone number click on the default schedule tab.
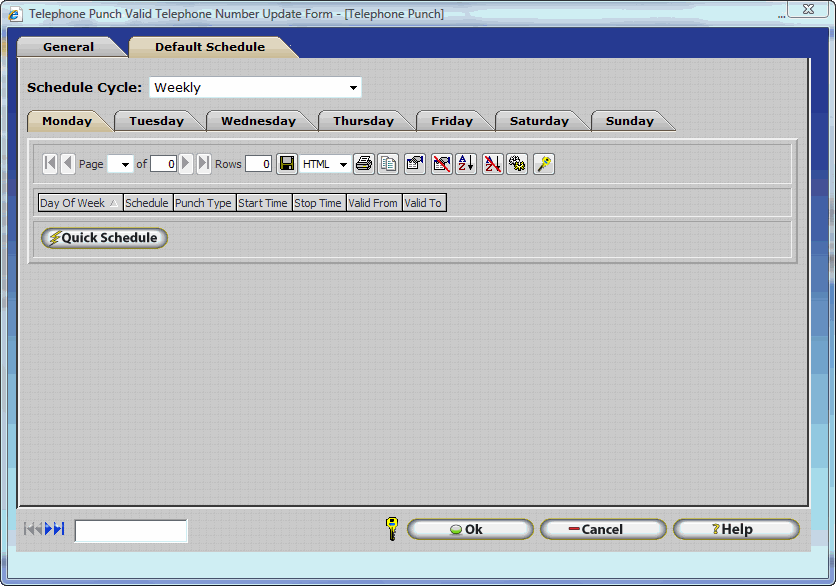
In the Default Schedule Tab you can insert a schedule of when this valid phone number is available to be used. Click on the Quick Schedule Button to create the schedule.
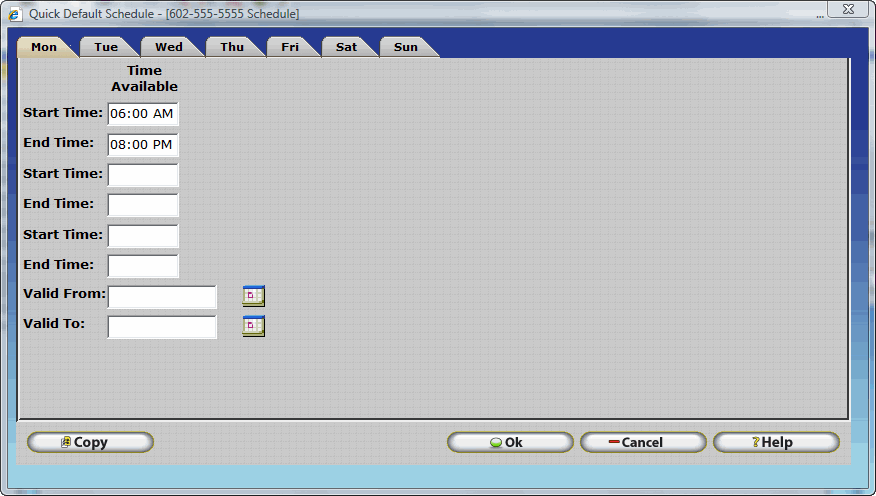
Start Time - In this field you can enter the start time of when this valid phone number is available to be used.
End Time - In this field you can enter the end time of when this valid phone number is available to be used.
Valid From - Is the date in which the schedule will start to be valid.
Valid To - Is the date in which the schedule will end being valid.
NOTE: The Valid From and Valid To fields are not required, if the fields are blank then the schedule will always be valid.
Copy Button - The copy button will copy the schedule from a particular weekday to other weekdays.
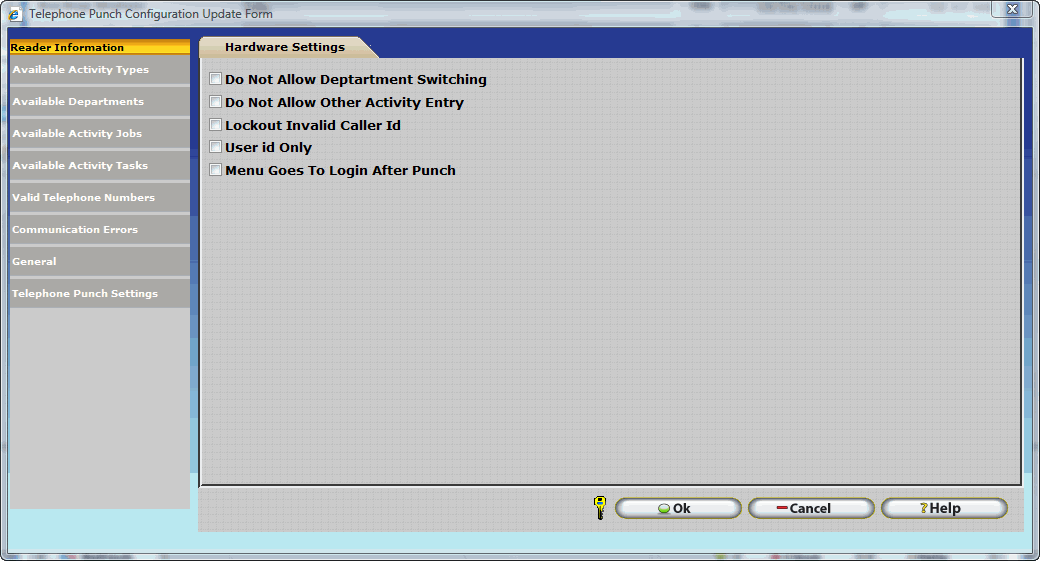
The Telephone Punch Settings allow you to set the telephone punch options:
Do not Allow Department Switching: This option will allow you to disable the employee's ability to switch departments, which means that the transaction will post the employee's default department or the department specified for the Telephone Punch.
Do Not Allow Other Activity Entry: This option will allow you to disable the employee's ability to enter other activity such as Sick Time, Vacation Time, Tips, etc. at the time of the call.
Lockout Invalid Caller Id: This option will allow you to limit which calls will be accepted as valid, if an employee calls from an unauthorized phone number the software will tell the employee that they are calling from an invalid number and the transaction will not be accepted. you will need to set valid telephone numbers from where an employee can call in, either at the employee level, department level or here in the reader configuration.
User Id Only: This option will allow you to set the Telephone Punch to only ask for an Id to punch in or out, and not ask for a password.
Menu Goes to Login After Punch: This option allows you to set the Telephone Punch to go back to the login prompt after an employee clock in or out. This is useful if you have multiple employees calling from the same location that way they do not have to dial the number again after each transaction.
InfiniTime includes several utilities, as summarized below, which can be used to add or alter Time and Attendance Data for multiple employees at a time. Since the possibility for accidental or improper use of these utilities exists, InfiniTime retains a log of all Purge, Quick Punch, Quick Schedule, and Supervisor Review actions. In this way, InfiniTime Administrators can undo unintended alterations.
Utility |
Purpose |
| Purge | Deletes all Timecard Activity for a specific Date Range for selected Employee(s). |
| Quick Punch | Inserts Punches for Selected Employees for all dates in the Specified Date range. |
| Quick Schedule | Creates Gannt Chart Schedules for Selected Employees for all dates in the specified Date Range. |
| Supervisor Review | Marks Employee Timecard Records in the specified Date Range as reviewed for Selected Employees. |
Details on how to access and utilize the History & Undo Tools for each of the utilities above are provided below.
The InfiniTime Purge History Tool maintains a running list of all purge actions that have been performed since database creation. Using the Undo feature any action can be undone. Should users make a mistake or remove information not intended for removal data can easily be restored using the Purge History Tool.
Accessing Purge History
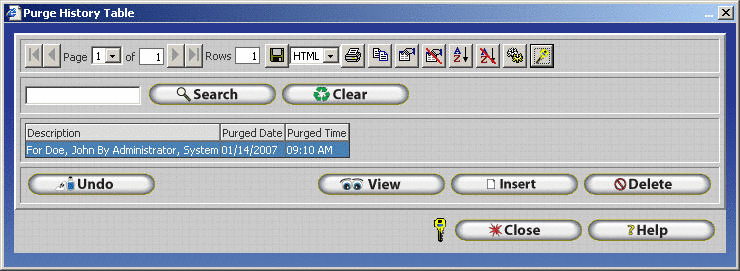
View – Displays information related to the purge action. The date range timecard activity was purged from, employees the purge action was performed on, and the employee that performed the purge action are all listed.
Insert – Click on Insert to purge employee activity. The action will be saved in the Purge History Table.

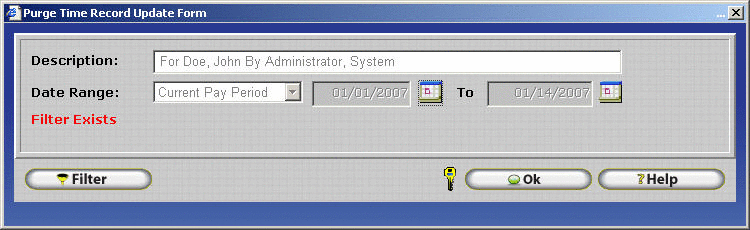
Description – Enter a descriptive name for the action you are performing. This description will be entered into the Purge History table. Using detailed descriptions will help users identify the record in the Purge History Table should the action need to be undone in the future.
Date Range – All Timecard Activity for specified employees that falls within this date range will be purged from the software.
Filter – Use the Employee Filter to select which employee(s) activity will be purged for.
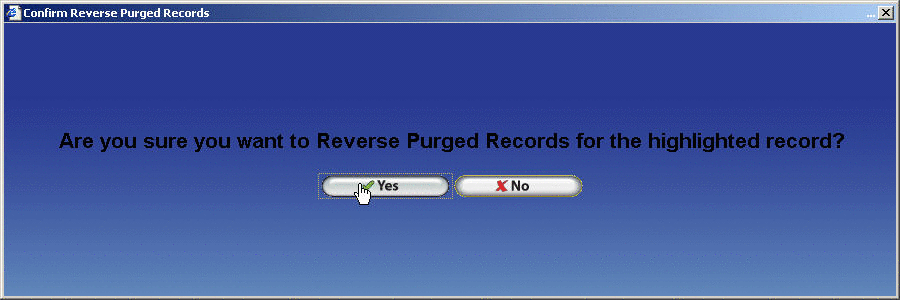
Undo – InfiniTime keeps a record of all Timecard Activity that was removed by a specific purge action. Should the user decide that they want to restore that data for any reason the Undo Feature can be utilized. All activity that was originally removed by the purge action will be restored
Technical Note: The Undo Feature takes a snapshot of current settings. Using the Undo Button simply instructs the software to restore the settings that were saved in this snapshot. The snapshot is taken before the changes specified by the purge action are applied. For example, lets say all of the Timecard Activity before 1/1/2005 is considered archivable and no longer required within the InfiniTime Application. A purge could be executed from 1/1/2000 when the company in this example started using the software to 1/1/2005. The Purge History Window saves a snapshot of all activity within this date range. Should the undo feature be used all activity within this date range will be restored. If any punches were manually added to the system between the date range of 1/1/2000 to 1/1/2005 after the purge action they would remain unaltered.
Delete – Removes the highlighted purge history record from the Purge History Table. Once a record is removed from the Purge History Table its actions cannot be undone. Default security role configuration permits purge record removal by the software administrator or payroll clerks in order to prevent actions from being undone in the future.


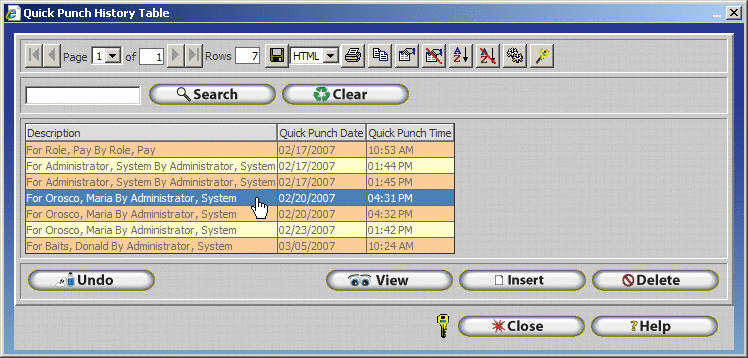
The InfiniTime Quick Punch History Tool maintains a running list of all quick punch actions that have been performed since database creation. Using the Undo feature any action can be undone. Should users make a mistake or add information for the wrong employees the Quick Punch History Tool makes it easy to remove incorrect Timecard Activity entries.
Accessing the Quick Punch History Tool:
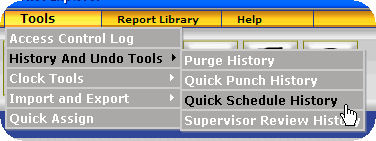
Click on Tools.
Click on History And Undo Tools.
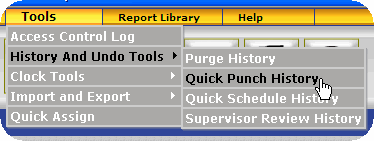
Click on Quick Punch History.
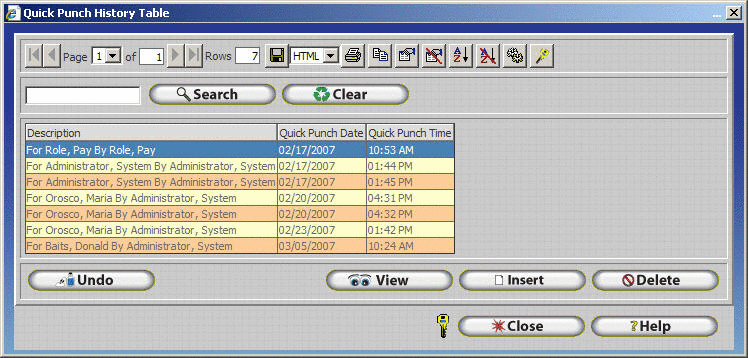
View – Displays information related to the quick punch action. The date range timecard activity was inserted, employees the activity was inserted for, and the related punch pair times are all listed.
Insert – Click on Insert to insert a Quick Punch. The action will be saved in the Quick Punch History Table.
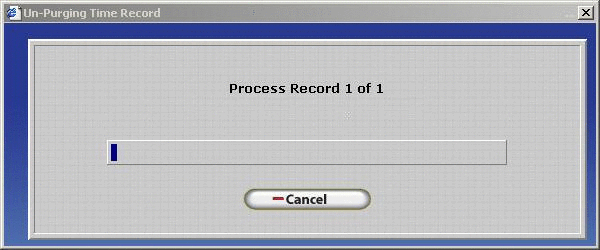
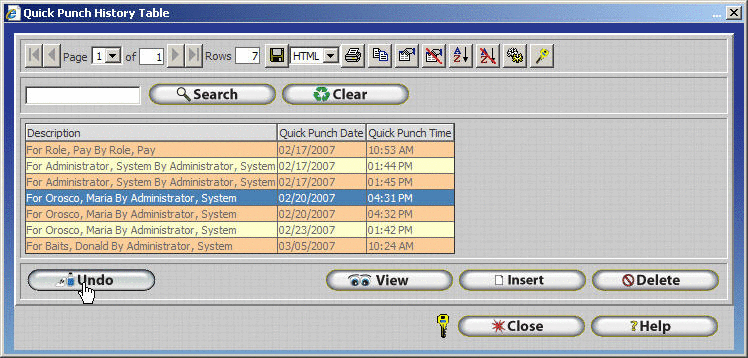
Undo – InfiniTime keeps a record of all Timecard Activity that was inserted by a specific quick punch action. Should the user decide that they want to remove that data for any reason the Undo Feature can be utilized. All activity that was originally inserted by the quick punch action will be removed.
Technical Note: The Undo Feature takes a snapshot of current settings. Using the Undo Button simply instructs the software to restore the settings that were saved in this snapshot. The snapshot is taken before the changes specified by the quick punch action are applied. For example, lets say Quick Punch was used to add activity from 8:00 AM to 5:00 PM for all employees by accident. Should the undo feature be used all activity added by the Quick Punch will be removed. If any punches added by the quick punch were manually edited after the quick punch these changes will be lost. All activity records added by the quick punch will be removed from the system.
Delete – Removes the highlighted Quick Punch history record from the Quick Punch History Table. Once a record is removed from the Quick Punch History Table its actions cannot be undone. Default security role configuration permits purge record removal by the software administrator or payroll clerks in order to prevent actions from being undone in the future.
.gif)
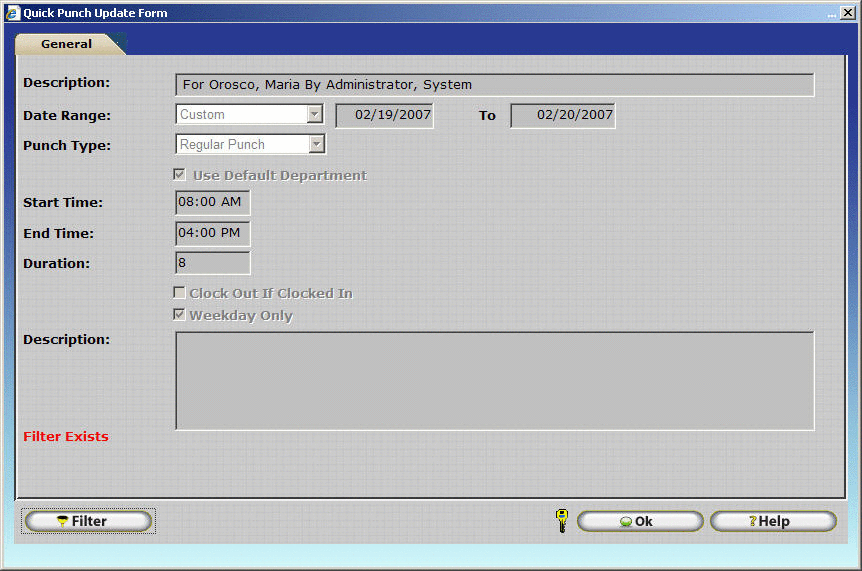
Description – Enter a descriptive name for the action you are performing. This description will be entered into the Quick Punch History table. Using detailed descriptions will help users identify the record in the Quick Punch History Table should the action need to be undone in the future.
Date Range – All Timecard Activity for specified employees that falls within this date range will be purged from the software.
Punch Type - Use the drop down menu to select the type of punch, choose from regular punch, schedule punch, single punch, or other activity.
Regular Punch - Inserts a set of punches. The first time specified is the clock in time, while the second time specified is the clock out time.
Scheduled Punch - Inserts punches according to the employees schedule. For example if the employee is scheduled to work from 8:00 AM to 5:00 PM InfiniTime will automatically clock the employee in at 8:00 AM and out at 5:00 PM.
Single Punch - Inserts a single punch. InfiniTime automatically determines the punch type based upon the timecard activity already present on the date where the single punch is inserted.
Other Activity - Inserts other activity such as holiday time, vacation time, sick time, and personal time.
Use Default Department - if this is checked the punches will be posted using the default department of the employee, if not checked you can choose a department using the magnify glass or typing in the department name to post those punches.
Use Default Job - if this is checked the punches will be posted using the default Job of the employee, if not checked you can choose a Job using the magnify glass or typing in the Job name to post those punches.
Use Default Task - if this is checked the punches will be posted using the default Task of the employee, if not checked you can choose a Task using the magnify glass or typing in the Task name to post those punches.
Start Time – Enter the time that employees specified by the employee filter started working.
End Time – Displays the time that employees specified by the employee filter stopped working. This field is automatically updated by the Duration and cannot be edited directly.
Duration – Enter the number of hours worked by employees specified by the employee filter. The End Time will automatically be updated by this value. For example, if the Start Time was set to 8:00 AM and 8 were entered into the Duration, the End Time would automatically update to 4:00 PM.
Add Duplicate Punches - Unless this box is checked InfiniTime will compare the punches being inserted to those already in the database when performing a Quick Punch. Any duplicate punches will be ignored. For example the image below shows an employee working from 7:30 AM to 5:00 PM on 1/17/2008. If a supervisor were to attempt to insert a punch on 1/17/2008 from 7:30 AM to 5:00 PM using quick punch then the punches would not be inserted unless Add Duplicate Punches was checked.

Weekday Only – If this is checked it will only insert punches for weekdays only and not the weekend, Saturday and Sunday.
Description – Used for Auditing Purposes, any information typed into this box will be saved to the Audit Trail for all inserted punches. This information can then be viewed using the Audit feature at a later date.
Filter – Use the Employee Filter to select which employee(s) activity will be inserted for.
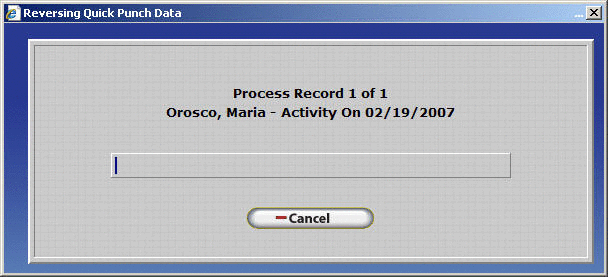
Determine which record in the Quick Punch History table corresponds to the action that you wish to undo. Viewing the record to see information about the Quick Punch can assist with this decision.
.gif)
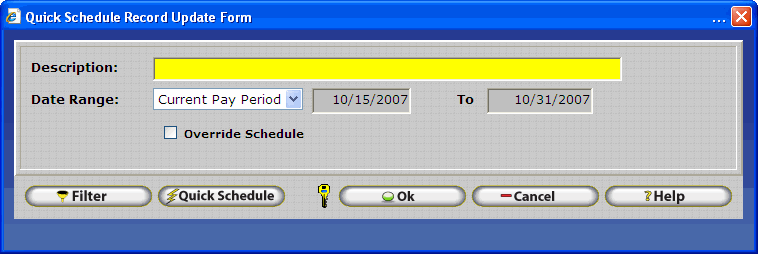
The InfiniTime Quick Schedule History Tool maintains a running list of all schedules that have been performed using the quick schedule function. Using the Undo feature any action can be undone.
Accessing Quick Schedule History
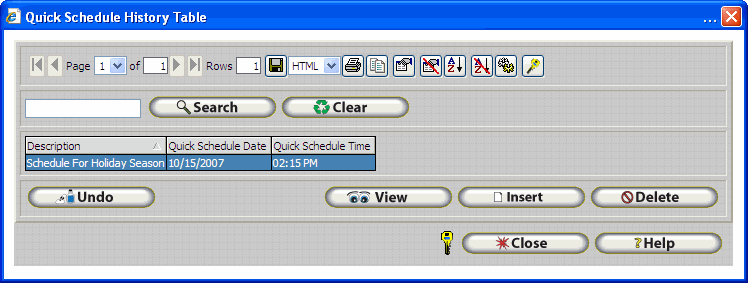
View – Displays information related to the quick schedule action. The date range of the schedule added, and the description of the schedule.
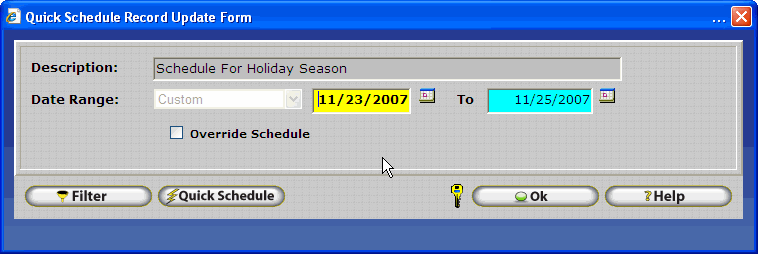
Insert – Click on Insert to create a schedule. The action will be saved in the Quick Schedule History Table.
Undo – InfiniTime keeps a record of all schedule records inserted by a specific quick punch action. Should the user decide they want to remove that data for any reason the Undo Feature can be utilized. All schedule records originally inserted by the quick punch action will be removed.
Technical Note: The Undo Feature takes a snapshot of current settings. Using the Undo Button simply instructs the software to restore the settings that were saved in this snapshot. The snapshot is taken before the changes specified by the Quick Schedule action are applied. For example, lets say Quick Schedule was used to add a schedule from 8:00 AM to 5:00 PM for all employees by accident. Should the undo feature be used all schedule records added by the Quick Punch will be removed. If any schedules added by the quick punch were manually edited after the quick schedule these changes will be lost. All activity records added by the quick punch will be removed from the system.
Delete – Removes the highlighted Quick Punch history record from the Quick Punch History Table. Once a record is removed from the Quick Punch History Table its actions cannot be undone. Default security role configuration permits purge record removal by the software administrator or payroll clerks in order to prevent actions from being undone in the future.
The InfiniTime Supervisor Review History Tool maintains a running list of all review actions that have been performed since database creation. Using the Undo feature any action can be undone. Should users make a mistake or accidentally review activity for the wrong employees the Supervisor Review History Tool makes it easy to revert Timecard Activity entries to their original un-reviewed status.
Accessing the Supervisor Review History Tool:
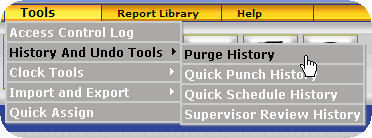
Click on Tools.
Click on History And Undo Tools.
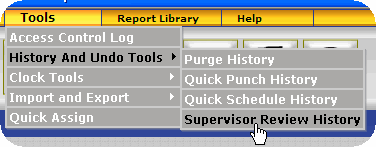
Click on Supervisor Review History.
.gif)
View – Displays information related to the Timecard Activity Review action. The date range timecard activity was reviewed, employees activity was reviewed for, and the record description are all listed.
.gif)
Insert – Click on Insert to review timecard activity. The action will be saved in the Supervisor Review History Table.
Undo – InfiniTime keeps a record of all Timecard Activity that was marked as reviewed by a specific review action. Should the user decide that they want to return that data to its original un-reviewed state for any reason the Undo Feature can be utilized.
Insert – Click on Insert to insert a Quick Punch. The action will be saved in the Quick Punch History Table.
Undo –InfiniTime keeps a record of all Timecard Activity that was inserted by a specific quick punch action. Should the user decide that they want to remove that data for any reason the Undo Feature can be utilized. All activity that was originally inserted by the quick punch action will be removed.
Technical Note: The Undo Feature takes a snapshot of current settings. Using the Undo Button simply instructs the software to restore the settings that were saved in this snapshot. The snapshot is taken before the changes specified by the review action are applied. For example, lets say a supervisor accidentally reviewed activity for all employees by neglecting to configure the employee filter. Should the undo feature be used all review records added by the review action will be removed.
Delete – Removes the highlighted Supervisor Review history record from the Supervisor Review History Table. Once a record is removed from the Supervisor Review Table its actions cannot be undone. Default security role configuration permits purge record removal by the software administrator or payroll clerks in order to prevent actions from being undone in the future.
.gif)
Description – Enter a descriptive name for the action you are performing. This description will be entered into the Supervisor Review History table. Using detailed descriptions will help users identify the record in the Supervisor Review History Table should the action need to be undone in the future.
Date Range – All Timecard Activity for specified employees that falls within this date range will be marked as reviewed.
Filter – Use the Employee Filter to select which employee(s) activity will be reviewed for.
Determine which record in the Supervisor Review History table corresponds to the action that you wish to undo. Viewing the record to see information about the Review action can assist with this decision.
.gif)
.gif)
.gif)
.gif)
Polled Information keeps track of all employee activity that has been received from external hardware readers and the InfiniTime Employee Module. Polled Information cannot be emptied, as it provides a data archive for the Employee Timecards. Should employees accidentally remove all employee activity by incorrectly deleting records, employee data can be reposted from Polled Information.
Accessing Polled Information:
.gif)
Employee Timecard activity can be reposted to the Timecard Table in the event of accidental activity deletion or if activity needs to be restored to its original form for any reason.
Reposting Employee Timecard Activity:
![]()
.gif)
![]()
System Monitor is designed to give InfiniTime Administrators an overview of automated processes performed by the InfiniTime Application. The last automated backup, Import, Export, Payroll Export, and Report process dates are shown. In order to understand the information presented in the system monitor window it is important to understand the nature of the InfiniTime Housekeeping Service. The InfiniTime Housekeeping Service is responsible for all automated tasks performed by the InfiniTime Application. In addition the list of automated processes above this also includes polling.
The InfiniTime Housekeeping service is a multi-threaded process that operates in a round robin manner beginning with polling and related processes. InfiniTime checks the last poll date and time of each clock sequentially according to a unique system identification number. It compares the last poll date and time to the current time and date to determine if it is time to update or poll the clock again. This same procedure is also performed for the Last Data Update Date and Time for each clock. Regular housekeeping routines such as checking the database for exceptions or automated exports and reports are performed separately from polling functions which allows the InfiniTime Housekeeping service to simultaneously poll time and attendance information while processing automated tasks. As the cycle is completed for each automated task the date and time to the right of each automated process will be updated as it is completed.
Should the InfiniTime Housekeeping Service encounter errors when attempting to communicate with a clock the Last Poll time will be updated with the current time and the service will move on to the next clock in the sequence. Additional attempts at communication will occur every polling cycle. If a maximum number of communication errors is specified the service will stop communication with the clock if the specified number of errors occur.
It should be noted that the system monitor does not refresh automatically to show updates for the status of clocks or automatic processes. In order to view the latest details the refresh button must be used. The System Monitor window has two refresh buttons, one within the grid where hardware terminals are listed and the other at the bottom left of the form. The refresh button within the hardware terminal grid only updates the information within the grid, while the refresh button at the bottom left of the form updates the entire system monitor window.
Accessing the System Monitor:
![]() Force Poll: Checks for punches
on the selected clock. If any punches are found the punch will be stored
in the InfiniTime database
and removed from the clock.
Force Poll: Checks for punches
on the selected clock. If any punches are found the punch will be stored
in the InfiniTime database
and removed from the clock.
![]() Update Reader: Forces the software
to clear the Last Data Update Date and Last Data Update Time fields. The
InfiniTime Housekeeping
Service will update the clock on its next pass through the reader processing
loop.
Update Reader: Forces the software
to clear the Last Data Update Date and Last Data Update Time fields. The
InfiniTime Housekeeping
Service will update the clock on its next pass through the reader processing
loop.
InfiniTime includes multiple automatic tasks such as sending reports to a printer or via email, creating backup files, importing employee related information, exporting employee related information, exporting payroll related information, and polling clocks. These automated tasks are performed by the InfiniTime Housekeeping Service in addition to other tasks such as tracking exceptions. The InfiniTime Housekeeping service must be running in order for these automatic processes to occur as expected.
Starting and Stopping the InfiniTime Housekeeping Service
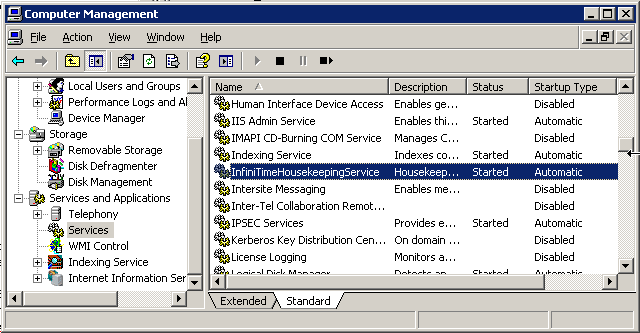
The InfiniTime Housekeeping Service can be started and stopped using the computer management console.
To Start the InfiniTime Housekeeping Service:
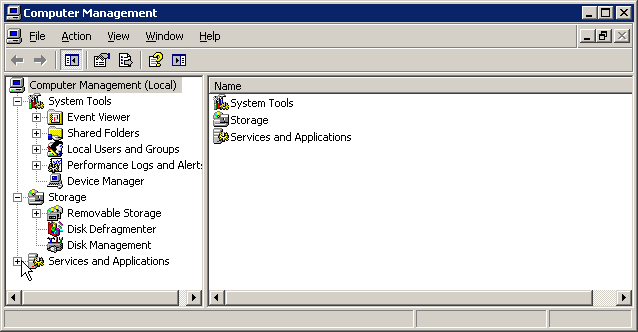
Right Click on My Computer and Click on Manage
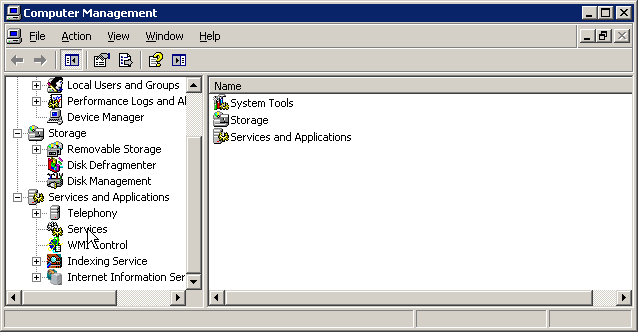
Click on the + to the left of Services and Applications in order to expand the list.
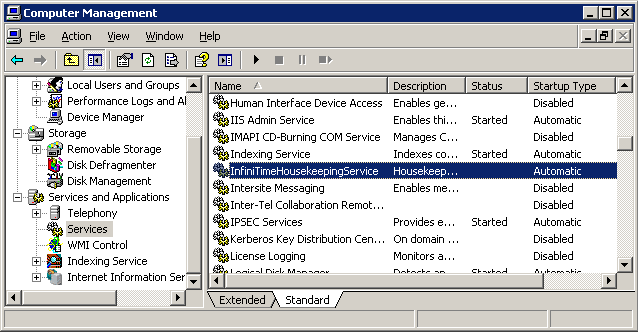
Click on Services to view the list of services installed on your machine.
Locate InfiniTime Housekeeping Service in the list.
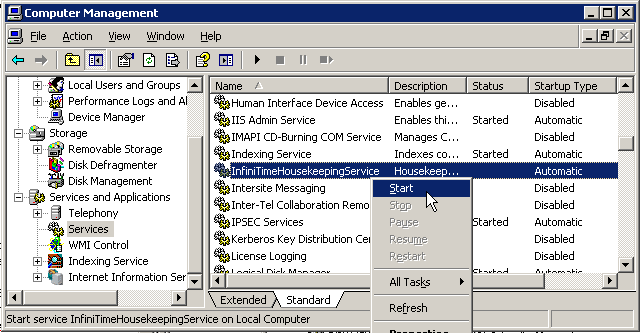
Right click on the InfiniTime Housekeeping Service and click start.
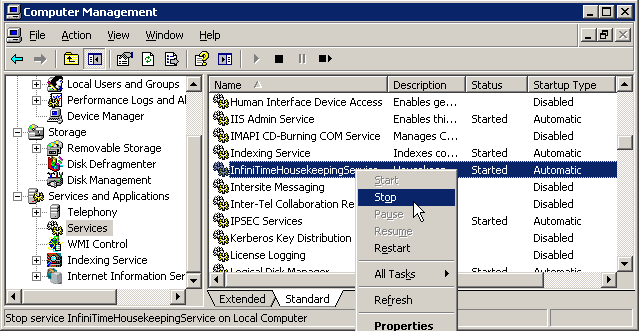
To Stop the InfiniTime Housekeeping Service:
Right Click on My Computer and Click on Manage
Click on the + to the left of Services and Applications in order to expand the list.
Click on Services to view the list of services installed on your machine.
Locate InfiniTime Housekeeping Service in the list.
Right click on the InfiniTime Housekeeping Service and click stop.
Housekeeping Procedures and Logic
The InfiniTime Housekeeping service operates in a round robin manner beginning with polling and related processes. InfiniTime checks the last poll date and time of each clock sequentially according to a unique system identification number. It compares the last poll date and time to the current time and date to determine if it is time to update or poll the clock again. This same procedure is also performed for the Last Data Update Date and Time for each clock. After checking the poll and update timestamps of each clock and attempting to communicate with each clock when necessary the InfiniTime Housekeeping Services will perform regular housekeeping routines such as checking the database for exceptions or automated exports and processes. The date and time to the right of each automated process will be updated as it is completed.
Should the InfiniTime Housekeeping Service encounter errors when attempting to communicate with a clock the Last Poll time will be updated with the current time and the service will move on to the next clock in the sequence. Additional attempts at communication will occur every polling cycle. If a maximum number of communication errors is specified the service will stop communication with the clock if the specified number of errors occur.
Poll and Update Procedure
The most prominent and logically complicated procedure performed by the InfiniTime Housekeeping Service is related to polling punches and activity from external devices such as badge readers, fingerprint readers, and hand geometry readers. This procedure is outlined below.
1.) Beginning with the first clock inserted into the system the Housekeeping service compares the last poll time with the current time in order to determine if the clock should be polled. If the polling interval specified for the clock has elapsed the clock will be polled. Any time and attendance punches, access control punches, or other activity entries stored on the clock will be polled to the database and removed from the clock. Recommended polling times can be found in the TCP/IP Clock Settings section of this document.
2.) Beginning with the first clock inserted into the system the Housekeeping service compares the last update time with the current time in order to determine if the clock should be updated. If the update interval specified for the clock has elapsed the clock will be updated with all employee information currently in the system. The employees sent to the clock are subject to multiple conditions. Employees with alphanumeric characters in the Login ID or Login Password fields will not be uploaded to a clock. Additionally the employees sent to a clock are subject to the employee filters as configured on the Reader Address Update form. It is important to note that hand templates or fingerprint templates will be removed from the clock for any employees that are not present in the InfiniTime Software Application as appropriate during the update procedure.
Note: Hand templates are only removed from Scout Terminals if the 'Maximum Template Security' Option is enabled. Fingerprint templates will always be removed from fingerprint readers such as the Thor for employees that have not been inserted in the InfiniTime Application.
3.) If an error should occur during a poll the last poll time will be updated with the current time and the housekeeping service will proceed to the next clock in the sequence.
4.) If an error should occur during an update the last poll time will be updated with the current time and the housekeeping service will proceed to the next clock in the sequence.
5.) If the poll and update processes complete without errors the InfiniTime Housekeeping Service continues on to the next reader in the sequence and repeats the above processes. When the last reader in the sequence has been processed the polling procedures are complete and the InfiniTime Housekeeping service will begin the polling procedures anew.
6.) If a clock is polled manually using the Force Poll Button on the system monitor the InfiniTime Housekeeping Service will automatically break from its normal sequence to poll these clocks. This reduces the wait time for force polling clocks on installations with multiple clocks.
Troubleshooting the InfiniTime Housekeeping Service
The InfiniTime Housekeeping Service is responsible for communicating with all readers and time keeping devices connected to the InfiniTime Software Application. If you should notice your employees are able to punch in and out on your time clock but the punches do not appear in the InfiniTime Application there could be several reasons why communication between the InfiniTime Application and your time clock(s) is failing. A list of typical issues and resolutions are listed below.
Check the dates associated with each housekeeping task on the System Monitor. Are these dates and times relatively current? Depending on your software configuration these dates and times should be current within 5 minutes to 4 hours. If these times have not been updated in more than a day it is likely that normal operations of the InfiniTime Housekeeping Service have been suspended. Follow the procedure above to stop and restart the Housekeeping Service and check to see if the housekeeping processes resume. The status fields should be updated with current dates and times.
If the status messages or dates associated with each housekeeping task on the System Monitor do not change after restarting the housekeeping there may be an issue with the file permissions required by the InfiniTime Housekeeping Service. The InfiniTime Housekeeping Service requires full control for the ASPNET user on the C:\Inception\InfiniTime\InfiniTime7\BIN directory by default.
Unassigned punches occur when an employee punches in on a timeclock, such as the Schlage Scout 2000 or Thor, using an id or badge that is not recognized by the software. Rather than ignoring the punch altogether because it cannot immediately be assigned to an employee, InfiniTime records these punches in the Unassigned Punches Table. Managers can then manually assign the punches as needed.
Accessing Unassigned Punches
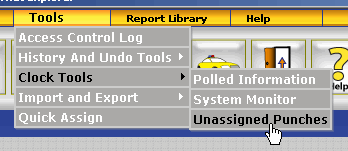
.gif)
The upper grid shows the Badge Id or ID and password that has unassigned punches. Clicking on this entry will populate the lower grid, showing all unassigned punches for the selected ID.
Situational Examples that would result in Unassigned Punches:
RSI Clocks:
Situation: Company A runs a 24/7 manufacturing operation. Payroll and office workers work until 5:00 PM while factory shifts work around the clock. Payroll employees install InfiniTime and setup the clocks during their work day, they are unable to complete employee setup for all employees before they leave for the day. A factory shift begins at 6:00 PM, the shift supervisor enrolls his employees in the Hand Punch and instructs them on its use. Employees begin punching and the Timecard Activity is stored in the Hand Reader. The next morning payroll polls Timecard Activity from the reader and all of the punches come across as unassigned because the employees have yet to be setup in the software.
Resolution: The employee responsible for managing the InfiniTime software will insert all of the employees into the software, making sure that the ID used by each employee the night before is assigned to them. It may be necessary to check with the Shift Supervisor or even the employees themselves regarding what ID they were enrolled with. The unassigned punches table may then be used to assign the punches accordingly.
Synel Clocks:
Situation: Should validate employee be disabled, see Synel Clock Configuration for more information, any badge of the appropriate coding and length will read when swiped through the Synel Card Reader. Should the badge number encoded into the card not be associated with an employee then the punch will be considered unassigned. This will occur if employees forget their badge and simply use a spare for the day.
Resolution: The punches can simply be assigned to the employee using the unassigned punches table to rectify the issue.
Zephyr Clocks:
Situation: If an employee is enrolled at the Zephyr Terminal using the User Manage - Add User option and is not present within the InfiniTime software any punches made with the badge assigned to this employee will come into the InfiniTime Software as unassigned. It is important to ensure employee information is configured within the InfiniTime Software and sent to the Zepyhr Terminal rather than entering employees at the clock itself.
Resolution: Ensure all employees have been added to the InfiniTime Database in the employee table. Assign a badge to the employee and enter the badge number on the Login Tab of the Employee's Record. Update the Zepyhr Clock. This will prevent unassigned punches from occurring in the future. Be sure to assign the punches that have already been polled into the InfiniTime database to the employee(s) after they have been added to the system.
Situation: If an employee's badge is changed within the InfiniTime Software the employee will be able to punch in and out with the old badge until the Zepyhr Clock has been updated. If they punch using their old badge, which is no longer in the InfiniTime Software, the punches will be considered unassigned.
Resolution: After changing important information such as employee Badge Numbers, Login IDs, Passwords, or Employee IDs be sure to update your clocks. This will send the information to the clock preventing employees from swiping with their old badge or punching using their old employee id. Ensure any punches that have already been polled into the database as unassigned punches are assigned to the correct employee(s).
Luna Clocks:
Situation: If an employee's Login ID is changed within the InfiniTime Software the employee will be able to punch in and out with the old badge until the Luna Clock has been updated. If they punch using their old badge, which is no longer in the InfiniTime Software, the punches will be considered unassigned.
Resolution: After changing important information such as employee Badge Numbers, Login IDs, Passwords, or Employee IDs be sure to update your clocks. This will send the information to the clock preventing employees from swiping with their old badge or punching using their old employee id. Ensure any punches that have already been polled into the database as unassigned punches are assigned to the correct employee(s).
The Import and Export Data selections greatly extend the functionality of InfiniTime. These functions allow you to import and export data collected with InfiniTime or compatible third-party applications such as Microsoft Excel. InfiniTime imports and exports ASCII comma separated and quotation delimited text. Additionally, data can be exported as a dBASE file (DBF) readable by dBASE spreadsheet software. For instructions on how to prepare and import data from a comma delimited file refer to the section of this document entitled Performing an Import.
Warning! Be sure to backup InfiniTime prior to importing data so that you will have a copy of original data, in case there is a problem with the imported data.
Accessing the InfiniTime Import Table:
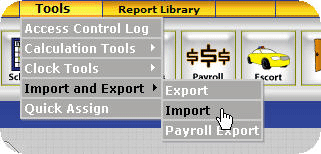
The Import Definition Table will be displayed as shown below.
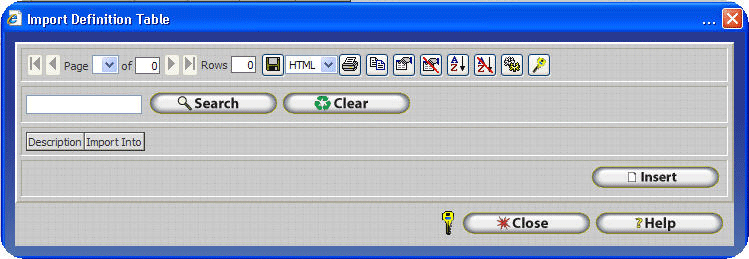
Import Button ![]() - The import button allows you to highlight an already saved import
structure and import it.
- The import button allows you to highlight an already saved import
structure and import it.
Insert Button ![]() - The insert button will allow you to create a new import structure.
When selecting this button, the Import File Selection Table will
appear.
- The insert button will allow you to create a new import structure.
When selecting this button, the Import File Selection Table will
appear.
Delete Button ![]() - This button will delete a highlighted import structure.
- This button will delete a highlighted import structure.
All fields within the InfiniTime Database that can be imported are listed within the following tables. It is important to keep in mind the nature of software and databases when attempting to perform an import. The tables in this section are comprised of six columns, Field Name, Description, Field Format, Field type, Required, and Valid Values. Each of these columns contain pertinent information for individuals preparing a CSV file for import into InfiniTime. An outline of each column, its contents, and how this information relates to the expected format of the CSV file for import is provided below.
Field Name - The name of the field as displayed within the Target Field grid of the Import Update form.
Description - A general description of the contents of the field.
Field Format - Provides a 'picture' of the data format. This column will contain one of three value types, a whole number, a decimal number, and an example detailing the format of the data. Examples of each value type that may be found in this field is provided below.
Whole Numbers - A whole number represents the number of characters or digits that can be stored within the respective field.
Decimal Numbers - A decimal number represents the number of digits before and after a decimal point that can be stored within the respective field. IE: 5.2 stands for Five Characters or Digits before the decimal place and two after: 12345.12
Data Format - Symbols and letters are often used as place holders for specific information. An example of a data format would be MM/DD/YYYY which indicates a ten character field where the first two digits represent the month, the third and fourth digits represent the day, and the last four digits represent the year. A forward slash (/) is also shown between each set of digits and is expected in the data to be imported.
Example Dates using an MM/DD/YYYY Format are provided below. Note how a single digit month is preceded by a 0 in order to fill both month characters in the MM/DD/YYYY format.
1.) 10/31/1986
2.) 08/01/1987
Field Type - Indicates the type of information the field can hold. Common field types are below. Only the characters indicated are supported by the InfiniTime Application. Use of special characters and punctuation should be avoided.
Numeric - Numeric fields can only hold numbers (0 to 9) and cannot contain leading zeroes.
Alphanumeric - Alphanumeric fields can only hold letters (A to Z), numbers (0 to 9) and spaces.
Character - Character fields can contain only one letter (A to Z) or number (0 to 9).
WARNING: While every attempt is made to remove characters incompatible with the chosen field type by the Import Processes care should be taken to ensure special characters and punctuation are not present in the import file. The database cannot store special characters or punctuation as employee information is sent to hardware terminals supported by InfiniTime. These hardware terminals have special database requirements which do not provide support for punctuation or special characters.
Required - Indicates if a field is required. Required fields must have a column from the import file mapped to them in order for records to be successfully imported. A value of 'Y' in this column indicates a field is required. A value of 'N' in this column indicates a field is not required. A value of 'P' indicates the field is not required in order to successfully import records however you will be prompted to enter the information manually when editing the record for the first time. For example if employee supervisors are not imported when importing employees then the software will prompt the user to enter the employee's supervisor when attempting to edit the employee record.
Valid Values - Some fields such as spin boxes give users the ability to select a value from a predetermined list of items. Only the predetermined values may be imported into these fields. Valid values have been listed for fields that are restricted to a predetermined list of items. Be sure to verify the proper case of the information that is to be imported. For example the Type field within Timecard Files has two predetermined values, Clock In and Clock Out. 'clock out' is not the same as 'Clock Out' and will not be recognized by the import.
Link to Table - Many fields available for import link to a separate table within the InfiniTime Database. When mapping values to these fields remember the data must exist in the destination table. For example it is not possible to assign existing employees to the 'Florida Employees' group using the Employee Group File if the 'Florida Employees' group does not exist. This example applies to the 'Link to Group Description Table' field.
Employee File - Creates Employee Records
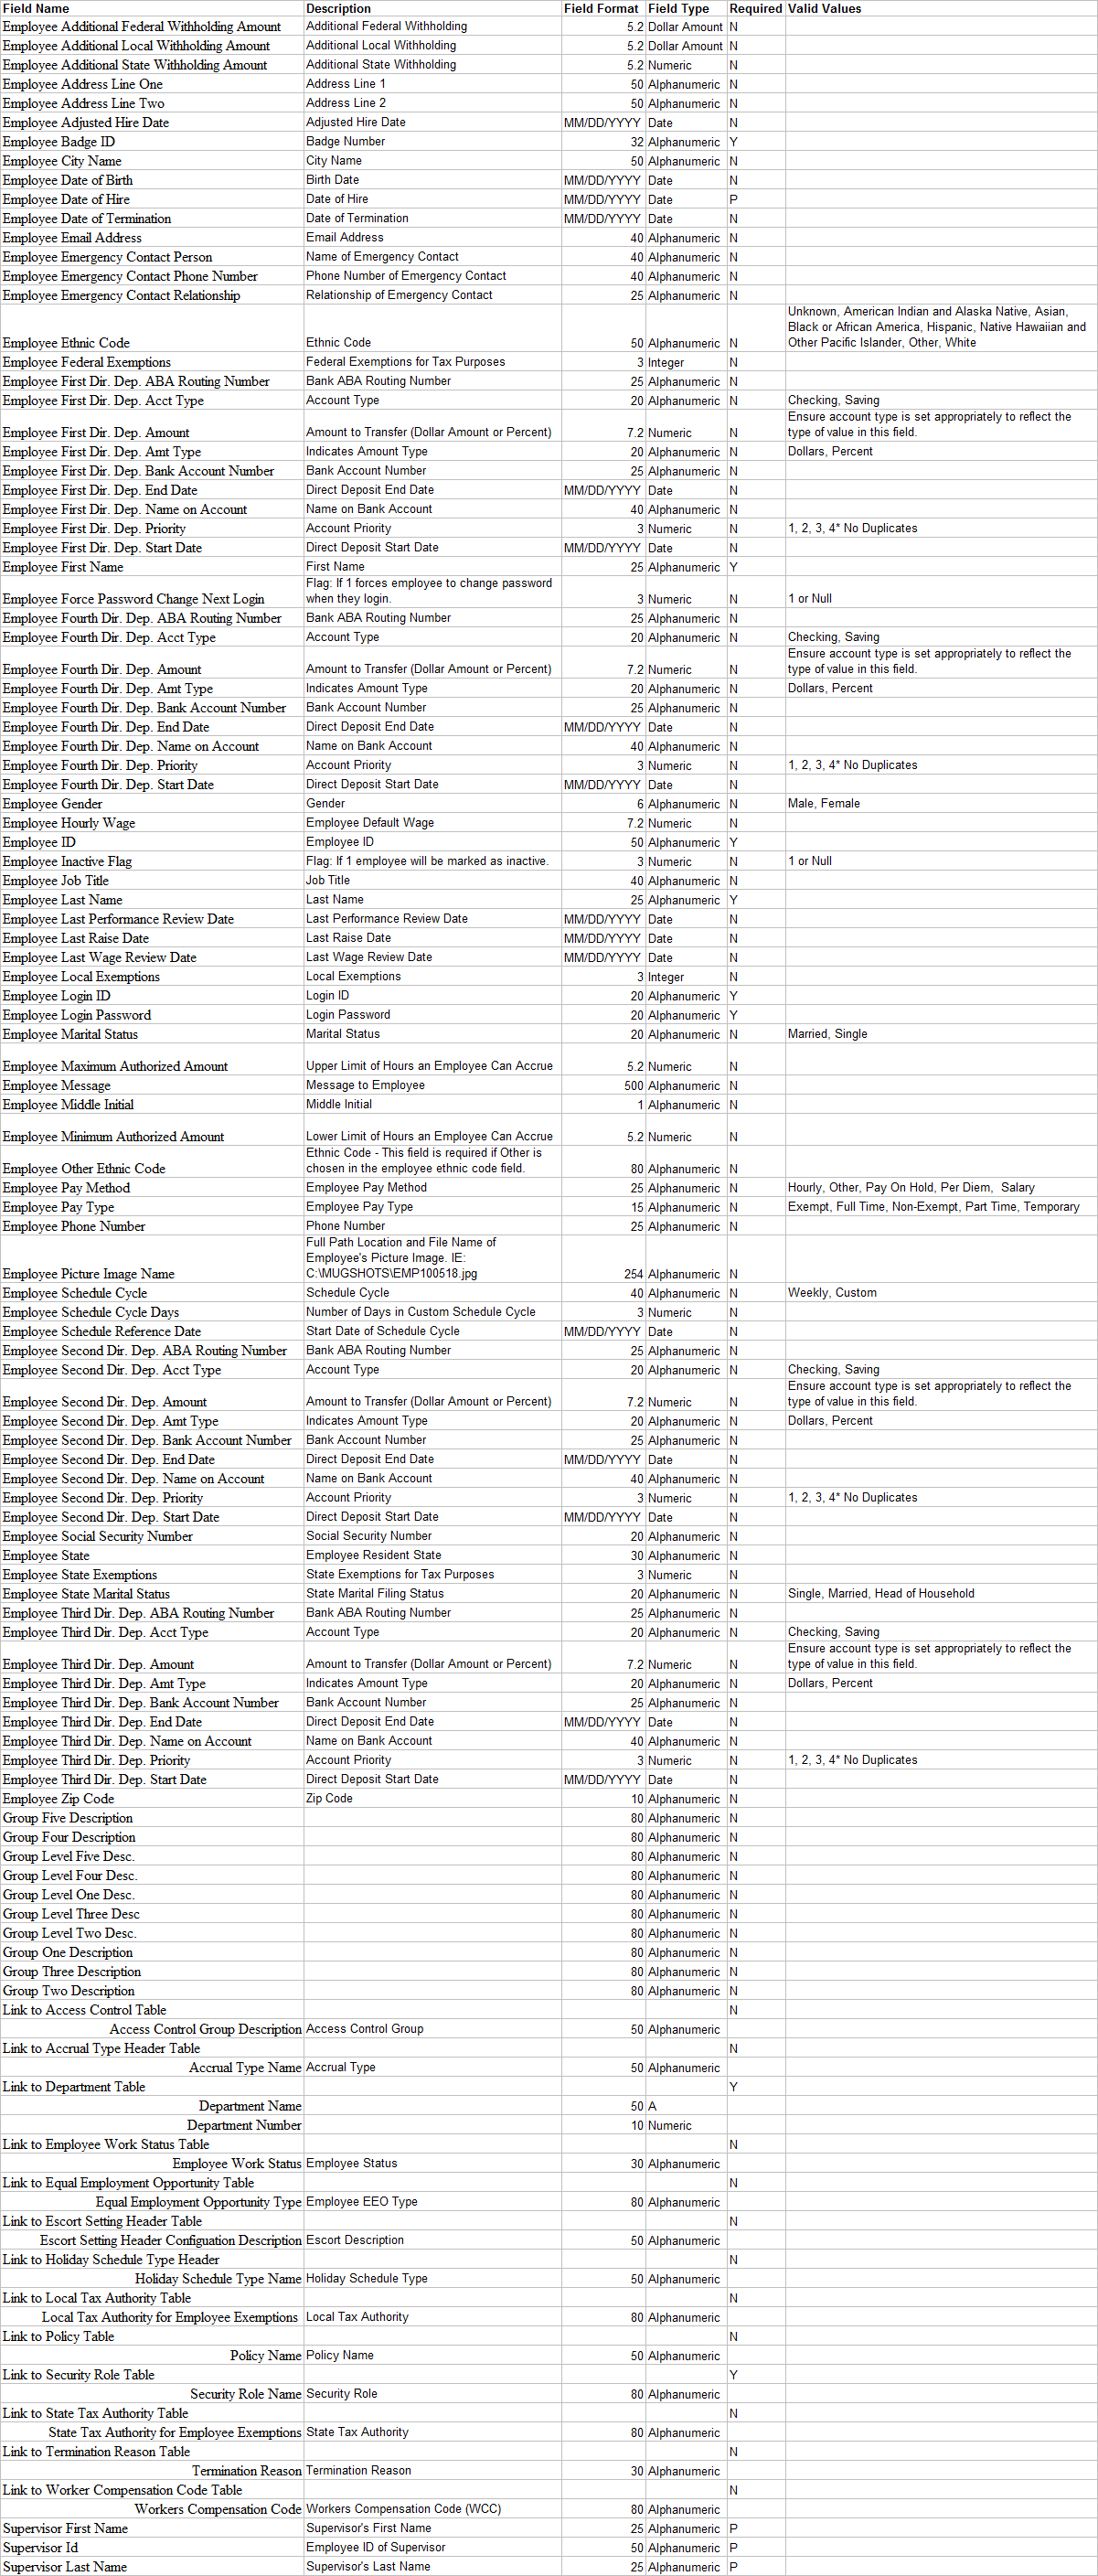
Department File - Creates Department Records
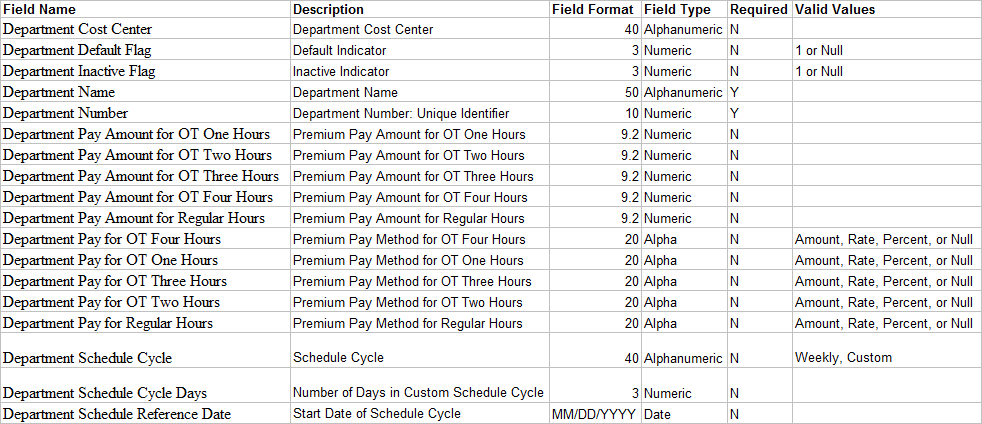
Employee Accrual Totals File - Updates Existing Employee Accrual Total Records

Importing Employee Accrual Base Amounts
In order to import employee Accrual Base Amounts, the following conditions must be met:
Employees must be assigned to an Accrual Type and must have Employee Accrual Total Records. The simplest way to verify all employees have Employee Accrual Total Records after assigning employees to a new accrual type is to perform a Company Recalculate for the Current Pay Period.
All Required Fields, as indicated in the Table Above, must be present in the import file and mapped when creating the Import Definition.
The Accrual Period Start and End Dates within the Import File must match the Start and End Dates for each individual employee's existing Employee Accrual Total Records.
Replace Existing Record without Prompt must be selected on the Duplicate Checking Tab.
Other Activity Type File - Creates Other Activity types
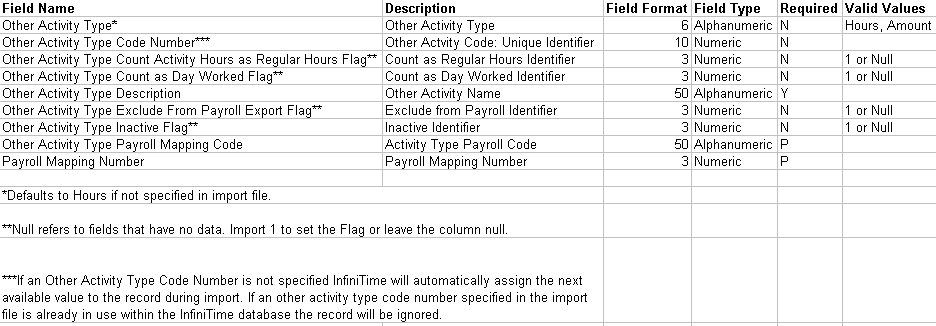
Groups Level File - Creates Group Levels

Groups Description File - Creates Groups

Employee Groups File - Assigns Existing Groups to Existing Employees
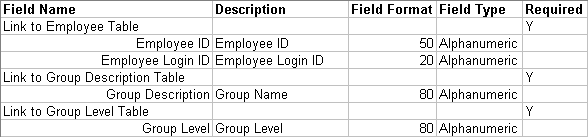
Importing Employee Group Assignments
In order to import Employee Group Assignments, the following conditions must be met:
An employee must exist with the Employee ID / Employee Login ID specified in the Link to Employee Table Field for each imported record. If a specified Employee ID / Employee Login ID does not exist the record will be skipped.
A Group Description must exist as specified in the Link to Group Description Table for each imported record. If a specified Group Description does not exist the record will be skipped.
A Group Level must exist as specified in the Link to Group Level Table for each import record. If a specified Group Level does not exist the record will be skipped.
Replace Existing Record without prompt must be selected on the Duplicate Checking Tab.
Employee Shifts File - Assigns Existing Shifts to an existing Employee

Note: Employees can only be assigned to a shift which is configured to be Used for Scheduling. If the shift specified for an import record does not have the Used For Scheduling option enabled, the record will be skipped.
Note: Shifts do not have to exist in the software in order to perform the import however schedules cannot be imported and must be configured manually for each shift created by the import process. For this reason, most customers choose to create shifts and define the schedule for each shift before importing employee shift assignments. Shifts created during the import process will have the Used for Scheduling option enabled automatically.
Employee Timecard file - Creates Employee Timecard Punches
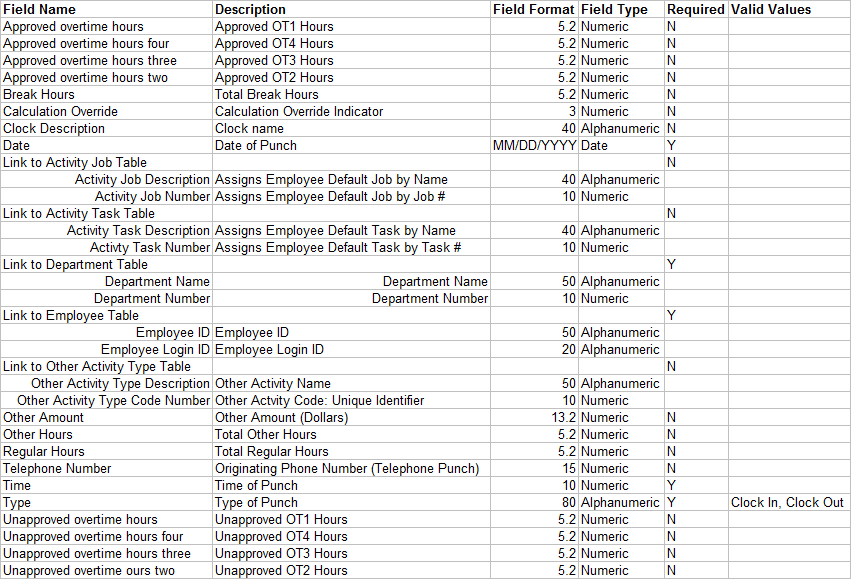
Note: When Importing Employee Timecards it is important to ensure duplicate records present in the import file will be ignored. To ensure duplicate punches, or punches for a specific employee with the same Time and Date, are not imported Date and Time must be tagged on the Duplicate Checking Tab as outlined below.
1. Click on the Duplicate Checking tab after selecting a source file.
2. Type Date in the search box and click on the Search Button.
3. Click Tag.
4. Type Time in the search box and click on the Search Button.
5. Click Tag.
6. Ensure 'Ingore It' is selected for 'If Duplicates are found:'
6. Continue configuring the Import.
Activity Job Information File - Creates Activity Jobs

Activity Task Information File - Creates Activity Tasks
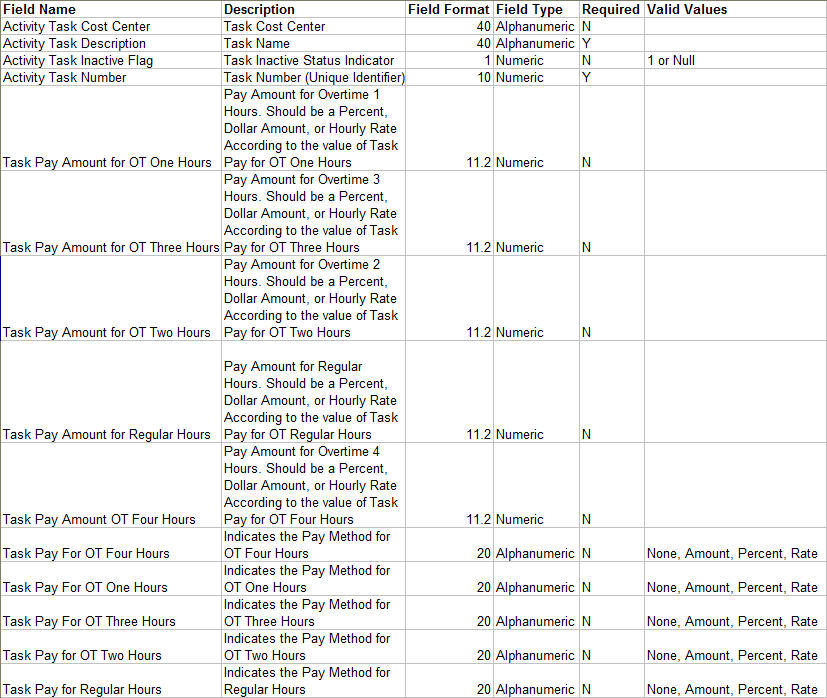
Employee Badges File - Creates Employee Alternate Badges
![]()
Employee Schedules File - Creates Employee Schedule Gannt Chart Entries

Importing Employee Schedules
The Employee Schedules File import type makes it possible to import GANNT Chart Schedules for employees. As indicated by the table above the Link to Employee Table, Link to Department Table, Schedule Date, Schedule Begin Time, and Schedule End Time Fields must be filled in order for a schedule record to be created by the import. The Employee Schedules File Import Type supports Working, Paid Break, and Unpaid Break schedules by setting the Schedule Type to the appropriate value. If the Schedule Type is left blank or is not mapped, then the Schedule Type defaults to working. Example records, with map by name headers, are provided below to illustrate the format for each schedule type.
Importing Schedule Records
The example records below will result in the following schedules:
Employee 1
9:00 AM 1:00 PM Working Department 2, Job 1, Task 1
1:00 PM 2:00 PM Paid Break Department 2, Job 1, Task 1
2:00 PM 6:00 PM Working Department 1, Job 2, Task 2
Employee 2
12:00 PM 2:00 PM Working Department 1, Job 1, Task 1
2:00 PM 3:00 PM Unpaid Break Department 1, Job 1, Task 1
3:00 PM 8:00 PM Working Department 1, Job 1, Task 1
Link to Employee Table
|
Link To Department Table
|
Schedule Date
|
Schedule Begin Time
|
Schedule End Time
|
Schedule Type
|
Link to Other Activity Type Table
|
Link To Activity Job Table
|
Link To Activity Task Table
|
1 |
2 |
04/1/2010 |
09:00 AM |
01:00 PM |
Working |
|
Job 1 |
Task 1 |
1 |
2 |
04/1/2010 |
01:00 PM |
02:00 PM |
Paid Break |
|
Job 1 |
Task 1 |
1 |
1 |
04/1/2010 |
02:00 PM |
06:00 PM |
Working |
|
Job 2 |
Task 2 |
2 |
1 |
04/1/2010 |
12:00 PM |
02:00 PM |
Working |
|
Job 1 |
Task 1 |
2 |
1 |
04/1/2010 |
02:00 PM |
03:00 PM |
Unpaid Break |
|
|
|
2 |
1 |
04/1/2010 |
03:00 PM |
08:00 PM |
Working |
|
Job 1 |
Task 1 |
Importing Other Activity Schedules (IE: Vacation Time)
The example record below will create a Vacation Schedule Record from 12:00 PM to 8:00 PM on 4/2/10 in Department 1, Job 1, Task 1 for Employee 2. Note that the Schedule Type field is null. It is not necessary to fill the Schedule Type field when scheduling Other Activity.
Link to Employee Table
|
Link To Department Table
|
Schedule Date
|
Schedule Begin Time
|
Schedule End Time
|
Schedule Type
|
Link to Other Activity Type Table
|
Link To Activity Job Table
|
Link To Activity Task Table
|
2 |
1 |
04/2/2010 |
12:00 PM |
08:00 PM |
Vacation Time |
|
Job 1 |
Task 1 |
Schedule Override For Imported Schedules
It should be noted that InfiniTime does not permit overlapping records on the Schedule Gannt Chart. Existing Gannt Chart Records including Working, Paid Break, Unpaid Break, Other Activity, and Scheduled Days Off on the Schedule Date for the specified employee will be deleted when schedule records are imported. Imported Schedules should be complete as they override any schedule currently defined for the given Schedule Date. Users should take care to ensure schedule records in the import file for a given schedule date do not overlap.
For example:
Proper Schedule Records Not Overlapping
Link to Employee Table
|
Link To Department Table
|
Schedule Date
|
Schedule Begin Time
|
Schedule End Time
|
Schedule Type
|
Link to Other Activity Type Table
|
Link To Activity Job Table
|
Link To Activity Task Table
|
1 |
2 |
04/1/2010 |
09:00 AM |
01:00 PM |
Working |
|
Job 1 |
Task 1 |
1 |
2 |
04/1/2010 |
01:00 PM |
02:00 PM |
Paid Break |
|
Job 1 |
Task 1 |
1 |
1 |
04/1/2010 |
02:00 PM |
06:00 PM |
Working |
|
Job 2 |
Task 2 |
Each record is back to back with a Working Period, a Break Period, and a second working period. None of the schedule records overlap.
Improper Schedule Records - Overlapping
Link to Employee Table
|
Link To Department Table
|
Schedule Date
|
Schedule Begin Time
|
Schedule End Time
|
Schedule Type
|
Link to Other Activity Type Table
|
Link To Activity Job Table
|
Link To Activity Task Table
|
1 |
2 |
04/1/2010 |
09:00 AM |
06:00 PM |
Working |
|
Job 1 |
Task 1 |
1 |
1 |
04/1/2010 |
08:00 AM |
05:00 PM |
Working |
|
Job 2 |
Task 2 |
The schedule records above are for the same day for working periods that overlap. Users should ensure imported schedules do not overlap as shown above.
Importing Overnight Schedules using the Employee Schedules File Import Type
The Employee Schedules File Import Type provides support for importing schedules that cross midnight. It is not necessary to split schedules at midnight in order to import overnight schedules, the schedule must be split at midnight. An example record for an employee starting at 8:00 PM on 4/1 and working until 4:00 AM on 4/2 is displayed below.
For example:
Overnight Schedule Record that Crosses Midnight
Link to Employee Table
|
Link To Department Table
|
Schedule Date
|
Schedule Begin Time
|
Schedule End Time
|
Schedule Type
|
Link to Other Activity Type Table
|
Link To Activity Job Table
|
Link To Activity Task Table
|
1 |
2 |
04/1/2010 |
08:00 PM |
04:00 AM |
Working |
|
Job 1 |
Task 1 |
A Brief Warning: Editing Comma Delimited (.CSV) Files
There are several applications available for editing comma delimited files such as those used for importing and exporting in InfiniTime. Microsoft Excel is available to most users and is commonly used to edit comma delimited files. Many users do not realize the ramifications of using Excel for editing comma delimited files. Excel does not display the exact contents of a field in a .CSV file for editing. Excel attempts to identify the format of the field though in some cases the data is altered during this process. When a .CSV file is opened in Excel leading zeroes are stripped from fields and Date - Time Stamps are automatically formatted to show only the Time Stamp. These automatic alterations can cause undesired changes to a file if the user does not take steps to return the data to its original format.
Due to these inherent issues with editing comma delimited files in Excel it is recommended to use other applications such as Notepad or Wordpad for editing .CSV files. Should you decide to use Excel be sure to pay extra attention to the formatting of fields containing Numeric or Date information.
Creating your Import File: A Typical Procedure to Prepare Data for Import.
In today's electronic world most companies have their employee data available in an electronic format in one form or another. The information may be saved in an excel spreadsheet, stored in a SQL or Access Database, or kept in a payroll application. Employee data from other applications can often be exported in a comma delimited format which in turn can be imported into the InfiniTime Software. When importing information from a third party application there are a few key items, as listed below, which require attention.
What information is to be imported?
Data Format
Valid Values
Column Headers
Importing Employee Information: What information is required and what optional information should I import?
While it is important to know what information can and cannot be imported into the InfiniTime software it is also important to recognize what information should be imported based upon the features you are currently using within the InfiniTime software. For example if Security Filters and Groups have been implemented in order to allow supervisors to see only employees within their group it is important to ensure each employee has the appropriate group assigned the them. In this case you would want to make sure the information required to import groups is included in each employee record. A list of commonly used optional features and the information used by each is listed below.
Filtering by Groups - Supervisor access is often restricted by providing access only to the individuals a supervisor is responsible for. This is accomplished by configuring the Supervisor's Security Filters and assigning specific groups to the supervisor. Employees must be assigned to the proper group in order for supervisor's to access their record.
Employee Messaging - By default Employee's only have the ability to send a message to their supervisor. If supervisor's are not configured properly the message will not reach the intended recipient.
Escort Windows - Escort Windows allow users to access custom designed portals to the InfiniTime software. An Escort must be assigned to an employee in order for them to access the Escort Module.
Access Control - Access Control Groups are used to designate which users have access to an entryway and at what times they are permitted to enter and exit. Access Control Groups must be assigned to an employee in order for them to use the Access Control Systems.
Holidays - Holiday Schedule Types are configured according to a company's policy for paid Holiday time. A holiday type must be assigned to employees in order for them to automatically receive paid holiday time.
Accruals - Accrual types are configured according to a company's policy for Vacation and Sick Time. An accrual type must be assigned to employees in order for them to accrue sick time or vacation time automatically.
Security Role - Security Roles govern access to the InfiniTime Application. If security roles are not specified in an import file all employees will default to the Employee Role.
Note: Some information such as Default Schedules and Security Filter Settings cannot be imported. It is important to ensure this information is configured appropriately after the import has been performed.
Note: Many of the above settings can be assigned to employees using Quick Assign. In some cases it may be easier to use quick assign to configure the settings appropriately after new employees have been imported into the software rather than configuring the import file. Some items such as Escort, Holiday Settings, and Accrual Types also have a default setting. The default setting will be automatically assigned to new employee records created with the Import Feature.
Preparing a Comma Delimited File for Import: Ensuring proper data format.
If employee data is not formatted correctly the record will not be imported. To ensure correct data format refer to the tables listed under the topic 'Target Fields Available For Import' A section of the Employee Information table is displayed below showing some of the fields that can be imported along with compatible format information. Each column of an import file and the data contained therein should be compared to this list in order to ensure proper data format before performing an import.

Data Type - The data type is described by the Field Type Column. This column indicates the type of information the field can hold. Common field types are below. Only the characters indicated are supported by the InfiniTime Application. Use of special characters and punctuation should be avoided.
Numeric - Numeric fields can only hold numbers (0 to 9) and cannot contain leading zeroes.
Alphanumeric - Alphanumeric fields can hold letters (A to Z), numbers (0 to 9) and spaces.
Character - Character fields can contain only one letter (A to Z) or number (0 to 9).
As shown above the Employee ID is an alphanumeric value. A combination of letters and numbers can be stored in the Employee ID up to a maximum of 50 Characters.
A note on importing numeric values: When importing numeric values into an Alphanumeric field the numeric value should be enclosed in quotes within the Comma Delimited File. This ensures the value will not be treated as a date or a number upon import.
Data Length and Format - The length and format are described by the Field Format Column. This column will contain one of three value types, a whole number, a decimal number, and an example detailing the format of the data. Examples of each value type that may be found in this field are provided below.
Whole Numbers - A whole number represents the number of characters or digits that can be stored within the respective field.
Decimal Numbers - A decimal number represents the number of digits before and after a decimal point that can be stored within the respective field.
Data Format - Symbols and letters are often used as place holders for specific information. An example of a data format would be MM/DD/YYYY which indicates a ten character field where the first two digits represent the month, the third and fourth digits represent the day, and the last four digits represent the year. A forward slash (/) is also shown between each set of digits and is expected in the data to be imported.
As shown above the Employee Middle Initial is an alphanumeric field and can hold one character. If you decide to import the middle initial ensure only one character is present in the Middle Initial Column. The middle initial field is intended only for a single character and cannot store a middle name or punctuation.
Required - Indicates if a field is required. Required fields must have a column from the import file mapped to them in order for records to be successfully imported, even if you are only updating employee information. A value of 'Y' in this column indicates a field is required. A value of 'N' in this column indicates a field is not required. A value of 'P' indicates the field is not required in order to successfully import records however you will be prompted to enter the information manually when editing the record for the first time. For example if an employee supervisors are not imported when importing employees then the software will prompt the user to enter the employee's supervisor when attempting to edit the employee record.
Required fields must be present in the import file and mapped to the appropriate field. Required fields for importing employees are listed below:
Employee Badge ID
Employee Clock ID
Employee Clock Password
Employee First Name
Employee ID
Employee Last Name
Employee Login ID
Employee Login Password
Link to Department Table
NOTE: As detailed above required fields must be present within the import file in order for the import to complete successfully. Even if you simply wish to update employee personal information such as Addresses and Emergency Contact information the required fields listed above must be present in the import file. These values are compared with multiple tables in the InfiniTime Application to ensure the appropriate record is being updated and no duplicates exist. If this information is not provided properly a blank employee record will generally be created. Blank records do not have a first or last name and should be deleted.
Valid Values - Some fields such as spin boxes give users the ability to select a value from a predetermined list of items. Only the predetermined values may be imported into these fields. Valid values have been listed for fields that are restricted to a predetermined list of items. Be sure to verify the proper case of the information that is to be imported. For example the Type field within Timecard Files has two predetermined values, Clock In and Clock Out. clock out is not the same as Clock Out and will not be recognized by the import.
As shown in the table above the Employee Pay Method has five valid values. These values are Hourly, Other, Pay On Hold, Per Diem, and Salary. Only these values can be imported into InfiniTime. Keep in mind these values are case sensitive.
Override - If desired the Override option can be used in leu if editing the import file. For example if your payroll system exports M or S for married and single these values can be imported directly using the override feature by configuring a conditional override. A conditional override searches for a specific term and imports another value when the term is matched. IE: IF Marriage Status = M then Import Married. Refer to Import Configuration: Override for more information on the override feature.
Import File Headers and Mapping Destination Fields - Map By Name
While some applications may not include a header record when exporting a comma delimited file it is often best to ensure a header record exists and includes the correct information. If column headers are set to the same name as the field within InfiniTime the Map By Name button can be used to simplify the mapping process. To identify the appropriate header to use for each column of your import file follow the procedure below:
1.) Identify which field the information you are importing corresponds to. For example employees are generally assigned a unique identifier. This identifier may include letters and numbers. By looking at the table of Employee Information Fields that can be imported you can quickly identify the item below as the correct field.
![]()
2.) The Field Name, or Employee ID in this case, should be used as the header for the import file.
The Import File Selection Table allows you to select what type of information will be imported to the InfiniTime program. In general the tasks below must be performed before a file can be imported. It is important to read the reference documents linked below prior to attempting to design an import file for use with InfiniTime. This will help you understand how to prepare a file for import into the InfiniTime Application.
1.) Prepare a comma delimited (.csv) file with the information you would like to Import into InfiniTime. Remember, all required fields must be present in the import file - even if you are only updating employee records. IE: To update employee personal information for multiple employees at once the import file must contain the fields you wish to update (Address Line One, Address Line Two, Emergency Contact Name etc.) in addition to all required fields such as Employee ID, Employee First Name, Employee Last Name etc. Refer to Import File Creation and Editing for more information on designing an import file.
2.) Ensure all information in the import file is compatible with database constraints. In general Alphanumeric fields should only contain A to Z, spaces, and 0 to 9 while numeric fields should only contain 0 to 9. A list of fields that can be imported into InfiniTime along with the type of data they can store is available for your reference.
3.) Create an Import Criteria to be used with the prepared import file. Be sure to specify the appropriate file type and check the option to skip the first record if your import file contains a header row.
4.) Map the fields within the file to fields within the InfiniTime Database. Be sure to perform any overrides as necessary.
5.) Save the import criteria and take a backup of the InfiniTime Database prior to performing the import. This ensures it will be possible to revert to the state of the database prior to the import if needed.
6.) Perform the import.
Selecting an Import File Type
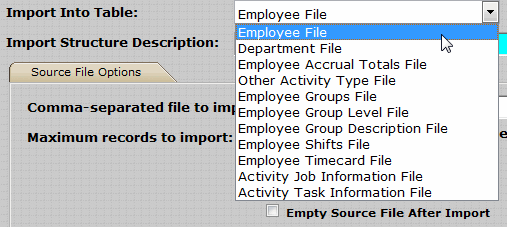
Department File - Imports the fields necessary for the program to create departments.
Employee Groups File - Assigns groups existing within the InfiniTime Database to employees.
Employee File - Imports Employee information into the program, this includes most HR information in InfiniTime.
Employee Accrual Totals File - Imports past amounts of accruals earned by the employee.
Employee Group Level File – Imports Group Levels, creating them within the database. Group Levels create folders within the Group Table. Locations is an example of a group level where the groups under it, Phoenix, Pittsburgh, Philadelphia, would be Group Descriptions.
Employee Group Description File - Imports Group Descriptions, creating them within the database.
Other Activity Type File - Imports the fields necessary for the program to create Other Activity Types, Other Activity Types are tips, vacation, sick time, Etc
Employee Shifts - Assigns shifts existing within the InfiniTime Database to individual employees.
Employee Timecard File - Imports Employee Timecard Punches.
Activity Job Information File - Imports Activity Jobs. Each record in the import file will be used to add a job to the InfiniTime database. Useful for manufacturing companies with 100+ jobs.
Activity Task Information File - Imports Activity Tasks. Each record in the import file will be used to add a job to the InfiniTime database. Useful for manufacturing companies with 100+ tasks.
Source File Options
The source file options tab is used to specify details about the file to be imported. Information about the format of the file and the location of the file are needed.

Import Structure Description - Enter a description for the import you are about to create. This name will appear on the initial window for easy importing.
![]()
Comma-Separated File To Import - Click on the magnify glass and select the file you wish to import. It is important to note that changing the selected file after Mapped Fields have been defined will clear the field mappings.
TIP: If you need to update records in an import file for a previously created an Import with mapped fields, but do not wish to reconfigure the mapped fields, the Comma Delimited File can be copied directly to the Input Directory in the InfiniTime Program File Location on the InfiniTime Server. This should only be performed if the order of fields and field headings have not changed from the original comma delimited file selected in the Import and the new file. Additionally, the name of the original and new comma delimited files must match.
Maximum Records to Import - This field will allow you to specify how many records should be imported. To import all records in the file leave this field at “0”
Field Separator - Enter the field separator used in your import file. The most common used separator is the comma, however certain files may contain hyphens or other symbols.
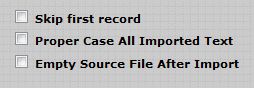
Skip First Record - If this box is checked the first line of the import file will be ignored. This should be checked if the first line is used as a header description.
Double Quotation Marks - Check this box if your file has quotation marks around each field. (ex “Jose Smith”,”111 InfiniTime™ St”,”Orange, AZ 85302”)
Proper Case All Imported Text – Imports all text into proper case form. (Ex. Jose Smith not jose smith)
Empty Source File After Import – This field should be checked if you want to empty the source file after you import.
Duplicate checking gives you the option to look for duplicate entries in your import file compared to data that is already in the program. Additional duplicate checking configuration is not required when importing.
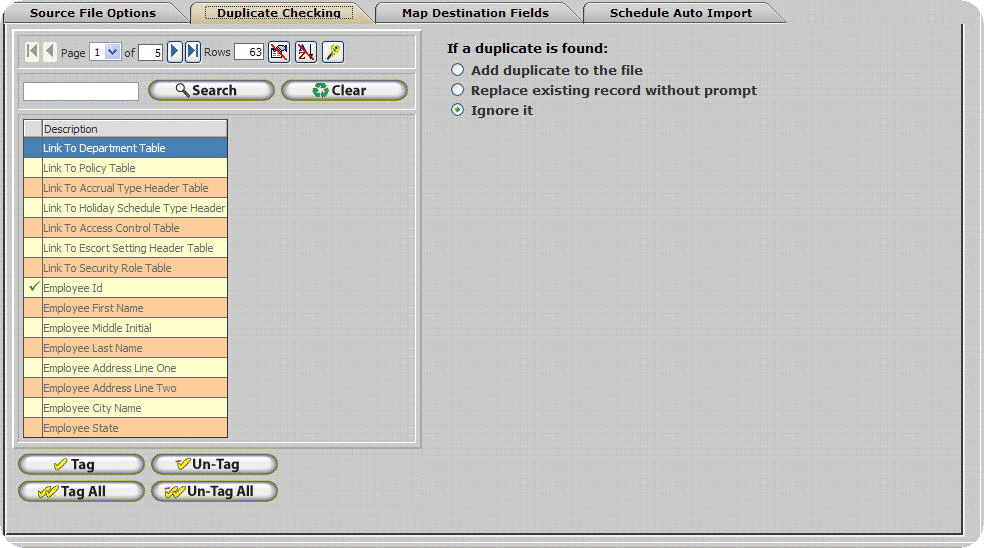
If duplicate is found:
Add Duplicate To The File - To add the duplicate to the file without prompting or replacing the existing file, check this field. Duplicates can be stored in a text file if this option is checked. See below.
Store Duplicates in a text File - If this box is checked, enter a path to create a file. This file will contain all duplicates that the program found while importing.
Replace Existing Record Without Prompt - To replace the record without prompting check this field. For example, this option should be selected if you are updating existing employee records will current contact or address information. Additionally, this option must be selected in order to import Employee Accrual Totals or Employee Group Assignments using the Employee Groups Import File Type.
Ignore It - If this field is checked, the program will simply ignore duplicate records completely.
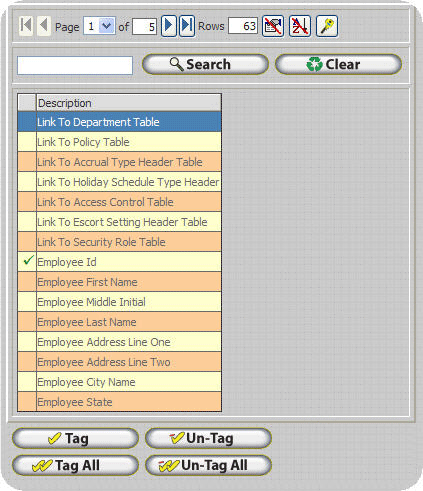
This window allows you to select which
fields to check for duplication. To select a field, highlight the
Field Name and click on the ![]() Button.
Button.
Note: When Importing Employee Timecards it is important to ensure duplicate records present in the import file will be ignored. To ensure duplicate punches, or punches for a specific employee with the same Time and Date, are not imported Date and Time must be tagged on the Duplicate Checking Tab as outlined below.
1. Click on the Duplicate Checking tab after selecting a source file.
2. Type Date in the search box and click on the Search Button.
3. Click Tag.
4. Type Time in the search box and click on the Search Button.
5. Click Tag.
6. Ensure 'Ingore It' is selected for 'If Duplicates are found:'
6. Continue configuring the Import.
Mapping the destination fields is the final phase of the import process. Here you will map the fields that reside in your import file to the fields that are in the InfiniTime program. It is important to verify all required fields are mapped when performing an import. Refer to Chapter 11 - Target Fields Available to be Imported for more information regarding required fields and import file format.
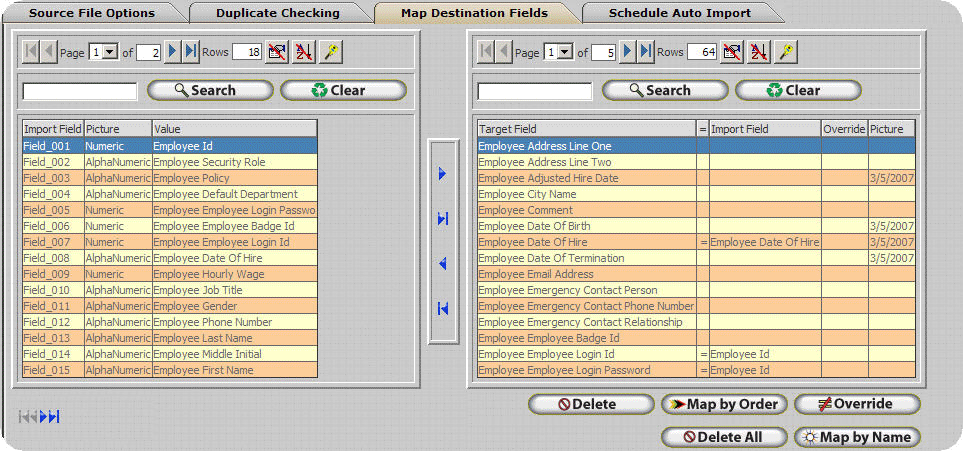
Import Fields - Import Fields appear in the grid on the left. These are from the file selection on the Source File Options tab.
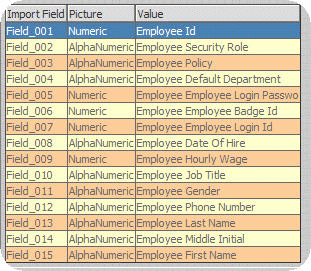
Target Fields - Target Fields appear in the grid on the right. These are the fields that are in the InfiniTime Program.
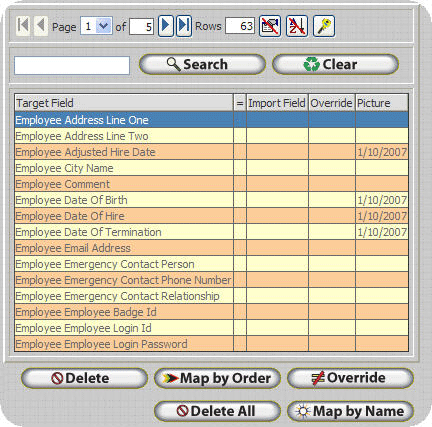
How To Map The Fields
To map the fields, start by highlighting the Source File Field on the left side grid. Then highlight the desired target field on the right side grid. Use the grid controls to change between pages in order to see all available fields.
The controls in the center of the screen are used to associate the selected import field with the selected target field as detailed below.
![]() – Associates the Selected Import field with the Selected Target Field.
You will notice that the data in the Import grid will be displayed in
the target grid after association is complete.
– Associates the Selected Import field with the Selected Target Field.
You will notice that the data in the Import grid will be displayed in
the target grid after association is complete.
![]() – Removes any association for the selected Target Grid Field. You will
notice that the data in the Target grid will be removed.
– Removes any association for the selected Target Grid Field. You will
notice that the data in the Target grid will be removed.
![]() – Removes all associations for the Target Grid. All data in the target
grid will be removed.
– Removes all associations for the Target Grid. All data in the target
grid will be removed.

![]() -
This button is used to remove a field that you have already dragged
over onto the field mapping area. This will not permanently remove the
field. It will simply put it back on the left side of the screen.
-
This button is used to remove a field that you have already dragged
over onto the field mapping area. This will not permanently remove the
field. It will simply put it back on the left side of the screen.
![]() - This button is used to remove a field that you have already mapped This
will not permanently remove the field. It will simply put it back
on the left side of the screen. *THIS
WILL REMOVE ALL OF THE FIELDS THAT YOU HAVE MAPPED!
- This button is used to remove a field that you have already mapped This
will not permanently remove the field. It will simply put it back
on the left side of the screen. *THIS
WILL REMOVE ALL OF THE FIELDS THAT YOU HAVE MAPPED!
![]() - Select this button if the header labels (First Line of your import
file) match the fields that you wish to import. This will
eliminate you from having to drag over the fields. This will only work
if the header of your import file contains the same field names as those
shown to the left of the Target Field.
- Select this button if the header labels (First Line of your import
file) match the fields that you wish to import. This will
eliminate you from having to drag over the fields. This will only work
if the header of your import file contains the same field names as those
shown to the left of the Target Field.
![]() - Select this button if all of the fields that are in your import file
are in the same order as the fields in the Target Grid. If you select
this button and your file is not in the same import you can cause file
corruption, be sure to take a backup before attempting to Import Employee
information.
- Select this button if all of the fields that are in your import file
are in the same order as the fields in the Target Grid. If you select
this button and your file is not in the same import you can cause file
corruption, be sure to take a backup before attempting to Import Employee
information.
![]() - Select this button to set the date picture. It will
bring up the Date Picture Form as shown below. The picture button is only
available for Target Fields that have an entry in the Picture Column.
- Select this button to set the date picture. It will
bring up the Date Picture Form as shown below. The picture button is only
available for Target Fields that have an entry in the Picture Column.
For example, you can specify the date format and separator used within the import file by changing the date picture and separator:
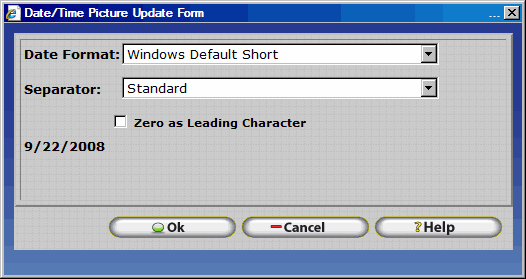
![]() - The Override button brings up the Override option
in the Import tool. This allows the user more flexibility to customize
the settings before the file is imported, i.e. the file being imported
may have all the employees in separate departments, the user can select
the Department link to be Department A only and all employees imported
from the file will fall under Department A instead of their own individual
departments.
- The Override button brings up the Override option
in the Import tool. This allows the user more flexibility to customize
the settings before the file is imported, i.e. the file being imported
may have all the employees in separate departments, the user can select
the Department link to be Department A only and all employees imported
from the file will fall under Department A instead of their own individual
departments.
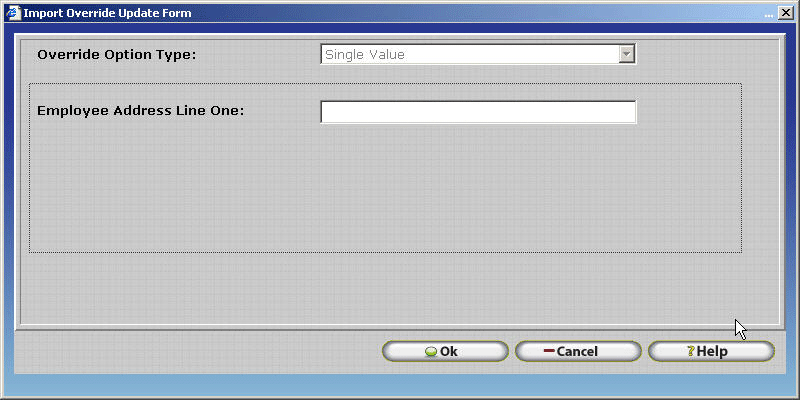
Override Option Type – This drop down menu brings up a set of options to select from. This determines the method by which the entry in the import file will be overwritten with. This drop down menu can only be viewed if a source field is assigned to the target field you are attempting to override.

The user can select from the options listed below to override the field's original value. Some options are only available for certain field types.
Single Value – A set value that will be a constant for each record imported into a specific field. This will overwrite the original in the file with the phrase or word inserted by the user for all records.
Conditional Override – Fields that will be overwritten if a condition is met. For example if your old software listed gender as M or F you could use conditional override to replace M with Male and F with Female as InfiniTime uses the full word for gender instead of an abbreviation. This is shown in the example below. Conditional Override is supported for both Link To and regular field types.
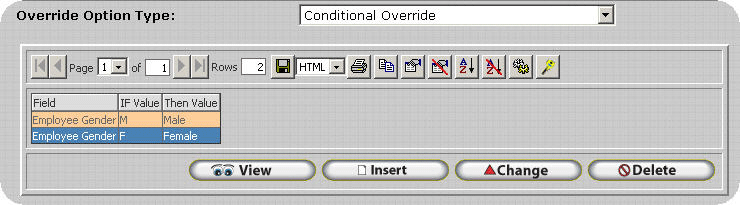
Click insert to insert a new condition.

The IF and Then field displays will be determined by what Target Field is selected when the Override is selected. In this example, Employee Gender is the Target Field. To complete this form, determine what conditions must be met and fill them accordingly.
(i.e. If Employee Gender equals F, Then Import Employee Gender as Female.)
Lookup In Another Table – This option looks up information from a separate field, such as the Department or Security Role table. This is only displayed when Override is used for a “Link To” field such as Link to Department Table or Link to Security Role Table. (i.e. Department names)
Parse Current Value – This option breaks down a field/record in an imported file to become a more accessible record. For instance, if the import file has every record under one field in an Excel worksheet, it can be broken down as if it were all in separate fields. (i.e. First and Last name are in the same field. By parsing the field, the user can separate the First and Last name to be imported as two separate fields.)
The Parse position type can be either by Character, Position, or Both. By Character it means to start or end the value by the designated character chosen by the user, (i.e. -, , “, or a space.)
To Parse by Position means to start or end the value by the numbered position of the characters in that record. (i.e. Daniel Kraus, is the record we wish to parse. Start Position would be 1, pertaining to D. End Position would be 6, as to L.)
Saving The import - To save the import structure that you have created click the OK button. Once the file is saved you will return to the Import Definition Table. To import a saved structure, highlight it and click on the Import button.
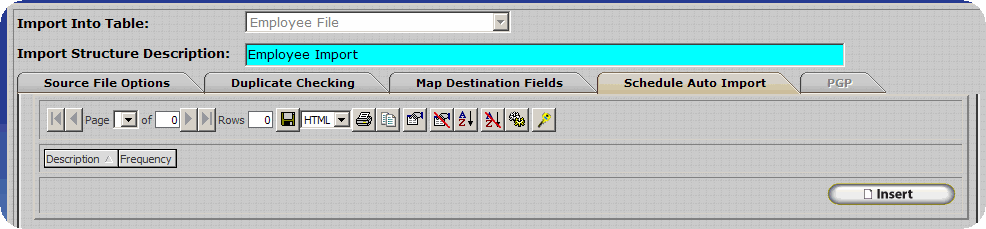
InfiniTime allows a schedule to be configured in order to perform an import automatically at a regular interval. This is often used to update employee information within the InfiniTime application from an external source on a regular basis. The following tasks must be performed prior to performing an automatic import:
1.) A comma delimited import file must be prepared and placed in the import directory. The import file must adhere to all database constraints.
2.) An Import Criteria must be configured for the import file. The name of the import file must always match the name specified in the Import Criteria or the import will fail.
3.) Atleast one Auto Import Schedule must be defined before an import will be performed automatically.
Note: The InfiniTimeHouseKeeping service must be running in order for an import to be performed automatically. The import file must be present in the Import directory with the same file name as that specified on the Import Criteria.
Insert – Click insert to open up the Auto Import Schedule Update Form and set a schedule.
Change – Click change to make any adjustments to a previously configured schedule.
Delete – Click delete to remove the highlighted Import Schedule.
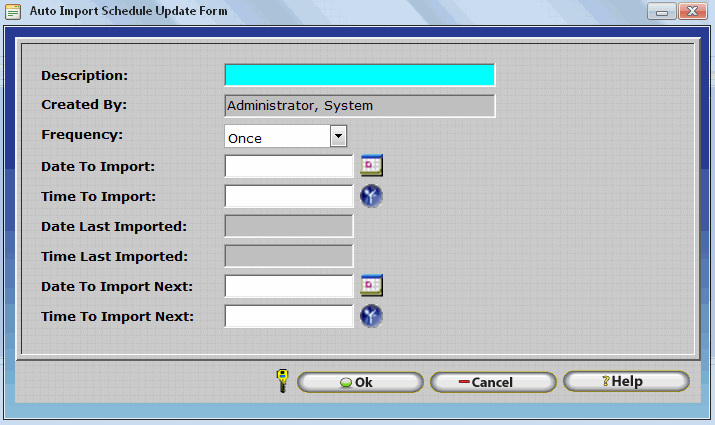
Description – Describes the Import Schedule you are creating.
Frequency – This is how often the program will run the auto import. The options are: Once, Daily, Weekly, and Monthly.
Date to Import– This is the date that you want the system to execute the auto import.
Time to Import – This is the time that you want the system to execute the auto import on the date selected above.
Date Last Printed – Tells you the last date the system automatically ran the import.
Time Last Printed – Tells you the last time on the date above the system automatically ran the import.
Date to Import Next – The date entered here will be the next future date that the system will automatically perform an import.
Time to Import Next - The time entered here will be the next future time that the system will automatically perform an import.
The Export tool makes it possible to export nearly every field within the InfiniTime software into a comma delimited file in a format specified by the user. The exported information can then be imported into another application or distributed as required. It is important to understand the different tables which store information within the InfiniTime database as a single export can only contain fields from one table. An overview of each file type that can be exported from the tables within InfiniTime is provided below.
Selecting an Export File type:
Before an export can be configured the user must understand what information is desired within the export file. A brief description of the fields available for each file is provided below. Refer to Chapter 11: Target Fields Available for Export for a complete list of all fields by file type.
Employee Timecard File - Exports Employee Timecard Punches.
Activity Job Information File - Exports Activity Jobs. Each record in the import file will be used to add a job to the InfiniTime database. Useful for manufacturing companies with 100+ jobs.
Before data from InfiniTime can be exported export criteria must be configured to provide details regarding what information will be exported and what format and order the fields will be exported in. Configuration examples are provided below. The first step is to open the Export Definition Table.
Accessing the InfiniTime Export Table:
Click on Tools.
Click on Import and Export.
Click on Export.
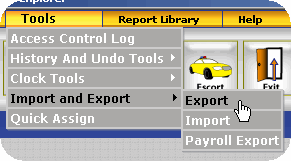
The Export Definition Table will be displayed as shown below.
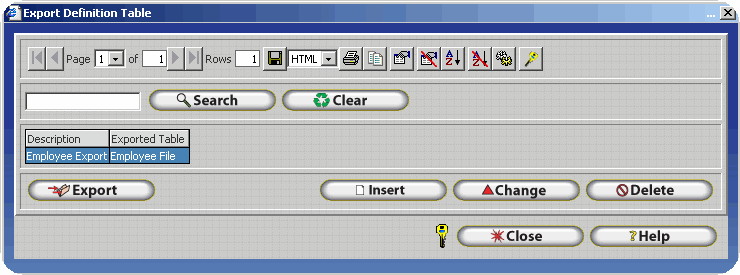
![]() - The export button allows you to highlight an already saved export
structure and export it.
- The export button allows you to highlight an already saved export
structure and export it.
![]() - The insert button will allow you to create a new export structure.
- The insert button will allow you to create a new export structure.
![]() - This button will delete a highlighted export structure.
- This button will delete a highlighted export structure.
Performing an Export:
The Export Update Form is displayed below. There are two major sections of the Export Update Form, Source File Options and Map Destination Fields, which must be configured properly in order to achieve desired results. An example configuration is shown below with a description of each field following.
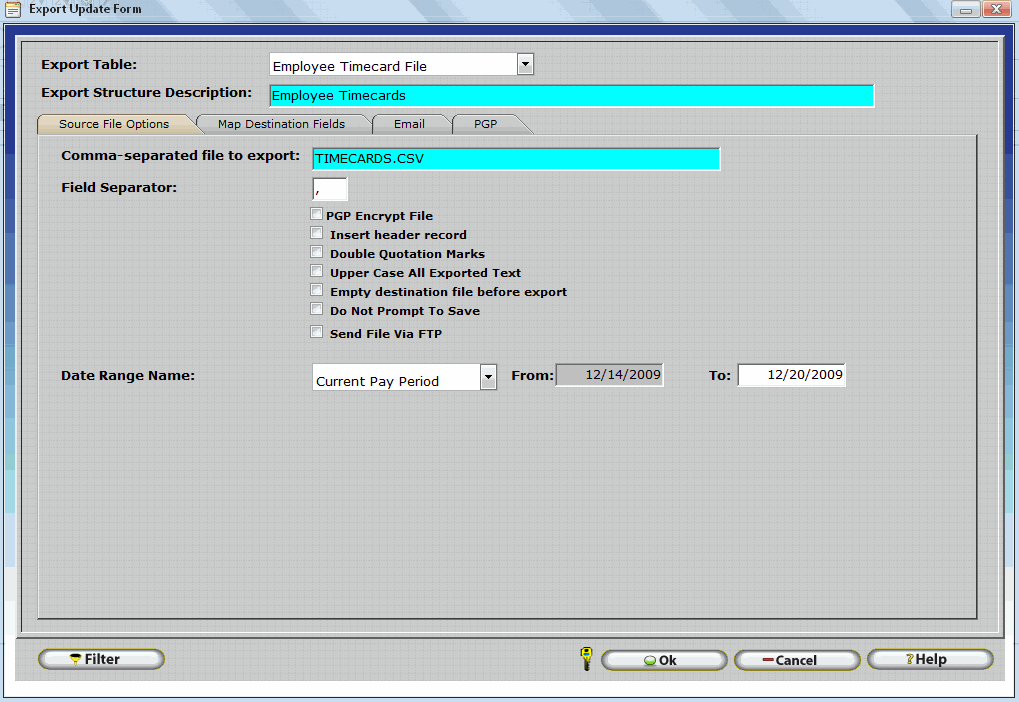
Export Structure Description - Enter a description for the export you are about to create. Export descriptions are listed on the Export Description Table for ease of use. In this way the user can identify the information that will be exported without checking to see which fields are mapped on the Export Update form. The description should be complete and straight forward in describing the fields associated with the export.
Comma-Separated File To Export - Specify a name for the file you would like to create. The file will be exported to the InfiniTime Output FTP site for access from Client Machines. The file may also be accessed from C:\Inception\InfiniTime\InfiniTime7\Output on the InfiniTime Server. This assumes the default installation location was used.
Technical Note: The file name should not contain spaces or special characters. Only A through Z and 0 through 9 are valid characters for use when naming the file. It should also be noted that a local path cannot be used. Files exported from InfiniTime are created on the server and must then be transferred to client machines.
Field Separator - Enter the field separator to be used in your export file. The most common used separator is the comma, however certain files may contain hyphens or other symbols.
Insert Header Record - If this box is checked the first line of the export will be used as a header, describing the rest of the fields in the column. The default header used for each field is the same as the fields name which can be found in Chapter 11: Target Fields Available for Export
Double Quotation Marks - Check this box if you want double quotation marks to be placed around each field. (IE: “Jose Smith”,”111 InfiniTime St”,”Orange, AZ 85302”)
Upper Case All Exported Text – If this box is checked all text in will be exported in upper case form. (Ex. JOSE SMITH not Jose Smith)
Empty Destination File before Export – Check this field to delete all contents from the destination file before exporting. This action will only be performed if the comma-separated file specified exists.
Do Not Prompt to Save - Check this field if you do not wish the software to prompt you to download the file to your local machine after it is created on the server.
Date Range Name - This field is only available for the 'Employee Timecard File' and 'Employee Accrual Hours' File Types. The Date Range Name settings is used to specify the date range for which Employee Timecards or Accrual Hours will be exported.
![]() - The filter button allows you to specify
which employees records will be exported for. Only certain export types,
as listed below, support use of the Filter Button. For example, tagging
a department, group, or individual employees when using the Employee Accrual
Totals Export Type will export employee accrual totals for all employees
in the selected department, group, as well as for the tagged employees.
- The filter button allows you to specify
which employees records will be exported for. Only certain export types,
as listed below, support use of the Filter Button. For example, tagging
a department, group, or individual employees when using the Employee Accrual
Totals Export Type will export employee accrual totals for all employees
in the selected department, group, as well as for the tagged employees.
Send File Via FTP - Use this feature to automatically transfer the file via FTP (File Transfer Protocol) to a destination of your choice. The following fields will become available and must be filled out. An example is shown below. Keep the items that follow in mind when entering this information.
A domain name or IP Address can be used in the Host Address Field.
Do not include the ftp:// prefix in the Host Address Field.
The Directory field can be left blank if you are uploading to the root of the FTP Site.
If you wish to upload to a specific folder on the FTP site you must specify the full path using a preceding forward slash ( / ) as shown in the image below.
The Login Name can be a Local Windows Account, a Domain Account, or Anonymous. Enter the Login Name in one of the following formats:
Local Windows Accounts:
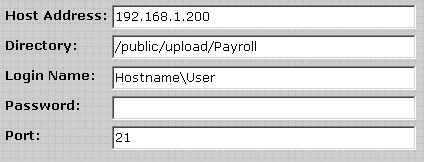
1. Enter the Host Address There are two valid formats for the host address field as detailed below. Do not include the ftp:// prefix in this field.
Valid Host Address Formats |
|
Format Type |
Example |
IP Address |
192.168.1.20 |
Domain Name |
www.InfiniTime.com |
2. Enter the Directory. Remember to include a preceding forward slash as shown.
3. Enter the Login Name in the following format: "HOSTNAME\USER" For Example if your FTP Server's hostname is FTPSERVER and the user you wish to connect as is FTPUSER then you would enter the following:
FTPSERVER\FTPUSER
4. Enter the user's password.
5. Specify the port to use when connecting to the FTP Server. This does not generally need to be altered.
Domain Accounts:
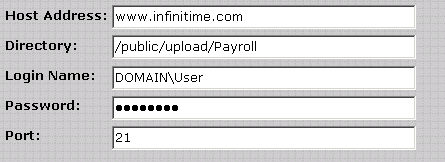
1. Enter the Host Address. There are two valid formats for the host address field as detailed below. Do not include the ftp:// prefix in this field.
Valid Host Address Formats |
|
Format Type |
Example |
IP Address |
192.168.1.20 |
Domain Name |
www.InfiniTime.com |
2. Enter the Directory. Remember to include a preceding forward slash as shown.
3. Enter the Login Name in the following format: "DOMAIN\USER" For Example if your FTP Server's domain is InfiniTime and the user you wish to connect as is FTPUSER then you would enter the following:
InfiniTime\FTPUSER
4. Enter the user's password.
5. Specify the port to use when connecting to the FTP Server. This does not generally need to be altered.
Anonymous User:
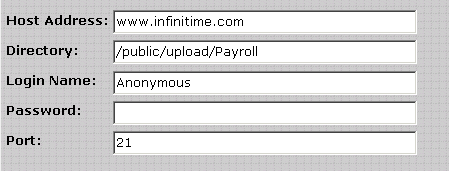
1. Enter the Host Address. There are two valid formats for the host address field as detailed below. Do not include the ftp:// prefix in this field.
Valid Host Address Formats |
|
Format Type |
Example |
IP Address |
192.168.1.20 |
Domain Name |
www.InfiniTime.com |
2. Enter the Directory. Remember to include a preceding forward slash as shown.
3. Enter Anonymous as the Login Name.
4. Leave the password field blank.
5. Specify the port to use when connecting to the FTP Server. This does not generally need to be altered.
Technical Note: Microsoft IIS includes an option to permit only anonymous connections to an FTP Site. If this option is checked as shown below only anonymous connections to the FTP Site will be allowed. This means ANYONE can access the payroll export file. This option should be unchecked and it should be confirmed that a login is required to gain read or write access to the directory where the Payroll Export File will be uploaded. Please contact your Information Technology Personnel for assistance with checking file permissions on your FTP Site.
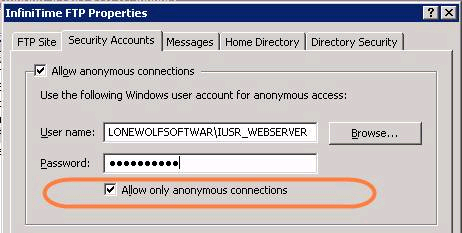
Technical Note: InfiniTime attempts to connect to the FTP Site to validate the Login ID, Password, and Directory when the OK Button is clicked on the Payroll Export Update Form. If InfiniTime is unable to successfully connect to the FTP Site with the provided login information, or if the specified directory does not exist, an error will be displayed.
Mapping the destination fields is one of the two crucial parts of Export Configuration. Here you will specify which fields will be exported from the InfiniTime software, arrange them in the desired order, and specify and formatting details.
Export Fields - Export Fields appear in the grid on the left. All available fields for your selected export table are displayed.
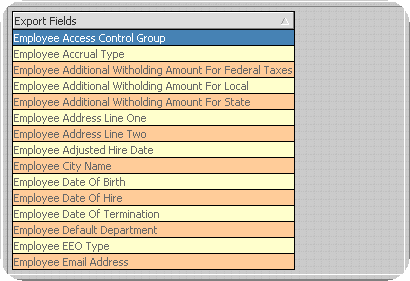
Target Fields - Target Fields appear in the grid on the right. These are the fields that will be exported to your file. An example of an export listing Employee Addresses, Names, and Employee IDs is displayed below.
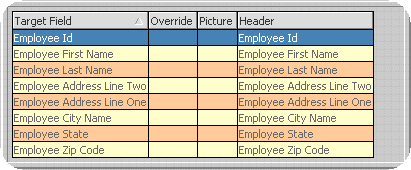
How To Map The Fields
To map the fields, start by highlighting an available field on the left side grid. Then use the controls in the center of the screen or the Add Field Buttons to move the field to the Target Grid. Use the grid controls to change between pages in order to see all available fields. It may help to use the search feature in the grid listing fields for export in order to find the desired field. This helps save time when compared with checking through several pages of fields by finding the desired field immediately. For example, if you wanted to map the Employee ID field you could search for 'ID', 'Employee', or 'ID'. All fields containing the search term in the name will be returned, narrowing the amount of fields displayed by a considerable amount.
The controls in the center of the screen are used to associate the selected export field with the selected target field as detailed below.
![]() – Adds the selected field to the target grid.
– Adds the selected field to the target grid.
![]() – Adds all available fields to the Target Grid.
– Adds all available fields to the Target Grid.
![]() – Removes the selected Target Grid Field. You will notice the data in
the Target grid will be removed.
– Removes the selected Target Grid Field. You will notice the data in
the Target grid will be removed.
![]() –
Removes all associations for the Target Grid. All data in the target grid
will be removed.
–
Removes all associations for the Target Grid. All data in the target grid
will be removed.
Altering Export Format and Field Order
A variety of tools and buttons are provided on the lower right hand corner of the Map Desintation Fields tab. Most of these buttons are hidden until atleast one field has been added to the Target Field grid. Each serves a separate purpose in the configuration of an export and are especially useful when the user has a particular format in mind. The use of each tool is outlined below.
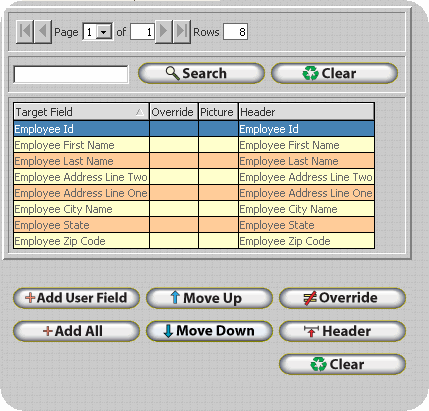
![]() - Adds information entered by the user to
the export. The software prompts the user for information which is then
entered for each employee in the column corresponding to the user defined
field. An example is shown below where the date 2/2/2008 is inserted between
the employee ID and the Employee Name for each employee exported.
- Adds information entered by the user to
the export. The software prompts the user for information which is then
entered for each employee in the column corresponding to the user defined
field. An example is shown below where the date 2/2/2008 is inserted between
the employee ID and the Employee Name for each employee exported.
1.) Click on ![]() to open the User Defined Field Update Form. Enter the information that
will be placed in the User Field for each employee.
to open the User Defined Field Update Form. Enter the information that
will be placed in the User Field for each employee.

2.) Click OK. The User Field label will be displayed in the header column as shown.

3.) Click on the ![]() button to change the header if desired. The Export Override Header Update
Form will be displayed as shown. Simply type the desired header and click
OK to save. Changing the Header for the user field does not change the
value that will be exported for all records. The original value entered
when the user field was inserted will still be exported for each record.
To change the value exported in the user field column for each record,
use Single Value Override.
button to change the header if desired. The Export Override Header Update
Form will be displayed as shown. Simply type the desired header and click
OK to save. Changing the Header for the user field does not change the
value that will be exported for all records. The original value entered
when the user field was inserted will still be exported for each record.
To change the value exported in the user field column for each record,
use Single Value Override.

4.) The header will be updated as shown.
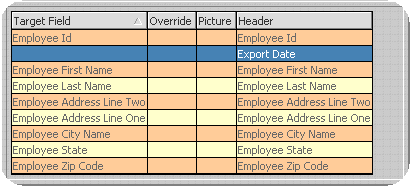
5.) Save the export settings by clicking OK on the Export Update form. Highlight the Export Definition and click export.
6.) You will be prompted to download the export file. An example of how the user entered information is formatted in the export file is shown below. Column B shows the user entered heading of "Export Date" and the user entered value 2/2/2008.

![]() - Adds all Export Fields to the Target Grid.
- Adds all Export Fields to the Target Grid.
![]() - The order of the export file is defined
by the fields in the target grid. The first field on Page 1 will be exported
as the first column of the export file. The second field will be in the
second column, while the third field will be in the third column, ect. This button will move the Selected Target Field
up in the order. IE: If the third field is highlighted
when this button is used it will be moved up to the second position while
the field that was in the second position will move down.
- The order of the export file is defined
by the fields in the target grid. The first field on Page 1 will be exported
as the first column of the export file. The second field will be in the
second column, while the third field will be in the third column, ect. This button will move the Selected Target Field
up in the order. IE: If the third field is highlighted
when this button is used it will be moved up to the second position while
the field that was in the second position will move down.
![]() - The order of the export file is defined
by the fields in the target grid. The first field on Page 1 will be exported
as the first column of the export file. The second field will be in the
second column, while the third field will be in the third column, ect. This button will move the Selected Target Field
down in the order. IE: If the third field is
highlighted when this button is used it will be moved down to the fourth
position while the field that was in the fourth position will move up.
- The order of the export file is defined
by the fields in the target grid. The first field on Page 1 will be exported
as the first column of the export file. The second field will be in the
second column, while the third field will be in the third column, ect. This button will move the Selected Target Field
down in the order. IE: If the third field is
highlighted when this button is used it will be moved down to the fourth
position while the field that was in the fourth position will move up.
![]() - The Override button opens the Export Override
Update Form. This gives the user more flexibility to customize the
data before a file is exported. For example if a company had multiple
locations they may assign a unique identifier to each location when designating
employee IDs. Lets say the unique identifier
is the first three digits of every Employee ID in the InfiniTime
Software and they want the export to have a column where only the unique
identifier for each location is listed. In this way the final file could
be opened with Microsoft Excel and sorted by the location identifier in
order to easily distinguish employees in one location from the next. This
could be accomplished through Override by using the Parse Current Value
Override Option. More information on the types of override available and
their use can be found below.
- The Override button opens the Export Override
Update Form. This gives the user more flexibility to customize the
data before a file is exported. For example if a company had multiple
locations they may assign a unique identifier to each location when designating
employee IDs. Lets say the unique identifier
is the first three digits of every Employee ID in the InfiniTime
Software and they want the export to have a column where only the unique
identifier for each location is listed. In this way the final file could
be opened with Microsoft Excel and sorted by the location identifier in
order to easily distinguish employees in one location from the next. This
could be accomplished through Override by using the Parse Current Value
Override Option. More information on the types of override available and
their use can be found below.
Select a field in the Target Export Grid and click on the Override button. The Export Override Update form will be displayed as shown.
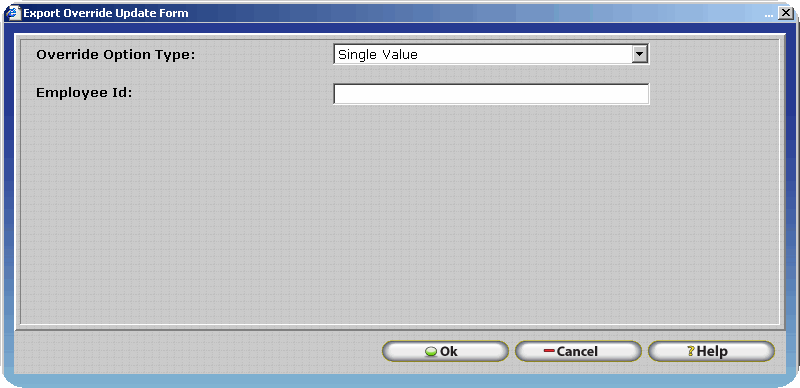
Override Option Type – This drop down menu brings up a set of options to select from. This determines the method by which the entry in the export file will be overwritten with. This drop down menu can only be viewed if a source field is assigned to the target field you are attempting to override.
The user can select from the options listed below to override the field's original value. Some options are only available for certain field types.
Single Value – Exports a constant value for a given field for each exported record, regardless of the fields original value. This will overwrite the original in the file with the phrase or word inserted by the user for all records. It should be noted that the Single Value override can be used to add a blank column to an export by adding a user defined field and overriding it with a space using the single value option.
Concatenation Override - Permits user to concatenate, or string together, multiple fields. Extra text such as punctuation, spaces, or an alphanumeric value can be inserted after each concatenated field. This feature is useful for exporting multiple InfiniTime fields to a single column. For example: John C. Smith can be exported using the settings shown below.
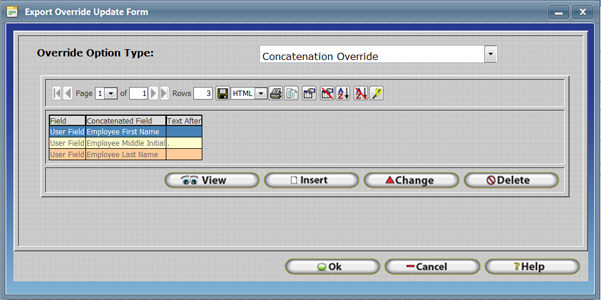
Conditional Override – Exports a specified string if the field's original value matches a predefined value. For example, if the Employee's Marital Status is Married then export M. Or, if the Employee's Marital Status is Single then export S. This is often useful if you are attempting to export information from InfiniTime and import it into another software application, such as a payroll application. If your payroll software tracks gender with M and F rather than Male or Female conditional override can be used to export M and F rather than Male and Female for the Employee Gender field. This example is explained below.
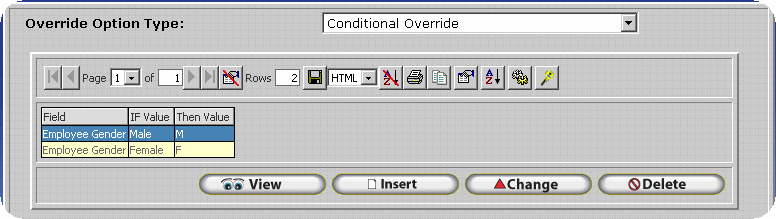
Click insert to insert a new condition.
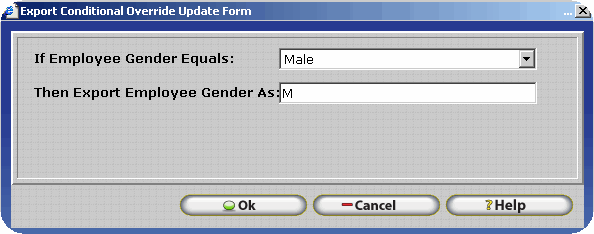
The IF and Then field labels will be determined by what Target Field is selected when the Override is selected. In this example, Employee Gender is the Target Field. To complete this form, determine what conditions must be met and fill them accordingly.
(i.e. If Employee Gender equals Male, Then Export Employee Gender as M.)
Lookup In Another Table – This option looks up information from a separate field, such as the Department or Security Role table. This is only displayed when Override is used for a “Link To” field such as Link to Department Table or Link to Security Role Table. (i.e. Department names)
Parse Current Value – This option breaks down a field/record in an exported file to export only parts of the record. For example if a company had multiple locations they may assign a unique identifier to each location when designating employee IDs. Lets say the unique identifier is the first three digits of every Employee ID in the InfiniTime Software and they want the export to have a column where only the unique identifier for each location is listed. In this way the final file could be opened with Microsoft Excel and sorted by the location identifier in order to easily distinguish employees in one location from the next.
The Parse position type can be either by Character or Position. By Character it means to start or end the value by the designated character chosen by the user, (i.e. -, , “, or a space.)
To Parse by Position means to start or end the value by the numbered position of the characters in that record. (i.e. Daniel Kraus, is the record we wish to parse. Start Position would be 1, pertaining to D. End Position would be 6, as to L.)
Saving The import - To save the import structure that you have created click the OK button. Once the file is saved you will return to the Import Definition Table. To import a saved structure, highlight it and click on the Import button.
![]() - The Header Button provides the user with
the ability to alter the default header used by InfiniTime.
Select a field in the target grid and click on the Header Button to display
the Export Override Header Update Form. Refer to the example above where
the header button is used to alter the header on a User Field.
- The Header Button provides the user with
the ability to alter the default header used by InfiniTime.
Select a field in the target grid and click on the Header Button to display
the Export Override Header Update Form. Refer to the example above where
the header button is used to alter the header on a User Field.
![]() - Select this button to set the date picture. It will bring up the Date
Picture Form as shown below. The picture button is only available for
Export Fields that have an entry in the Picture Column.
- Select this button to set the date picture. It will bring up the Date
Picture Form as shown below. The picture button is only available for
Export Fields that have an entry in the Picture Column.
For example, you can specify the date format and separator used within the import file by changing the date picture and separator:
![]() - Restores
Override and Picture settings for the highlighted target field to the
defaults.
- Restores
Override and Picture settings for the highlighted target field to the
defaults.
Export files can be emailed by setting the options on the Email Tab. Simply enter the appropriate information in each field below.
Note: All Fields on the Email Tab should be filled. Do not leave any fields blank.
Note: Are recipients having trouble with receiving Email from InfiniTime ? Refer to InfiniTime Server SMTP Setup and Troubleshooting for information on configuring and troubleshooting SMTP Service Settings on the InfiniTime Server.
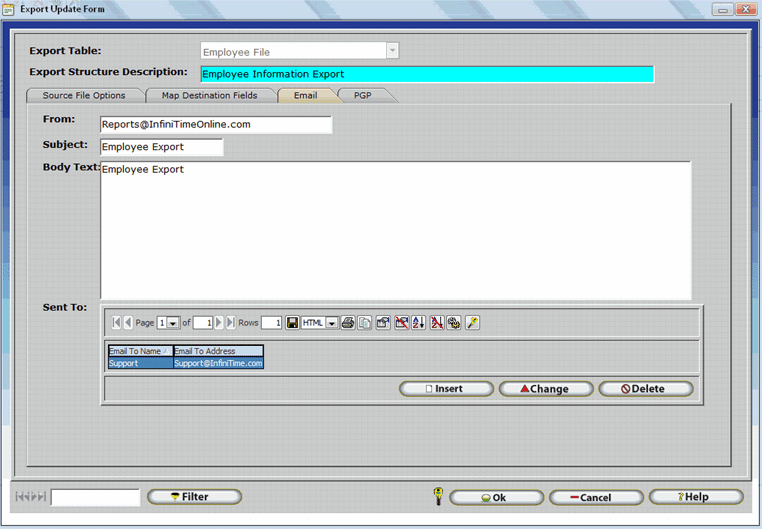
From - Type in the email address of the sender, if a recipient wants to reply to the email they can do so, and it will get back to the original sender.
Subject – Type a subject for the email.
Body Text – Type your message in this field.
Sent To – The sent to grid displays all recipients that the payroll export will be sent to. Recipients are inserted by using the Insert button.
Insert – Used to insert a new recipient as shown below.
Email To Name - Enter the Name of the recipient.
Email To Address - Enter the Email Address of the recipient.
InfiniTime allows a schedule to be configured in order to perform an export automatically at a regular interval. This is often used to update employee information within an external application from data stored within InfiniTime on a regular basis. The following tasks must be performed prior to performing an automatic export:
1.) An Export Criteria must be configured.
3.) At least one Auto Export Schedule must be defined before an import will be performed automatically.
Note: The InfiniTimeHouseKeeping service must be running in order for an import to be performed automatically. The import file must be present in the Import directory with the same file name as that specified on the Import Criteria.
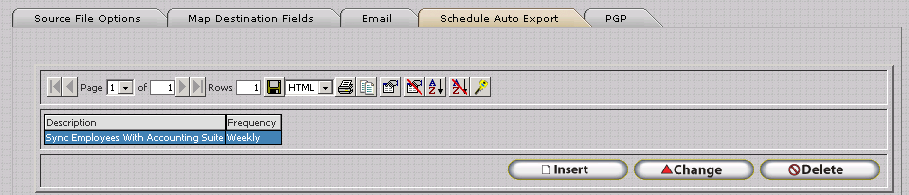
Insert – Click insert to open up the Auto Export Schedule Update Form and set a schedule.
Change – Click change to make any adjustments to a previously configured schedule.
Delete – Click delete to remove the highlighted Import Schedule.

Description – Describes the Import Schedule you are creating.
Frequency – This is how often the program will run the auto import. The options are: Once, Daily, Weekly, and Monthly.
Date to Import– This is the date that you want the system to execute the auto import.
Time to Import – This is the time that you want the system to execute the auto import on the date selected above.
Date Last Printed – Tells you the last date the system automatically ran the import.
Time Last Printed – Tells you the last time on the date above the system automatically ran the import.
Date to Import Next – The date entered here will be the next future date that the system will automatically perform an import.
Time to Import Next - The time entered here will be the next future time that the system will automatically perform an import.
Employee File
(In Alphabetical Order)
Employee Access Control Group
Employee Accrual Type
Employee Additional Withholding Amount for Federal Taxes
Employee Additional Withholding Amount for Local
Employee Additional Withholding Amount for State
Employee Address Line One
Employee Address Line Two
Employee Adjusted Hire Date
Employee City Name
Employee Date of Birth
Employee Date of Hire
Employee Date of Termination
Employee Default Department
Employee EEO Type
Employee Email Address
Employee Emergency Contact Person
Employee Emergency Contact Phone Number
Employee Emergency Contact Relationship
Employee Employee Badge ID
Employee Employee Login ID
Employee Employee Login Password
Employee Escort
Employee Ethnic Code
Employee Federal Exemptions
Employee First Dir. Dep. ABA Routing Number
Employee First Dir. Dep. Acct Type
Employee First Dir. Dep. Amount
Employee First Dir. Dep. Amt Type
Employee First Dir. Dep. Bank Account Number
Employee First Dir. Dep. End Date
Employee First Dir. Dep. Name on Account
Employee First Dir. Dep. Priority
Employee First Dir. Dep. Start Date
Employee First Name
Employee Force Password Change Next Login
Employee Fourth Dir. Dep. ABA Routing Number
Employee Fourth Dir. Dep. Acct Type
Employee Fourth Dir. Dep. Amount
Employee Fourth Dir. Dep. Amt Type
Employee Fourth Dir. Dep. Bank Account Number
Employee Fourth Dir. Dep. End Date
Employee Fourth Dir. Dep. Name on Account
Employee Fourth Dir. Dep. Priority
Employee Fourth Dir. Dep. Start Date
Employee Gender
Employee Holiday Schedule Type
Employee Hourly Wage
Employee Id
Employee Inactive Flag
Employee Job Title
Employee Last Name
Employee Last Performance Review Date
Employee Last Raise Date
Employee Last Wage Review Date
Employee Local Exemptions
Employee Local Taxing Authority
Employee Marital Status
Employee maximum Authorized Amount
Employee Message
Employee Middle Initial
Employee Minimum Authorized Amount
Employee name
Employee Other Ethnic Code
Employee Pay Cycle
Employee Pay Method
Employee Pay Type
Employee Phone Number
Employee Picture Image Name
Employee Policy
Employee Schedule Cycle
Employee Schedule Cycle Days
Employee Schedule Reference Date
Employee Second Dir. Dep. ABA Routing Number
Employee Second Dir. Dep. Acct Type
Employee Second Dir. Dep. Amount
Employee Second Dir. Dep. Amt Type
Employee Second Dir. Dep. Bank Account Number
Employee Second Dir. Dep. End Date
Employee Second Dir. Dep. Name on Account
Employee Second Dir. Dep. Priority
Employee Second Dir. Dep. Start Date
Employee Security Role
Employee Social Security Number
Employee State
Employee State Exemptions
Employee State Marital Status
Employee State Taxing Authority
Employee Termination Reason
Employee Third Dir. Dep. ABA Routing Number
Employee Third Dir. Dep. Acct Type
Employee Third Dir. Dep. Amount
Employee Third Dir. Dep. Amt Type
Employee Third Dir. Dep. Bank Account Number
Employee Third Dir. Dep. End Date
Employee Third Dir. Dep. Name on Account
Employee Third Dir. Dep. Priority
Employee Third Dir. Dep. Start Date
Employee Workers Compensation Code
Employee Zip Code
Department File
(In Alphabetical Order)
Department Cost Center
Department Default Flag
Department Inactive Flag
Department Name
Department Number
Department Schedule Cycle
Department Schedule Cycle Days
Department Schedule Reference Date
Employee Accrual Totals File
(In Alphabetical Order)
Accrual Detail Name
Accrual Type Name
Employee Accrual Totals Date
Employee Accrual Totals Time Accrued
Employee Accrual Totals Time Base
Employee Accrual Totals Time Used
Employee First Name
Employee Id
Employee Last Name
Employee Middle Initial
Other Activity Type File
(In Alphabetical Order)
Other Activity Type
Other Activity Type Code Number
Other Activity Type Count activity Hours as Regular Hours Flag
Other Activity Type Count As Day Worked Flag
Other Activity Type Description
Other Activity Type Exclude From Payroll Export Flag
Other Activity Type Payroll Mapping Code
Payroll Mapping Number
Employee Groups
(In Alphabetical Order)
Employee First Name
Employee Id
Employee Last Name
Employee Middle Initial
Group Description
Group level Description
Employee Group Level File
(In Alphabetical Order)
Group Level
Group Level Description
Employee Group Description File
(In Alphabetical Order)
Group Description
Group Level Description
Employee Shifts File
(In Alphabetical Order)
Department Name
Employee First Name
Employee Id
Employee Last Name
Employee Middle Initial
Policy Name
Shift Name
Employee Timecard File
Approved overtime hours
Approved overtime hours four
Approved overtime hours three
Approved overtime hours two
Break Hours
Calculation Override
Clock Description
Date
Department Name
Department Number
Employee Employee Login ID
Employee First Name
Employee ID
Employee Last Name
Other Activity Type Description
Other Amount
Other Hours
Regular Hours
Telephone Number
Time
Type
Unapproved overtime Hours
Unapproved overtime hours Four
Unapproved overtime hours Three
Unapproved overtime hours two
InfiniTime provides a unique solution for server maintenance allowing system administrators to alert users of maintenance schedules and even force users out of the software. This solution prevents data loss and possible database issues by assuring users are unable to login or alter the database while the system is down for maintenance.
The server maintenance warning can be used to notify users of scheduled maintenance. Server maintenance messages are read from a text file called servergoingdown.txt located in the original program installation directory,or C:\Inception\InfiniTime\InfiniTime7\, by default. Instructions for configuring a Server Maintenance Warning are provided below.
![]()
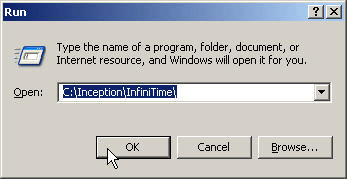

Taking InfiniTime Down for Maintenance
Before performing maintenance on the InfiniTime database or server InfiniTime should be brought down. This is accomplished by inserting a text file called serverdown.txt in the original software install location on the InfiniTime server. Remote clients will be denied access to the software if serverdown.txt is in place, though the InfiniTime Application can still be accessed from the InfiniTime Server using shortcuts directed to localhost or 127.0.0.1. For example, the shortcuts below can be used to access the InfiniTime Application from the InfiniTime Server.
http://localhost/InfiniTimeManagerModule/
http://127.0.0.1/InfiniTimeManagerModule/
Technical Note: Only Internet Explorer may be used to access the InfiniTime Software while Serverdown.txt is in place.
Steps to take InfiniTime 7.0 Down for Maintenance:
![]()
Users attempting to log into the software during the maintenance period will see the following message:
Users already logged into the software when serverdown.txt is placed in the InfiniTime7 directory will see the following warning when attempting to perform any action within the software

Inception Technologies periodically releases updates to the InfiniTime Application in order to provide new features and changes to the InfiniTime Application to our customer base. These updates are available at no charge for customers with a valid support contract. It should be noted that updates are available in this way only for products you already own. For example customers who own InfiniTime 6 are not eligible to upgrade to InfiniTime 7 for free, as InfiniTime 7 is considered a separate product rather than a software update. Changes made to the InfiniTime Application are listed in below by version number.
When applicable a link is provided to relevant documentation for each new feature or change made to the InfiniTime Application. This provides direct access to a detailed explanation regarding each alteration to the software. Inception Technologies recommends reading the release notes and any applicable documentation after applying a software update in order to understand the alterations made to the InfiniTime Application and how they may effect your day to day use of the software. Updates to the help files are included with Updates to the InfiniTime Application, though the latest help files can always be viewed at our website.
The Latest Software Update and Help Files are available at the ftp site below. Installation files are password protected. Please contact Inception Technologies or your Authorized InfiniTime Dealer in order to retrieve a password for the setup files.
ftp://www.InfiniTime.com/public/InfiniTime/
Added Software Key (HASP) Drivers to the InfiniTime Installation Wizard. HASP Drivers will automatically be installed for all supported Operating Systems during the Software Installation.
An issue related to Internet Explorer Security settings and the automatic Internet Explorer Security Configuration performed by the Installation Wizard would cause any website executing an Active X control to prompt the user. This has been resolved and users will no longer be prompted to allow web sites to allow Active X controls.
Installs Correct ODBC Drivers for use with Vista Business. It should be noted that Vista is not yet supported as of this release.
An issue that would cause unexpected breaks to occur in the Timecard Activity Table when transferring from one department to another has been resolved.
InfiniTime Reports are now loaded every time the Installation Wizard is executed rather than only during the initial installation.
New Users may no longer be created by the Installation Wizard for use with the InfiniTime Housekeeping Service. An existing user must be utilized.
An issue during the Installation of InfiniTime on Windows 2003 Server caused required file permissions to not be configured as intended. This issue has been resolved.
Install Changes
Software Changes
Fixed issue of the backup window not closing when restoring a database.
Expanded the TCP/IP field on the reader configuration to allow more characters for people that want to use dynamic DNS
Fixed the manual poll option on the reader configuration.
Added an option to the payroll reports to allow to group the report by Activity Department as well as group by default department.
Added an option to the timecard reports to allow to group the report by Activity Department as well as group by default department.
Fixed In/Out Board not to show future other activity.
Fixed PCpunch to show the correct punch type.
Added a feature to allow consecutive day overtime to reset at a work week.
Changed TCP/IP timeout setting from 6 to 90 on the reader configuration.
Fixed where the software allowed for multiple policies to set as default, now it only allows one to be a default.
Fixed where the software allowed for no policies to be set as default, now one policy is as default.
Allow Other activity that causes overtime to be approved.
System Monitor no longer refreshes automatically.
When upgrading the first person to login is set with the Administrator role and all others are given the Employee role.
Fixed an issue with enrollment of hand templates.
Resource disk is autorun so you can see documentation.
Install Changes
Removed Grid Virtual Directory
Created Grid3 virtual Directory
Removed grid registration tools
Added barcode fonts
Altered installation of Adobe Acrobat Reader
Software Changes
Date / Time / Lookups will no longer cause postbacks.
Employee / Manager / Escort / Punch modules show the correct version of InfiniTime in the IE Title bar.
Fixed issue which caused Exempt and Non Exempt Pay Types to be the only selectable options.
Fixed issue with the import which prevented the software from importing Departments with the override feature.
Fixed issue on Escort where the controls froze after inserting items onto the escort.
InfiniTime Grid has been updated to newer version to increase performance.
Default Schedule Changes: added Quick Schedule on the GANTT chart
Added a Quick Schedule history button.
Support For Bioscript readers has been added.
Fixed issue on Activity Summary report displaying hours improperly when using paid breaks.
Filter button changed.
VCR button now refreshes supervisor.
Fixed issue where the accruals where showing incorrectly in the Employee module.
Added Zephyr Clock to product line.
redesigned the Recalculate widow.
Fixed issue causing a BO Fetch error while enrolling and polling of terminals.
Schedule Reports will now print for a date range selected not only for the week.
Exception Detailed Report has been redesigned to improve performance.
Changed Tools Menu added History & Undo Tools
Expanded the Required Information Field for Payroll Exports
Fixed an issue where Selected Departments would revert to All for Saved Report Criteria
Install Changes
Resolved issue where zkemkeeper.dll would not register properly during installation.
Resolved issue where the version number was not properly updated when converting from InfiniTime 4.x to InfiniTime 7.x
Resolved issue where the InfiniTime Housekeeping Service was not stopped when upgrading under certain conditions.
Software Changes
Resolved issue where Other Activity was doubling itself when counted as regular hours. (would appear in regular hours and other hours)
Other Activity in the future is now shown in the activity screen.
Auto Recalc has been removed from the timecard activity table.
Altered calculation and export logic to reflect the proper amounts when employees were pushed into overtime by other activity.
Resolved issue where round to schedule would only round to the first shift assigned to an employee.
Resolved issue where Adobe would not close under certain conditions.
Resolved issue where the restore in progress window would not close automatically.
Altered Builddb to remove ' from employee data.
Resolved an issue where Builddb would not close under certain conditions.
Resolved an issue where the serverdown.txt file was placed in multiple locations.
Leading Zeroes are Permitted in Badges with the Zephyr.
Improve Luna & Zephyr Status Messages.
Zephyr Default Baud Rate Set Appropriately.
Unassigned Punches no Longer cause corrupt data messages on Zephyr Readers.
Bells uploaded 2 days in advance to allow additional bells on clock. (Today + 2 Days)
Telephone Punch support has been added.
Fixed an issue where the Clock Description would overlap other fields on the Timecard Detail Report with Clock Description.
Resolved an issue where saved reports would not retain previously set department filters.
Resolved an issue where individual break hours were not displayed on timecard detail reports.
Issue where exception was generated in event viewer each time quick punch was performed is now resolved.
Altered Payroll Export to include an option to allow Overtime to export as Half Time.
Added Luna terminal to the software.
Developed a badge report to allow customers to print their own badges from within InfiniTime.
Resolved in issue where changes to the the 'Holiday Starts on Day Before' time would not be saved.
Resolved an issue that led to inconsistent InfiniTime Housekeeping Service operation when using non-US date formats.
Resolved an issue where holiday hours were doubled on reports when using 'All Worked Hours are Set to Holiday Pay'
Resolved an issue where an error would occur when attempting to insert an auto report.
Delete button on the category view of the report table is how properly shown or hidden according to security settings.
Altered Auto Report Documentation to clearly specify requirements for sending auto reports.
Altered Company Policy Documentation (Overtime) to clearly specify the operation of the missing punch threshold setting.
All changes to the InfiniTime Software from 7.04 to 7.05 are listed below. Where applicable links are provided to documentation for the new features.
Upgrade Notes and Considerations
InfiniTime 7.05 includes over two hundred and fifty new features, some of which require special attention during the upgrade process. Each feature requiring specific preparation when upgrading from previous versions of InfiniTime 7 has been listed below. Details are provided to assist the user with performing the required actions in order to make the transition to InfiniTime 7.05 as smooth as possible.
Security Roles: The Security Role Class System introduced in InfiniTime 7.05 requires classes to be configured for each security role. Security Roles created by the user prior to Version 7.05 will not have a class associated with them, and will default to the employee class for security reasons. The user must configure the appropriate class for each user created security role. Please refer to Chapter 2: Security - Security Roles for more information on the Class System.
Reader Time Zones: The Time Offset Feature previously used to offset remote clocks from the server time based upon their location relative to the InfiniTime 7 server has been replaced by Time Zones. The InfiniTime 7 Application now incorporates Time Zones into the Reader Address Record in order to properly identify the current time for both areas that do and do not follow daylight savings time. Please refer to Chapter 14: Reader Configuration - Polling Tab for information about setting the time zone feature.
Employee Groups: Due to changes in filtering logic InfiniTime now requires groups to be assigned to each employee if groups are present in the system. The first group description inserted for every group level will automatically be set as the default group and will be automatically assigned to any employee who does not have a group assigned. If this is undesirable Inception Technologies recommends creating a group entitled unassigned. Any employees who are not intended to be assigned to a group should then be assigned to the unassigned group. It should be noted that any group can be designated as the default. Keep in mind that new employees will automatically be assigned to the default group and will remain on the default group until their groups are manually assigned. Additional information regarding assigning groups can be found in Chapter 5 - Groups.
Note: Quick Assign provides an intuitive interface for assigning groups.
Termination Reasons: With the addition of InfiniTime 7.05, InfiniTime offers a broad selection of Human Resources features. Among these is the Termination Reasons feature which allows users to enter details concerning an employee's termination. Termination reasons should be setup within the InfiniTime 7 application and entered for any previously terminated employee. Additional information regarding Termination Reasons can be found within Chapter 3 - Termination Reasons.
Reader Configuration Table: The reader configuration table has been redesigned to provide a hierarchical view of all readers within the InfiniTime Software according to clock and connection type. The intention behind this alteration is to provide ease of use and organization. The hierarchical view provides quick access to reader address records when it is necessary to alter clock settings. The intended view is shown below:
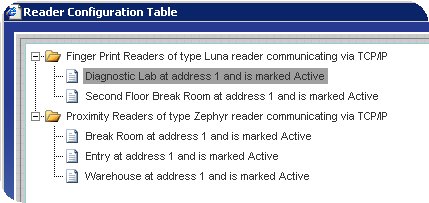
As shown reader address records are arranged under a single folder according to Reader and Communication Type. When upgrading it is not uncommon for multiple folders to be present for a single reader and communication type. Reader address records on the Reader Configuration table can be dragged and dropped from one folder to another as long as the destination is the same reader and communication type as the original record. Simply move all of the reader address records to a single folder and delete any additional folders. Additional information regarding the Reader Configuration table can be found in Chapter 14 - Reader Configuration Table.
Note: Take care to ensure reader address records are not accidentally deleted during this process.
Grid Display: When upgrading from InfiniTime 7.04 to 7.05 in some cases the grid settings will need to be reset in order to resolve display issues. If records displayed in the grid are improperly aligned use the default sort and default column selection buttons on the grid to restore the default settings.
Note: This is a fairly common occurrence. Simply restoring the default grid settings resolves the issue.
Install Changes
User selection for the InfiniTime Service has been eliminated in order to simplify the InfiniTime Installation. The InfiniTime Installation Wizard creates 'InfiniTimeUser' on the local machine. The InfiniTimeUser is automatically granted the 'Run as A Service' right and added to the Administrators and Ora_Dba group.
Microsoft Windows Vista Business and Ultimate Editions are now supported.
It should be noted that 64 Bit Operating Systems are not supported at this time. Refer to the Minimum Hardware Requirements and supported Windows Operating Systems for more information.
The installation will now display a warning and terminate the installation when attempting to install on a 64 Bit Operating System.
Adobe Acrobat 8.12 will now be installed with InfiniTime.
The Virtual Directories used to access the InfiniTime Application have been altered to be compatible with Windows Vista. These alterations are purely behind the scenes and will not effect the operation of the software. The same virtual directories, InfiniTimeManagerModule, InfiniTimeEmployeeModule ect, can still be used to access the InfiniTime Application.
A configuration setting for the SMTP Virtual Server installed by InfiniTime has been altered to allow the InfiniTime Server to send auto reports.
When performing an installation on Windows XP Professional simple file sharing will be disabled by the Installation Wizard if it is enabled.
Software Changes
Software Changes
Software Issues Resolved
Luna clock was not updating the new firmware.
Thor clock was not updating correct firmware.
Thor clock fix for no-image-found error on the employee wallpaper.
Fixed Time Sheet issues when approving exceptions.
Software Issues Resolved
Fix for the qcursorScheduleQueue error
Added new Thor Firmware Update
Fix for the auto clock in where the first day of the employee's work does not pickup the auto clock in
Added the TCGrid Virtual directory
Removed InfiniTimeGrid3 Virtual directory
Fixed dateTimeFormat error on the reports
Zero hour report takes into account the adjusted hire date and not just the hire date as previous version
Software Issues Resolved
Fixed Script errors on the payroll export
Fixed Script errors on backup
Fixed accrual problem with Fiscal year and allowing zero entry for month and day
Fixed issue on payroll exports, where you could not click on OK or Save.
Software Issues Resolved
Resolved an issue for Payroll Exports where Daily Exports with Mapped Amount fields would not show other activity hours if there were not regular hours on the day.
Resolved an issue with a background process responsible for cleaning temporary data from the Oracle Database. In some cases this issue would cause script errors upon opening the Report Library, making it impossible to print reports.
The Insert Button within the Timecard Table now functions appropriately if used when a record with only a single punch is highlighted. A single punch will now be inserted instead of a complete record with an In and Out Punch.
Resolved an issue which caused the Missing Break Exception to unexpectedly occur on days where an employee received activity for an other activity type set to count toward regular hours.
Other Activity can now be inserted as a negative amount. This feature can be used to offset employee hours as needed and is particularly useful for cancelling an auto paid break. To accomplish this create an other activity type with the same Payroll Mapping Code as that used for Regular Hours. Then insert a negative amount equal to the employee's paid break.
Other Amounts now have a maximum value of $9,999,999.
Software Requirements & Supported Environments
InfiniTime now provides support for the following 64 Bit Operating Systems:
Windows 2008 Server Standard 64 Bit
Windows 2008 Server Enterprise 64 Bit
Windows Vista Business 64 Bit
Windows Vista Ultimate 64 Bit
Software Issues Resolved
Corrected problem where housekeeping is not generating exceptions or auto punches consistently.
Fixed problem in Employee signature message where number of characters are limited to 4 characters.
Added new Mini-Timecard with Details report.
Resolved issue of Thor badge readers not showing on drop-down list in the reader configuration form.
Software Issues Resolved
Fixed Mini Timecard Report showing the times incorrect where it would put the out punch as an in punch.
Fixed Mini Timecard Report to allow Other Activity to show on the report when there are no hours for that activity.
Lookup buttons will no longer display when security has been configured to hide a lookup field.
Resolved an issue which caused SYSID fields to display when editing security.
Resolved a spelling error on the Reader Address Update Form.
Resolved an issue which caused the Early Departure Exception to occur incorrectly if an employee was scheduled to work in two departments back to back.
Corrected an error on the Policy Update Form. The 'Latest Clock Out Time' Setting was incorrectly labeled "Latest Clock In Time"
The Average Hours Setting on the Holiday Master Holiday Update Form will now be hidden if 'All Worked Hours Are Holiday Pay' is set to Yes. The Average Hours feature is not supported with this setting.
Resolved an issue which caused all departments in a multi-company environment to display on the Quick Assign Department Lookup.
Resolved an issue on the payroll export where hours were not exported correctly when employees worked under multiple departments for a single job or task.
Resolved an issue which prevented the backdoor program for the Athena, Juno, Luna, and Zephyr Terminals from functioning.
The 'Do Not Auto Fill Employee ID When Inserting Employees' option will now fill the Badge ID Automatically if the InfiniTime License only has Biometric Terminals.
Removed the Badges Tab from the Reader Address Update Form for the Thor Terminal. The Badges Tab will now only be displayed for Synel Clocks as appropriate.
Added 'External Devices' Tab to the Reader Settings Section of the Reader Address Update form for the Thor Terminal. This tab includes settings for Wiegand Badge & Barcode Readers, and Relay Configuration.
The External Bell setting on the Thor Terminal must be set to Yes in order for External Bells to function. InfiniTime now automatically sets this option to Yes during the reader update process.
All changes to the InfiniTime Software from 7.05i to 7.05j are listed below. Where applicable links are provided to documentation for the new features.
Upgrade Notes / Considerations
Customer concern was expressed over a few items which were found to be operating as intended. For clarity, these items and their requirements have been listed below.
| Reported Item: | The View Total Hours Function Key cannot be assigned to the Scout Clock After it is deleted. |
| Steps to Reproduce: |
This only occurs when the Total Hours Type Drop down on the General Tab is set to 'None' |
| Reported Item: | Employees working overnight do not receive holiday hours from 12:00 AM to 12:00 PM on the date of the holiday. |
| Steps to Reproduce: |
|
When the Back Plate of the Thor is Removed.
For this reason, Relay 2 is recommended ONLY FOR USE WITH BELLS OR A BUZZER. If an access control device should be wired to Relay 2 Security could be circumvented simply by removing the back plate from the Thor.
Outstanding / Known Issues
The following items are considered known issues. For various reasons these items did not make the scheduled release date for InfiniTime 7.05j. A subsequent release following InfiniTime 7.05j will include these items.
Thor Poll From File Functionality: At this time Thor Poll From File Functionality is not supported. Alterations must be made to the InfiniTime Polling System to support the file format used by the Thor Terminal.
Ability to Disable Juno Key Beep: At this time it is not possible to disable the Juno Key Beep due to an issue with the Juno Bios.
Thor Transfer - Issue with Department, Job, and Task Selection: When using the Transfer Function key on the Thor if a user should enter the number corresponding to a department, task, or job, the Thor appears to select the and record the transaction with the appropriate item. However, the final transaction records the first item in the list of Departments, Jobs, or Tasks respectively. The following steps can be performed to work around this issue:
1. Press the Function Key Corresponding to the Transfer Function on the Thor.
2. Enter the Number of the Department, Job, and / or Task you wish to select. The cursor will highlight the item.
3. Press the Up or Down arrow on the directional pad to highlight to a different item in the list. Use the directional pad to highlight the desired item.
4. Press OK to select the desired item. The transaction will be recorded properly.
Software Issues Resolved
Resolved an issue which prohibited the approval of multiple records with overtime on a single day.
Resolved an issue where the Security Key was visible to employees on the Employee Security Role when sending Messages, Schedule Change Requests, or Time Off Requests.
Resolved an issue which made it possible to delete the last employee in a multi company environment.
The Default Wiegand Format String has been changed to ensure maximum compatibility. Wiegand26, which defines a generic 26 bit badge format, can be used to communicate with External Wiegand Readers using badges without a site code. A specific code however must be used with External Wiegand Readers using badges with a site code. The Default Wiegand Format String has been changed from 'wiegand26' to 'pccccccccccccccccccccccccp:eeeeeeeeeeeeeooooooooooooo'
Resolved an issue with Consecutive Day Overtime where both Regular and Overtime hours were posted to the overtime bucket selected for Regular Hours even if Overtime Hours were configured to post to a different overtime bucket.
Resolved a Typo on the Reader Configuration Update Form under the Reader Settings Category. Wiegand is now spelt correctly.
Resolved an issue where Accrued Hours were reported incorrectly if the sum of Accrued Hours and Base Amount were greater than the Stop At value. In this scenario accrued hours were reported as the Stop At amount and the total available hours were reported as Total Accrued Hours + Base.
Resolved an issue with the Unscheduled Time Mapping Policy Settings. Hours can now be mapped as intended for employees with schedules that cross midnight.
Resolved an issue with the Thor Terminal which caused the error "FM Connection is Nothing! Poll and Update of clock <Clock Name>" The issue was related to use of the Time Off Request or Schedule Change Request on the Thor Terminal.
Resolved an issue with Shift Differentials that span midnight whereby an employee would not receive credit for differential hours appropriately if they took a break before midnight.
Resolved an issue with the DOT Off Duty Exception which caused it not to occur as intended. The DOT Off Duty Exception now occurs correctly if the employee does not have a 10 hour break between periods of work.
Resolved an issue with the Attendance Review report whereby all days would be filled with the Non Worked Day Character if any value was entered in the Non Worked Day field under the Report Options Tab.
BuildDB is intended to run an extended set of commands for customer's upgrading to InfiniTime 7 from earlier software versions such as InfiniTime 6 or InfiniTime 5. An issue which caused the BuildDB to skip the extended command set has been resolved.
Resolved an issue where Review would not mark Absent Records as reviewed. This caused employees to be falsely listed on the Employees Without Reviewed Timecards report. Absent Exceptions are not intended to show a blue review mark though employees will no longer be falsely listed on the Employees Without Reviewed Timecards report.
Resolved an issue which stopped the Insert Button on the Shift Tab of Quick Assign from inserting shifts as appropriate.
Resolved an issue with the Average Hours feature for Holidays which caused the Holidays to include an additional day in the calculation when averaging hours. For example, if days to average was set to three (3) hours would be averaged for four (4) days prior to the date of the holiday.
Resolved an issue related to Change to Break and Rounding which caused employees to be paid for an unpaid break under the following conditions:
First change to break is configured as an unpaid break.
Second change to break is configured as a paid break.
Unscheduled Break Rounding is not enabled.
Unscheduled Clock In and Clock Out rounding is set to quarter hour.
An employee punches such that their break would be considered an Unpaid Break IF break rounding was enabled.
Hardware Issues Resolved
Scout
Functionality Issues Resolved
The View Hour Totals Function now operates as intended. Hours and hundredths of hours will now be correctly reported by the Scout Terminal. The InfiniTime Application must be configured with a polling interval of 5 seconds or less for the View Hour Totals Function to operate.
Resolved an issue with the communication libraries used to communicate with the Scout Terminal which caused Dynamic DNS to be inoperable with Scout Readers.
Thor
Upgrade Notes / Considerations
An issue with the operation of Tamper has been resolved. Tamper is intended to activate Relay 2 under the following conditions:
When the Back Plate of the Thor is Removed.
When an employee continuously enters an incorrect password. Relay 2 will activate after a preset number of failed attempts which can be set under System Settings - Display within the Thor Menu / Bios.
For this reason, Relay 2 is recommended ONLY FOR USE WITH BELLS OR A BUZZER.
If an access control device should be wired to Relay 2 Security could be circumvented simply by removing the back plate from the Thor.
An option to disable tamper will be available in InfiniTime 7.06 which will remove this known vulnerability.
New Functionality
The EPSON TM-T88IV Thermal Printer has been introduced as an add on to the Thor and is available for purchase from Inception Technologies. The EPSON TM-T88IV can be used with the Thor Terminal to print a variety of reports directly from the Thor Terminal. Available Reports are listed below. Additional information and examples can be found by clicking on each report or by referring to the Thor Reports section of this document.
Total Hours Report - Prints total Regular, OT1, OT2, OT3, and OT4 hours for a single employee according to the 'Total Hours' Date Range set for the Thor Terminal on the Reader Address Update Form.
Accrual Totals Report - Prints Accrued Hours, Used Hours, and Remaining Hours for all Accrual Types assigned to a single employee.
In & Out Board Report - Prints a list of all employees on the Thor Terminal and their current status. Employees who are punched out at the time of running the report will be marked as Out while employees who are punched in at the time of running the report will be marked as In.
Timecard Report - Prints a report comparable to the Timecard Detail Report available within the Report Library of the Manager Module for a single employee according to the 'Timecard' Date range set for the Thor Terminal on the Reader Address Update Form. The report shows individual punches and totals for Regular Hours, OT1, OT2, OT3, OT4, and Other Activity.
Schedule Report - Prints schedule records for a single employee according to the 'Schedule' Date Range set for the Thor Terminal on the Reader Address Update Form.
Punch Receipt Report - Prints Employee Information and the time of their last punch. The Punch Receipt Report is accessible from the Last Punch Function Key though it can also be printed after each successful Time and Attendance Transaction via an option on the Reader Settings table.
Messages Report - Prints messages from the Thor. Messages, Requests for Time Off, and Requests for Schedule Change can be printed from the Messages Menu accessed from the Employee Info Function Key.
A USB Barcode Reader has been introduced as an add on to the Thor and is available for purchase from Inception Technologies. The USB Barcode Reader can be plugged directly into the Thor Terminal for use with Code 3 of 9 badges for Job Costing and / or Time and Attendance.
The Directional Pad is used to move the cursor from field to field and item to item within the Thor Menu / Bios. The active item will now be highlighted to show the position of the cursor.
The Thor Terminal now supports a maximum Employee Login ID Length of 9 Digits. The maximum Employee Login ID Length was expanded from 5 digits in 7.05i to 9 digits in 7.06j.
Functionality Issues Resolved
The Internal Bell can now be disabled as intended by setting 'Bell In Clock' to OFF within the Thor Menu / Bios.
The Del ID Card Only function found on the Delete User Menu accessed from the User Management Table of the Thor Menu now functions as expected. Using this function removes all badges from the selected employee.
Resolved an issue which caused the View Schedule Window accessed from the Schedule option under the Employee Info Function to display employee schedules improperly under some conditions. For example if an employee was scheduled to work in Department A from 8AM to 12PM and Department B from 12PM to 4PM on 7/1/09 the Thor would display 7/1/09 8AM to 12PM in place of all expected schedule records.
Resolved an issue where the Wiegand Format String for Indala External Proximity Readers could not be sent to the Thor Terminal via the Update Process. The issue caused the update to freeze at 'Sending Config Information'
Resolved an issue where the Thor would freeze, display a black screen with a flashing cursor, and reboot under specific conditions when attempting to enter Other Activity for an employee. The issue occurs in the following scenario in 7.05i:
Ensure the Hours Function is assigned to a function Key on the Thor.
Press the corresponding function key and enter an employee ID when prompted.
Press F3 to select Other Activity.
Press ESC to exit the Other Activity Menu.
Press F3 to select Other Activity.
Press any two keys on the numeric pad. The Thor will display a black screen with a flashing cursor and will then reboot.
The Reset Option available within the Thor Menu under System Settings has been altered to operate as intended. The Reset Option sets all options and settings within the Thor to their default settings. Default settings configured by the Reset Option are listed here.
Resolved an issue where Supervisor requests to Add a Punch, Delete a Punch, or Change a Punch were not recorded correctly on the Thor Terminal.
Resolved an issue where Lockout did not function on the Thor Terminal. Employees would be locked out at all times regardless of the schedule. Employees will no longer be locked out during the window defined by their schedule. For example: An employee's schedule is configured as 8AM to 5PM. The Thor terminal will permit the employee to punch in and out without supervisor authorization between the hours of 8AM and 5PM. If the employee attempts to punch outside of this window the Thor will prompt for Supervisor Override. Additional information on the operation of lockout can be found here.
Resolved an issue where the Access Menu (Menu - User Mng - Access) was not displayed on the Thor Terminal as intended. The Access Menu is now properly hidden and shown according to the Terminal Mode set on the Reader Settings Tab. The Access Menu is displayed in all terminal modes except Time and Attendance.
Resolved an issue where Access Control Schedules were not populated properly on the Thor Terminal. Schedules are now sent to the clock correctly instead of one day ahead. For example, In 7.05i a schedule defined as 8AM - 5PM on Monday would be sent to the Thor as 8AM - 5PM on Tuesday.
Resolved an issue where the Key Board configuration would be cleared during the update process if the Reader Settings Menu was not viewed prior to updating the Thor. To work around this issue on 7.05i perform the following steps:
Open the System Monitor, Highlight the Scout Terminal, and Click on Change.
Click on Reader Settings on the Left Side.
Click on OK to save.
Resolved an issue where Dual Mode Time & Attendance and Access Control did not send Access Control Schedules to the Thor.
Cosmetic Issues Resolved
Altered status messages, prompts, and warnings throughout the Thor Menu / Bios to increase clarity. The following alterations were made:
Fixed a Typo in the 'Delete Password' prompt on the Delete User Menu accessed from the User Management Table of the Thor Menu. Changed from 'OKDelete Password?' to 'Delete Password?'
Fixed a Typo in the 'Delete User' prompt on the Delete User Menu accessed from the User Management Table of the Thor Menu. Changed from 'OKDelete User?' to 'Delete User?'
Fixed a Typo in the 'Delete Fingerprint' prompt on the Delete User Menu accessed from the User Management Table of the Thor Menu. Changed from 'OKDelete Fingerprint?' to 'Delete Fingerprint?'
Fixed a Typo in the 'Delete Card' prompt on the Delete User Menu accessed from the User Management Table of the Thor Menu. Changed from 'OKDelete Card?' to 'Delete Card?'
A warning message is displayed on the Thor when the back plate is removed. To avoid confusion the Tamper Warning Message has been changed from 'System Broken' to 'Back Plate Not Attached!'
The message displayed when an employee with the user security role attempted to access the Menu / Bios was unclear. The message has been changed from 'Illegal Management!' to 'Access Denied!'
The message displayed when an employee with the user security role attempted to access the Supervisor Tools Function was unclear. The message has been changed from 'Illegal Management!' to 'Access Denied!'
There was no message displayed when an employee with the supervisor security role attempted to access the Menu of the Thor. A message has been added and will now display 'Access Denied!' as intended.
Fixed a Typo in the 'Changes Saved' message on the Display Settings screen of the Thor Menu / Bios. Changed from 'Setup Success, Press OK Back!' to 'Changes saved successfully!'
When attempting to Update the Thor Bios manually a message is displayed to alert the user if a USB Drive is not attached to the Thor. To avoid confusion this message has been altered from 'PenDrive not find!' to 'USB Drive not found!'
When attempting to download data from the Thor to a USB Drive a message is displayed to alert the user if a USB Drive is not attached to the Thor. To avoid confusion this message has been altered from 'PenDrive not find!' to 'USB Drive not found!'
Confirmation messages for Delete Password, Delete User, Delete Fingerprint, and Delete Card on the Delete user Menu accessed from the User Management Table of the Thor Bios were truncated due to screen size and character limitations. The messages have been repositioned to the lower center portion of the screen to ensure they are displayed properly.
The Power Key Option accessed from System Settings - Misc Settings within the Thor Menu / Bios was unclear. The option has been altered as follows:
'Lock' was changed to 'Disabled' If the Power Key option is set to Disabled the Power Key on the keypad cannot be used to turn off the Thor clock.The Power Key looks like a small bullseye on the lower right corner of the keypad.
'UnLock' was changed to 'Enabled' If the Power Key Option is set to Enabled the Power Key on the keypad can be used to turn off the clock. The Power Key looks like a small bullseye on the lower right corner of the keypad.
To avoid confusion 'PenDrive' has been replaced with 'USB Drive' throughout the Thor Menu / Bios.
All changes to the InfiniTime Software from 7.05j to 7.06 are listed below. Where applicable links are provided to documentation for new functionality.
Upgrade Notes / Considerations
The Microsoft Windows 2000 Operating System is no longer supported for the InfiniTime 7 Server Installation.
User Interface Changes
Lookup Fields will be cleared when a value is entered that does not match an item in the database. For example, the Policy Field on the Settings Tab of the Employee Table allows the user to select from a list of policies in the database. If a value is entered in the Policy Field that does not match the name of a policy in the database the field will be cleared when the user clicks on another field.
Holiday Options such as Holiday Starts Day Before, Holiday Ends on Holiday, Holiday Ends Day After, and Holiday Based on Employee's Schedule are only relevant when employee's are required to work on the Holiday. For this reason these options will be disabled if 'All Worked Hours are Holiday Pay' is set to No.
A Stop At Amount is required in order for Carry Over to function properly with Employee Accruals. If there is no value in the 'Stop At' field the Carry Over Check Box will be hidden on the Accrual Type Details Update Form.
Units (seconds, minutes, hours, etc.) have been added to the following forms for clarity:
Policy Update Form: Break Rules
Policy Update Form: Overtime Tab
Policy Update Form: Rounding Rules - Scheduled Rounding Tab
Policy Update Form: Rounding Rules - Unscheduled Rounding Tab
Shift Differential Form: Differential Pay Tab
Department update form: Differential Pay Tab
Job Update Form: Premium Pay Tab
Task Update Form: Premium Pay Tab
The Policy Update Form will now prompt users to set the Shift Differential Pay Method after Shift Differentials are added to the policy.
The System Wide Date Format can now be changed from the Cosmetic Options Tab on the Company Update Form. Supported formats are listed below with examples.
Date Format |
Appearance |
mm/dd/yyyy |
|
dd/mm/yyyy |
|
yyyy/mm/dd |
|
yyyymmdd |
|
The System Wide Time Format can now be changed from the Cosmetic Options Tab on the Company Update Form. Supported formats are listed below with examples.
Time Format |
Appearance |
hh:mm tt |
|
HH:mm |
|
hh:mm |
|
The Window Skin can be altered from the Cosmetic Options Tab on the Company Update Form. Supported skins are listed below with example images to show their appearance.
Skin Name |
Appearance |
Vista |
|
Black |
|
Default |
|
Forest |
|
Hay |
|
Office 2007 |
|
Outlook |
|
Simple |
|
Sunset |
|
Telerik |
|
Web20 |
|
WebBlue |
|
New Functionality
Overtime One Wages - Displays wages for Overtime One Hours.
Overtime Two Wages - Displays wages for Overtime Two Hours.
Overtime Three Wages - Displays wages for Overtime Three Hours.
Overtime Four Wages - Displays wages for Overtime Four Hours.
Regular Hours Wages - Displays wages for Regular Hours.
Wages - Displays Total Wages for all Hours Types.
The Form Security Table has been updated to include a 'Required' tab which allows user to customize the InfiniTime Software by setting fields as required. One possible use of this feature is to ensure specific fields are filled out by supervisors when entering employees. More information can be found here.
"Change Schedule" and "Time Off" Requests will now warn the user if they make a request more than a year in advance. The user must confirm their intentions to submit a Change Schedule or Time Off request which will reduce the likelihood of accidental entries in the distant future. An example of the warning can be reviewed here.
Overtime Pay can now be configured to pay as a Rate, a Percentage of Employee Wages, or as an Amount as listed below. Additional Information can be found under the Overtime Settings section of this document.
Amount: Employees will be paid a specified dollar amount in addition to their base wage.
Percentage of Employee Wage: Employees will be paid an additional percentage of their base wage.
Rate: Employees will be paid a specified hourly rate.
Procedure Security Controls have been added to the Company Update Form. It is now possible to grant or deny access to the Company Update Form based on Security Role.
Default Company Update Form Security Settings will grant access only to Administrators and Payroll Clerks.
A new escort button 'Process Selected Payroll Export' has been added which exports a user selected Payroll Export when the button is clicked.
All reports related to Employee Timecard, Payroll, or other employee information can now be sorted by Groups.
Dollar Amounts are now associated with Accrual Totals based on the employee's Default Wage. Total Accrued Earnings and Total Remaining Earnings are calculated as listed below. An Example Report showing Employee Accrual Dollar Amounts is provided for clarity.
Total Accrued Earnings: Time Accrued for Accrual Period * Default Wage
Total Remaining Earnings: Remaining Amount for Accrual Period * Default Wage
Additional options have been added to the Employee Accruals report for use with Accrual Dollar Amounts. Dollar Amounts will only be displayed on the Employee Accruals report when these options are enabled. An example report can be seen here.
'Print Accrued Earnings?' - Prints Total Accrued Earnings on the Employee Accruals Report when set to Yes.
'Print Remaining Accrued Earnings?' - Prints Total Remaining Earnings on the Employee Accruals Report when set to Yes.
The Group Category has been removed from the left side of the Employee Update Form. Group Settings are now located on the Settings Tab of the Demographics Category as shown below.
To Access the Group Settings:
Open the Employee Table.
Highlight the desired employee and click Change.
Click on the Settings Tab.
Click on the Groups Sub Tab.
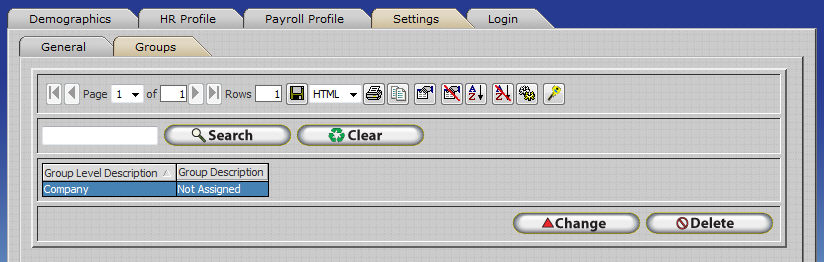
'Do Not Add Default Groups to Employee On Insert' has been added as an option on the Company Update Form. If this option is checked Default Groups will not be automatically assigned to new employees. Users adding employees to the InfiniTime Application will be required to manually select employee groups.
Security Roles are now prioritized by Class. For security reasons no user may assign a Security Role with a higher priority class than their own security role. Class priorities are listed below in descending priority (IE: Highest - Lowest).
Payroll Clerk
Supervisor
Employee
Premium Pay has been added as an option for Departments, Jobs, and Tasks. Premium Pay makes it possible to define premiums for working in a given Department, Job, or Task. Premiums can be configured as an additional dollar amount per hour (Amount) , a percent wage increase (Percent), or an alternate rate (Rate).
Export Files, such as Employee Information or Department Information, can now be emailed by configuring options on the Email Tab of the Export Update Form.
Activity Jobs can now be imported from a comma delimited file by using the Import Tool and selecting 'Activity Job Information File' as the file type.
Activity Tasks can now be imported from a comma delimited file by using the Import Tool and selecting 'Activity Task Information File' as the file type.
Shift Assignments can now be imported from a comma delimited file by using the Import Tool and selecting 'Employee Shifts File' as the file type.
Automated reports utilize printer drivers to generate reports. When selecting a printer for use with automated reports it is important to select a printer that is physically attached to the InfiniTime Server. A warning will be displayed to inform users that an Image Printer such as 'Microsoft XPS Document Writer' cannot be used with Automated reports.
Edit Lockout can now be overridden by security role. This makes it possible to select security roles which are exempt from Edit Lockout. This feature is especially useful for payroll clerks who are responsible for checking and editing employee timecards after they have been submitted by supervisors. Lockout Override makes it possible for supervisors to be locked out of timecards while payroll clerks were permitted to edit time as needed.
Support for 'Split Punches at End of Day' has been added. This makes it possible to split punches for overnight employees at the end of each day. It is important to note that the time at which the day ends can be changed by setting both the Clock In and Clock Out Missed Punch Day Change Times to the same time.
Support for arbitrary pay cycles, or those without consistent dates, has been added through manual entry of the Pay Period Start and End Dates. A new option, 'Manual', has been added to the Pay Cycle drop down on the Policy Update Form. Selecting Manual as the pay cycle type allows the user to manually enter the start and end dates for the current and last pay period.

Employee Timecard File and Employee Accrual Totals File Exports now include a date range filter which make it possible to export timecard records or employee accrual totals for a specific time period.
Added support for Canadian Public Holidays via the 'Employee Required to Work' option. This option makes it possible to require employees to work a certain number of hours over a given number of days prior to the Holiday in order to be eligible for the holiday.
Added support for Employee Schedule Based Holidays via the 'Holiday Based on Employee's Schedule' option. If this option is set to Yes the holiday start and end times will automatically be adjusted to match the employee's schedule.
Altered the operation of Average Hours to more accurately match customer needs. Average hours can now be set to calculate average hours over a number of days prior to the holiday or over a number of work weeks prior to the holiday. It is important to note that the 'Days' and 'Weeks' settings operate differently. The 'Days' selection averages hours over a specified number of days starting with the day immediately before the date of the holiday. The 'Weeks' selection averages employee hours worked over a specified number of weeks starting with the week before the date of the holiday. This is illustrated below.

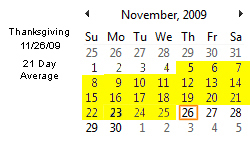
The images above illustrate the difference between a 3 Week Average and a 21 Day Average. Days shaded in yellow represent days which will be included in the average hours calculation. The boxed date indicates the date of the holiday. Notice how the 21 Day Average includes the days immediately before the date of the holiday that fall during the same week of the holiday.
Software Issues Resolved
Accrual Expiration Logic has been altered for Accruals with a Calendar Reset Type. In prior versions of InfiniTime Accruals using the Calendar Reset Type would expire after 365 Days after the start date of the accrual period + any expiration period entered by the user. InfiniTime 7.06 calculaltes Accrual Expiration for Calendar Reset Type as: Accrual Period Ending Date + any expiration period entered by the user.
Employee Default Jobs and Tasks are now associated with Break Hours inserted by Auto Break as intended.
Resolved an issue which prevented Other Activity Entries from being imported using the Timecard File Type in the Import Tool.
Resolved an issue which caused script errors on the Schedule Gannt Chart if the user attempted to drag a second schedule entry while changes to another record were being saved. It is no longer possible to drag a second schedule entry until changes to the first entry are saved.
Hardware Issues Resolved:
The Key Beep Feature for the Juno Terminal can now be enabled or disabled as intended. This item only applies to new Juno Terminals as the issue was hardware related.
The default External Wiegand String for the Thor has been altered to provide support for Site Codes.
External Wiegand Reader Settings can now be configured from within the InfiniTime Application for the Athena.
The default External Wiegand String for the Athena has been altered to provide support for Site Codes.
All changes to the InfiniTime Software from 7.06 to 7.06a are listed below.
Software Issues Resolved
It is no longer necessary to enter the CAPTCHA code twice in order to login to an InfiniTime Database with multiple companies.
An issue has been resolved which caused the Report Library to close when exporting a report that was also configured to Print a Preview.
An issue has been resolved which caused the Report Library to close when sending a report via email that was also configured to Print a Preview.
The Reader Address Field for TCP/IP Schlage Hand Readers is now user editable. This feature provides support for the New Handpunch 2000 Bios released by Schalge.
Issues leading to script errors in the Employee Module when Accruals have not been configured in the database have been resolved.
An issue has been resolved which prevented the Poll From File Selection window from displaying when attempting to Force Poll a clock set as the 'File' communication Type.
Cosmetic Options such as Date and Time Format now have default values, preventing these options from being blank which can lead to script errors.
Hardware Issues Resolved
InfiniTime 7.06a includes support for the new Schlage HP2000 Bios. It should be noted that the Reader Address must be set to 1 for TCP/IP HP 200 Readers with the New Schlage Bios.
All changes to the InfiniTime Software from 7.0a to 7.06c are listed below. Where applicable links are provided to documentation for new functionality.
Upgrade Notes / Considerations
Software Licensing Solution
InfiniTime now uses a software licensing solution. Existing customers with HASP License Keys must perform an Initial Activation to activate their software after upgrading to 7.06c. Instructions for performing the initial activation can be found here. For existing customers with Hardware License Keys, the HASP License Key must remain in the InfiniTime Server after the initial activation or the software will revert to Demo Mode.
The Software Licensing Solution replaces the HASP Key hardware licensing solution for new InfiniTime Orders. Elimination of the USB HASP Key removes the requirement of a USB Port from the InfiniTime Application's minimum requirements and makes the software more appealing for use on a virtual machine. Yet, this is not the intent of the Software Licensing System. To read more about InfiniTime's Software Licensing Solution and Virtual Machines, please refer to the following note on Software Licensing and Virtualization.
Software Performance
General Improvements
The InfiniTime Application has been reviewed with a focus on performance. In general, software performance has increased significantly throughout all areas of the application. Steps have been taken to reduce the loading time for all windows software wide.
Delayed Save on Timecard
Timecard Tables, including the Company Timecard, Employee Timecard, and the Employee module Timecard, now have a delayed save option which performs significantly faster than the traditional timecard where changes are saved as each change is made. Additional information about using the Delayed Save Timecard feature can be found here. The Delayed Save feature is highly recommended for all users who utilize In-Line edit.
Technical Note: When changing the Delayed Save Company Option, the option does not take affect until the Timecard Table is closed and reopened. Alternatively, simply close any open Timecard Tables before changing the option and then reopen them after the option has been enabled or disabled as needed.
Technical Note: When changing the Disable Audit Trail Option, the option does not take affect until the Timecard Table is closed and reopened. Alternatively, simply close any open Timecard Tables before changing the option and then reopen them after the option has been enabled or disabled as needed.
In Line Timecard Editing & Delayed Save
As of InfiniTime 7.06c, Tab is no longer a supported method for moving focus between records in the Timecard Table. When altering punches with In-Line edit the Down Arrow Key can be used to move to the next record and save changes to the current record. The Up and Down Arrow Keys may also be used to switch focus between records in the Company, Employee, and Employee Module Timecard Tables. Overall, when combined with Tab and the Up & Down Arrows, Delayed Save makes editing employee timecards comparable to working with a spreadsheet.
Saving Changes to a Single Timecard Record
If there is only a single record for the selected date range, focus must be removed from the record before any changes will be saved. In the example below, an employee missed a punch on the first day of a pay period.

In Line Edit refers to entering changes directly in the timecard record. Use tab to move the cursor to the Out Date field and set the desired date. Then use Tab again to move the cursor to the Out Time field and set the desired time. Alternatively, simply click in the Out Date and the Out Time and enter the desired values.

Once the desired values have been entered, press the Down Arrow Key. If Delayed Save is disabled the change will be saved immediately and the hour totals will display.

If Delayed Save is enabled the Save Button will display. Click on the Save button to save the changes and calculate hour totals.

Using the Up & Down Arrow Keys to Move Between Records in the Timecard Table
The Up & Down Arrow Keys can also be used to move focus between records in the Timecard Table. Combined with Tab and the Arrow Keys, delayed save makes moving from field to field and record to record in the Company, Employee, and Employee Module Timecard Tables comparable to editing a spreadsheet.
InfiniTime Minimum Hardware Requirements
Minimum Requirements for the InfiniTime Software have been raised as performance issues have been verified when using Windows XP Machines with less than 2GB of RAM. Minimum software requirements have been raised to require 2GB of RAM on the InfiniTime Server. For existing installations, customers who choose to run InfiniTime on systems with less than 2GB of RAM may experience decreased performance. For new installations and customers who wish to update to 7.06c, the InfiniTime Installer will stop the installation if the InfiniTime Server does not have 2GB of RAM.
Clock ID
Prior to InfiniTime 7.06c it was not possible for individual companies in a multi-company installation to use the same ID numbers with Hardware Terminals such as the Scout. Two fields, Clock ID and Clock Password, have been added to the Login Tab of the Employee Update form to make this possible. The Clock ID and Clock Password replace the Login ID and Password for the purpose of PIN Entry on hardware terminals. With this in mind, these values must be numeric. After upgrading to 7.06c, please check the Clock ID and Clock Password for all employees to ensure the values are numeric. A procedure for verifying the Clock ID and Clock Password fields are numeric for all employees is outlined below.
Exporting Employee Clock ID and Passwords
Login to the Manager Module as an Administrator
Click on Tools - Import and Export - Export
Click Insert to Create a New Export Definition
Enter Clock ID Verification as the Export Structure Description
Enter CLOCKID.CSV as the Comma-Separated File to Export
Check the Insert Header Record Option
Check the Empty Destination file before export option
Click on the Map Destination Fields Tab
Type 'id' in the left search field and click Search
Highlight the Employee Login ID Field and click the right arrow button (>) to map the field
Type 'Clock' in the left search field and click Search
Highlight the Employee Clock ID field and click the right arrow button (>) to map the field
Highlight the Employee Clock Password Field and click the right arrow button (>) to map the field
Click OK to save the Export Definition
A new window will open and prompt you to download the export file
Open the Export File with Excel and review the Clock ID and Clock Password for each employee. All values should be numeric. If alphanumeric Clock IDs or Passwords are found, they should be set to a numeric value.
Client Installer
As of InfiniTime 7.06c, InfiniTime is bundled with a Client Installer which can be executed on Client Machines to configure all required Internet Explorer 8 Browser Security Settings and create shortcuts to the InfiniTime Software on the desktop of the client machine. The Client Installer is located in the Client Shortcuts directory on the Desktop of the InfiniTime Server. During installation, the Client Installer prompts the user for the best method of communicating with the InfiniTime Server. For on-site clients, the InfiniTime Server's hostname is recommended, while the Public IP Address or Domain Name of the InfiniTime Server is recommended for use with Off-Site Clients.
For More Information regarding the Client Installer:
Using the Client Installer: On-Site Clients
Using the Client Installer: Off-Site Clients
New Software Functionality
Thor, Juno, Luna, Athena, and Zephyr Terminals now take grace periods into account when determining lockout schedules. Currently, the lockout window is calculated as follows:
Schedule Start Time - Clock In On Time Grace Period - Clock In Early Grace Period = Start of Lock Out Window
IE: 8:00 AM - 10 Minutes - 0 Minutes = 7:50 AM
Schedule End Time + Clock Out Late Grace Period = End of Lock Out Window
IE: 5:00 PM + 10 Minutes = 5:10 PM
Employees may punch in and out at any time during the Lockout Window, which is 7:50 AM - 5:10 PM in the example above where a 10 minute Clock In On Time Grace Period and 10 Minute Clock Out Late Grace Period are defined. InfiniTime 7.06d will include complete compatibility between Software Lockout and Hardware Lockout, at this time hardware lockout functions as detailed above.
Employee Alternate Badges can now be imported using the Import Tool.
When adding a new company to a multi-company database, it is no longer necessary to keep a copy of the report files in the ImportReports directory. Report Files will now be automatically copied from the first company. This also makes it possible to insert Custom Reports and Report Categories in the first company, which will be copied to new companies.
A warning will be displayed after upgrading to 7.06c prompting users to activate their software. This warning will be displayed each time a user logs into the InfiniTime Software until the software is activated. For existing customers with hardware HASP Keys, instructions for the initial activation can be found here. For new customers with software license keys, instructions for activation can be found here.
Due to the significant increase in performance and user friendly spreadsheet-like nature of the Timecard while Delayed Save is enabled, all new installations will have Delayed Save on Timecard enabled by default. If the customer wishes to use the traditional timecard where changes are saved each time a record is altered, the 'Delayed Save On Timecard Editors' company option must be unchecked.
Placing Serverdown.txt in the Program File Location now allows access from Localhost shortcuts. All other attempts to access the InfiniTime Software, such as from client machines, will be denied. This functionality is useful for Software Administrators who wish to take a backup while ensuring no clients are accessing the application.
The Employee Update Form now displays the name of the employee being edited in the Title Bar of the window for each category on the left side of the form such as Accrual Totals, Badge Numbers, Benefits, etc.
The Policy Update Form now displays the name of the policy being edited in the Title Bar of the window for each category on the left side of the form such as Break Rules, Exceptions, General etc.
The Reader Address Update Form now displays the Reader Description of the reader being edited in the Title Bar of the window for each category on the left side of the form such as Available Activity Types, Available Departments, Bell Schedules, etc.
'Week Before Last' is now an available Date Range for the InfiniTime 7 Software Application.
The Supervisor Field, a required field on the Employee Update Form, will now be set to 'System Administrator' for the System Administrator employee by the Installation. This will ensure new users do not receive warnings regarding entering a value in the Supervisor field when viewing the System Administrator Employee record for the first time.
The length of the Employee and Supervisor Message Fields on the Timecard Reports have been expanded to 255 Characters.
A New Option, Print Footer, has been added to the In And Out Board Report. When enabled, a Footer will be displayed at the bottom of the report indicating the total number of employees that are Clocked In and Clocked Out. A Sub Footer is also displayed for each Department, Job, Task, and / or Supervisor when the report is grouped by Department, Job, Task, Group, or Supervisor.
The Schedule Skeleton Window no longer displays Inactive Employees.
For clarity purposes, In and Out Board functionality has been altered to display a Red X rather than a Green Check Mark for employees that have no timecard activity.
User Input for Default Field Settings on the Security Procedure Form is now validated for proper length and data type.
Do you have an escort you have designed that you would like to share with other InfiniTime users? After upgrading to 7.06c, export your Escort and email the .ESB File to:
EscortSubmission@InfiniTime.com
Submitted Escorts will be reviewed and compiled into a collection to be made available on the InfiniTime WebSite for InfiniTime 7.08.
Installation Changes
A USB Driver for the USB to Serial Converter device sold by Inception Technologies is now installed during installation and update of the InfiniTime Application. The USB to Serial Converter is used for USB Communication with Juno Readers and USB communication with Zephyr Readers.
Microsoft Windows Server 2008 R2 x64** is now listed as a supported operating system. In order to provide support for Windows Server 2008 R2 the InfiniTime 7 Installer installs additional ASP.NET components as listed below. If any of these items are removed manually by Server Administrators the InfiniTime Application will cease to function:
ASP.NET 1.1
ASP.NET 1.1 SP1
ASP.NET 1.1 Security Patches
**Note: Pre-Install and Post Install instructions are identical for Windows Server 2008 R2 and Windows Server 2008. Refer to the Windows 2008 Server installation instructions for both Windows Server 2008 R2 and Windows Server 2008.
A client installer which prepares a machine for remotely accessing the InfiniTime Application is now available on the InfiniTime FTP Site:
Software Architecture Changes
In order to reduce customer costs and offer competitive pricing the HASP Key used for Licensing the InfiniTime Application has been eliminated. A hardware HASP Key will no longer be shipped with new InfiniTime Orders. The software licensing method replaces the HASP Key hardware licensing solution.
For more details, read about the InfiniTime Software Licensing Solution.
The Software Licensing Solution replaces the HASP Key hardware licensing solution for new InfiniTime Orders. Elimination of the USB HASP Key removes the requirement of a USB Port from the InfiniTime Application's minimum requirements and makes the software more appealing for use on a virtual machine. Yet, this is not the intent of the Software Licensing System. To read more about InfiniTime's Software Licensing Solution and Virtual Machines, please refer to the following note on Software Licensing and Virtualization.
Software Issues Resolved
The Date Read and Time Read fields on the Incoming Messages grid now fill as intended when a Message of the Note Type is viewed for the first time.
Resolved an issue where the user interface did not recognize dates with a day value of 13 or higher when the System Date format was set to dd/mm/yyyy
Resolved an issue where the Schedule Grid on the Shift Update Form did not update properly when moving from day to day with the previous day or next day buttons.
Resolved an issue where a javascript error would occur when attempting to delete a schedule record on the Default Schedule Tab of the Employee Valid Telephone Number Update Form. This issue only occurred for customers with the Telephone Punch Module.
Autofill now functions with the '-Disable Security Filters for Timecard Activity Selections' company option. When this feature is enabled, auto fill for the Department Field in the Timecard can be used for any department and will not be restricted by the settings on the supervisor's security filter.
Fixed a typographical error on the Required Field Warning Dialog box. The warning now displays 'The Following Errors were found' instead of 'The Following Errors where found'
The date format, yyyyMMdd was removed due to compatibility issues. This System Date Format is no longer supported by InfiniTime.
Resolved an issue where Script Errors would occur when attempting to remove the Task Field from the In & Out Board Using the Select Grid Columns Button.
Resolved an issue where Script Errors would occur when using the dd/mm/yyyy System Date Format and attempting to set the Reference Date Field on the Default Schedule Tab of the Department Valid Telephone Number Update Form to a Default Value.
Resolved an issue where Script Errors would occur when using the dd/mm/yyyy System Date Format and attempting to set the Reference Date Field on the Default Schedule tab of the Shift Update Form to a Default Value.
Script Errors will no longer occur when closing the Employee Update Form before the form was fully loaded after altering the Security Filter for an employee.
Resolved an issue where dates with a Day Value of 13 or Higher are considered invalid date formats by the User Interface when using the dd/mm/yyyy System Date Format.
Resolved an issue where the Previous Day and Next Day Buttons did not update the Schedule Grid to display the appropriate schedule for the highlighted tab when working with Custom Schedule Cycles.
Base Amounts are no longer cleared from Accrual Period to Accrual Period as employees move from one accrual type to another.
Resolved an issue where the Incoming Messages Grid did not display results when searching for the name of an employee, even if messages had been received from the employee.
Resolved an issue which caused the Save Grid Button on the In & Out Board not to function.
Resolved an issue which caused the Print Button on the In & Out Board Grid not to function.
Resolved an issue with Shift Based Payroll Exports where only one department would be exported if employees worked in Multiple Departments that were not associated with a Shift Differential.
Resolved an issue where the 'PGP Encrypt File' option on the Export Update Form and the Import Update Form controlled the display of the Schedule Auto Export Tab rather than the PGP tab. The Schedule Auto Export Tab is now always displayed, while the PGP Tab is now properly hidden based upon the value of the PGP Encrypt File option.
Grid Column Settings for the Use Schedule Skeleton Window now save when the Schedule Button is clicked. This allows Fields such as the Hire Date and Phone Number to be hidden from view.
The Day Before Holiday Must be Worked Option now properly recognizes a Holiday with an Other Activity Type set to 'Count as Day Worked' as a worked day. This allows holidays to occur on consecutive days with use of the 'Day Before Holiday Must be Worked' option.
Resolved an issue with Split Punch at End of Day where punches would not properly split if employees had an unpaid or paid break before Midnight on a night where they worked over Midnight. In this scenario, the end of day was set to Midnight.
Resolved an issue with Split Punch at End of Day where punches would not properly split if employees had an unpaid or paid break before the end of day on a night where they worked over the end of day. In this scenario, the end of day was set to a value other than Midnight, such as 2:00 AM.
Resolved an issue where all open windows would close when Clicking Cancel from the Map Destination Fields Tab of the Import Update Form.
Script errors no longer occur in the Company Timecard Table if the user attempts to use the Employee Search Field while the Date Range is set to custom and the From Date Field has been blanked out.
Script errors no longer occur in the Company Timecard Table if the user attempts to use the Employee Search Field while the Date Range is set to custom and the To Date Field has been blanked out.
The Incoming Messages Grid Configuration Window is now properly sized by the Safari Web Browser.
Tag / UnTag / Tag All / UnTag All Buttons are now properly displayed on the Pay Type and Pay Method Filter Tabs of the Range Selections Tab on the Payroll Export Employee Filter Update Form.
Resolved an issue which caused the Safari Web Browser to crash when attempting to perform any payroll export.
Resolved an issue which caused a script error when clicking on the Lookup Button for the Security Role Field on the Employee Update Form when logged in as an employee assigned to a security role with the 'Payroll Clerk' class.
Resolved an issue with Lockout Override where Quick Punch could not be used during a period that was locked out when logged in as a user assigned to a security role listed in the Lockout Override Roles list. Quick Punch can now be used as intended by users assigned to security roles listed in the Lockout Override Roles list.
Resolved an issue with the Split Punches At End of Day feature where InfiniTime attempted to insert split punches even if a punch already existed at the end of day time. This issue caused deadlock errors and stopped punches from polling and posting for the employee(s) with a punch at the end of day time.
Resolved an issue where the Review Button in the Timecard Table would not properly review Absent Exceptions during the date range selected for review.
Resolved an issue where the 'Alert When Unreviewed Exceptions are Found for Exported Employees' payroll export option would display a warning for reviewed Tardy, Early Departure, or Absent exceptions occurring during a pay period. The warning will no longer be displayed for these exceptions when they are properly reviewed.
Resolved an issue where the Missing Break Exception occurred on days with only Other Activity Hours of an Other Activity Type set to Count As Regular Hours. The Missing Break Exception will no longer occur under this condition.
Resolved an issue which caused the Missing Break Exception not to trigger according to the set Threshold as expected.
Resolved an issue where the Report Selection Criteria Update form was not sized properly under certain conditions causing the Misc. Selections Tab to be unaccessible.
Resolved an issue which disabled the ability to backspace text typed into the Message Field of the Message Database Update form for Internet Explorer 8 and Safari.
Resolved an issue which disabled the ability to backspace text typed into the Employee Message Field of the Employee Update form for Internet Explorer 8 and Safari.
Resolved an issue where the Tag Buttons are not displayed on the Pay Method and Pay Type tabs of the Misc Selections Tab on the Report Update Form.
The duplicate checking tab of the Import Update Form now displays the Tag, Tag, Untag, Tag All, and Untag All buttons as intended.
Resolved an issue which caused HTTP 404 errors when attempting to access the various categories on the left side of the Policy Update Form as a supervisor with View Only Rights.
Resolved an issue which caused HTTP 404 errors when attempting to access the various categories on the left side of the Reader Address Update Form as a supervisor with View Only Rights.
Resolved an issue which caused HTTP 404 errors when attempting to access the various categories on the left side of the Employee Update Form as a supervisor with View Only Rights.
Resolved an issue which caused the Report Selection Criteria Update form to be displayed improperly when using the Quick Print Button on an Escort.
The Audit Description Update Form will now close as intended when the OK button is clicked after entering a reason for editing the timecard.
Resolved an issue where the Lookup Button would not properly save the selected item when setting a Default Value for the Security Role Field on the Default Tab of the Form Security Table for the Employee Update Form.
Identified and resolved typographical errors in the Builddb Log File. The following items were identified:
***A will no longer display after 'Moving Table Spaces'
*** Deletetd All Foreign Keys Successfully *** has been corrected to *** Deleted All Foreign Keys Successfully ***
*** Deletetd All Procedures Successfully *** has been corrected to *** Deleted All Procedures Successfully ***
*** Deletetd All Functions Successfully *** has been corrected to *** Deleted All Functions Successfully ***
*** Deletetd All Functions Successfully *** has been corrected to *** Deleted All Functions Successfully ***
*** Deletetd All Views Successfully *** has been corrected to *** Deleted All Views Successfully ***
*** Deletetd All Packages Successfully *** has been corrected to *** Deleted All Packages Successfully ***
*** Deletetd All Tables Successfully *** has been corrected to *** Deleted All Tables Successfully ***
*** Deletetd All Sequencers Successfully *** has been corrected to *** Deleted All Sequencers Successfully ***
Resolved an issue which caused the Bell Schedule Update Form to display Sunday Bell Schedules on the tab labeled 'Sat'. Bell Schedules set for Saturday will now display on the 'Sat' tab as expected.
Resolved an issue which caused Escort Windows created in 7.05j to display improperly after upgrading to 7.06. Symptoms include:
Blank Escort Design
Missing Buttons, Tabs, and Labels on the Escort Design Form
Resolved an issue where Consecutive Day Overtime Hours did not calculate properly when a gap in consecutive working days crossed the Start of Week.
Resolved an issue where attempts to use an Other Activity Type set to Deduct From an Accrual Type would be denied if the Carry Over Setting was enabled and did not have an expiration date set.
Resolved an issue which caused the Tag, Untag, Tag-All, and Un-Tag All Buttons to be absent from the Duplicate Checking Tab of the Import Update Form.
Resolved an issue which caused Daily Totals and the Date Field to be blank for the Timecard Detail and Timecard Detail with Weekly Totals Reports when multiple group levels were present in the database.
Resolved an issue which caused Daily Totals and the Date Field to be blank for the Timecard Detail and Timecard Detail with Weekly Totals Reports when no group levels were present in the database.
Resolved an issue which caused Available Accrual Hours to calculate improperly when a base amount is entered such that Base Amount + Accrued Time > Stop At Amount. Available Accrual hours will now calculate properly even if Base Amount + Accrued Time > Stop At Amount. It is important to note that manually entered base amounts can result in Available Accrual Hours that are greater than the stop Amount.
Resolved an issue which caused the Message Database Update Form, as called from the Escort Button "Time Off Request Update Form", to display 'Approve' and 'Decline' buttons which permitted employees to approve and deny their Time Off Requests.
Resolved an issue which permitted employees to access the Approve and Decline Buttons when sending a Schedule Change Request from the Employee Module. It is no longer possible for employees to approve their own schedule change requests.
Resolved an issue which permitted employees to access the Approve and Decline Buttons when sending a Time Off Request from the Employee Module. It is no longer possible for employees to approve their own Time Off Requests.
Resolved an issue where the Use Schedule Skeleton Window did not correctly filter employees according to task in certain scenarios.
Resolved an issue where the 'Hire Date Plus' accrual setting does not function when an employee is hired in the last 360 days and the first calculation of accrual hours occurs in the next calendar year.
Resolved an issue where Employee Punches were not posted correctly when the Reader Drop Down was used to select a different reader than the initially selected reader or when set to 'All'.
Resolved an issue which prevented Employee Pictures from being imported on the Employee Update Form.
Resolved an issue where all group levels in a multi-company database were displayed on the Quick Assign Form under certain conditions.
Resolved an issue which caused a script error upon opening the Report Library under certain conditions: "String was not recognized as a Valid Date Time."
Resolved an issue which caused errors to occur when updating the Juno Timeclock under certain conditions.
Resolved an issue where Scheduled Payroll Exports would not export detail records when run automatically by the Housekeeping Service.
Resolved an issue which caused the software to display 'Activity Task Description is Required' when creating Trained Task Skeleton Schedules even if no Jobs or Tasks were present in the database.
Resolved an issue which caused the In and Out Board not to display Green Check Marks as expected for employees who were clocked in.
Resolved an issue which prevented Other Activity Types without the 'Count As Regular hours' option enabled from deducting properly from Accrued Hours.
Resolved an issue which caused Escort Controls such as Images, Labels, Buttons, and Hyperlinks to be added to the incorrect tab after viewing a tab and returning to the first tab in design view.
Resolved an issue which caused an error " 'Rsa_szPrinterName' has a selectedValue which is invalid because it does not exist in the list of items" when attempting to view or change Auto Report Schedules for a saved report with Email Addresses defined in the 'Send To' Grid of the Email Tab.
Resolved an issue which caused Escort Labels to display as a single line even if the label is designed with dimensions that caused the text to be displayed on multiple lines in Escort Design View.
Resolved an issue which prevented audit trail comments entered when editing employee timecard records from being saved to the database.
Upgrade Notes / Considerations
New Required Field for Importing Employees
The 'Link to Security Role Table' field is now a required field for the Employee File Import Type. Employee records will not be created if the Link to Security Role field is not mapped when performing an employee import.
Alterations to Accrual System Functionality
The InfiniTime Accruals System has been reviewed and modified to better meet the needs of InfiniTime Users. Prior to upgrading to InfiniTime 7.08, InfiniTime Software Administrators should familiarize themselves with the changes to the accrual system and decide to either permit InfiniTime to calculate accruals back to employee hire date or set effective dates for accrual types and then review employee accrual totals after the upgrade. A complete description of each alteration to the Accrual System can be found in the Software Issues Resolved: Accrual System Alterations section of this document.
As of InfiniTime 7.08, Employee Accrual Totals will be automatically calculated back to employee hire date or if it is configured, the effective date for the employee's Accrual Type. Employee Accrual Totals are calculated with respect to Employee Hire Date, Tenure, and the Accrual Class system. This allows InfiniTime to determine the correct accrual rate for prior accrual periods and also removes the need to recalculate for past date ranges in order to populate accrual records.
In order to prepare for upgrading to InfiniTime 7, customers who utilize the accrual system should understand the options below and take appropriate actions to prepare for the upgrade:
Allow InfiniTime to Calculate Employee Accrual Totals back to Hire Date
This option is most appropriate for companies who do not carry over accrued hours from accrual period to accrual period. InfiniTime 7.08 will automatically calculate employee accrual totals back to the employee's hire date. For this scenario, no actions must be taken prior to upgrading to InfiniTime 7.08 though after upgrading Remaining Accrual Hours should be checked for each employee using the Employee Accruals Report to confirm Employee Accrual Totals reflect expected values..
For example, Company ABC started using InfiniTime in 2009. Accrual records were created for employees for the 2009 and 2010 accrual periods as shown below. Company ABC awards 16 Hours of Sick and 40 Hours of Vacation per year, all unused hours are lost at the end of the year.
After upgrading to InfiniTime 7.08, Employee Accrual records will be automatically created for each accrual period back to the employee's hire date. In the example below, the employee was hired on January 8th, 2007. This has no effect on available accrual hours as accrued hours are not carried over from year to year.
Set an Effective Date for Each Accrual Class
This option is most appropriate for companies who carry over accrued hours from accrual period to accrual period. It should be noted the Accruals Plus module is required to enable the Effective Date Accrual Option. In order to prepare for the InfiniTime 7.08 upgrade, the following steps must be taken:
Prior to upgrading to InfiniTime 7.08 the effective date for each Accrual Type should be set to the date the organization started using the InfiniTime Application to track employee accruals, or when accrued hours were last cut over from an outside system using base amounts.
For each employee, Base Amounts should be set to reflect the number of hours employees had available on the effective date for each accrual type such as Sick Time or Vacation Time. In most situations, no actions are necessary as Base Amounts were set for employees when switching to InfiniTime from the prior accrual system.
After Upgrading the InfiniTime 7.08, check Remaining Accrual Hours for each employee using the Employee Accruals Report to confirm Employee Accrual Totals are correct.
For example, Company XYZ started using InfiniTime on March 13, 2009. Company XYZ awards 16 Hours of Sick and 40 Hours of Vacation per year, all unused hours are carried forward to the next year. Accrual records were created for employees for the 2009 and 2010 accrual periods as shown below. When Company XYZ moved to InfiniTime, Base amounts were set for all employees on the 2009 Accrual record in order to show the number of accrued hours brought forward from the prior system used for accrual tracking. For example, the employee below had 8 hours of Sick Time and 24 Hours of Vacation time carried forward from the prior accrual tracking system.
Employee Accrual Totals on InfiniTime 7.06c
If the effective date is not set before upgrading to InfiniTime 7.08, Employee Accrual records will be automatically created for each accrual period back to the employee's hire date. In the example below, the employee was hired on January 8th, 2007. As shown below, this results in incorrect accrual totals. Hours accrued before Company XYZ went live with InfiniTime on March 13, 2009 were already accounted for by base amounts on the 2009 accrual records.
Employee Accruals on InfiniTime 7.08 - No Effective Date Set
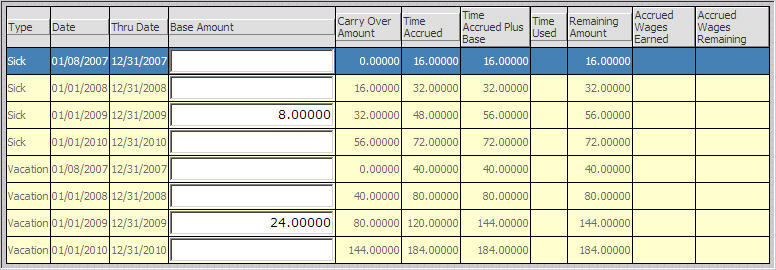
In order to ensure accrual records are not created for accrual periods prior to March 13, 2009 an effective date of 03/13/2009 must be set on each accrual calculation used by Company XYZ. Steps to set the Effective Date are listed below.
Login to the Manager Module as an Administrator.
Click on Lookups - Calculations Setup - Accrual Types.
Select the first Accrual Type in the list and click Change.
Click on the Accrual Calculations tab.
Select the first Accrual Calculation in the list.
Click Change.
Enter the Desired Effective Date in the Effective Date Field.
Click OK to Save the Changes.
Repeat these steps for each Accrual Calculation on each Accrual Type within the software.
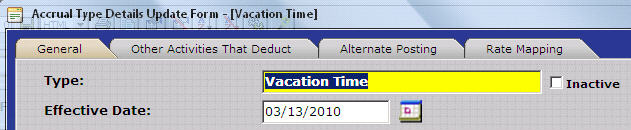
Employee Accruals will be calculated back to the effective date after upgrading to InfiniTime 7.08 as shown below.
Employee Accruals on InfiniTime 7.08 - With Effective Date Set
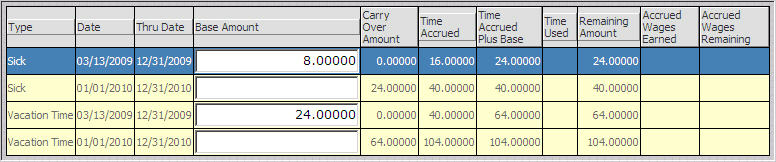
Allow InfiniTime to Calculate Employee Accrual Totals back to Hire Date then Adjust Base Amounts
This option is most appropriate for companies who carry over accrued hours from accrual period to accrual period and do not own the Accruals Plus Module. The following steps must be taken:
Upgrade to InfiniTime 7.08.
For each employee, Base Amounts should be set to reflect the actual number of hours used during each accrual period prior to the date the organization switched to InfiniTime for tracking Employee Accruals.
After making adjustments to Base Amounts for each employee, check Remaining Accrual Hours for each employee using the Employee Accruals Report to confirm Employee Accrual Totals are correct.
For example, Company XYZ started using InfiniTime on March 13, 2009. Company XYZ awards 16 Hours of Sick and 40 Hours of Vacation per year, all unused hours are carried forward to the next year. Accrual records were created for employees for the 2009 and 2010 accrual periods as shown below. When Company XYZ moved to InfiniTime, Base amounts were set for all employees on the 2009 Accrual record in order to show the number of accrued hours brought forward from the prior system used for accrual tracking. For example, the employee below had 8 hours of Sick Time and 24 Hours of Vacation time carried forward from the prior accrual tracking system.
Employee Accrual Totals on InfiniTime 7.06c
If the effective date is not set before upgrading to InfiniTime 7.08, Employee Accrual records will be automatically created for each accrual period back to the employee's hire date. In the example below, the employee was hired on January 8th, 2007. This results in incorrect accrual totals as shown. Hours accrued before Company XYZ went live with InfiniTime on March 13, 2009 were already accounted for by base amounts on the 2009 accrual records.
Employee Accruals on InfiniTime 7.08 - No Effective Date Set
This can be accounted for by removing the previously entered base amounts and entering negative base amounts to reflect the actual hours used by employees in prior accrual periods. In the example below, the 8 Hour and 24 Hour base amounts were removed and base amounts were entered on the 2007 and 2008 Accrual Periods to show the actual number of hours used by the employee. Notice how after adjustment, the hours carried forward into the 2009 Accrual Period for Sick and Vacation reflect the number of hours brought from the previous accrual system.
Employee Accruals on InfiniTime 7.08 - After Base Amount Adjustment
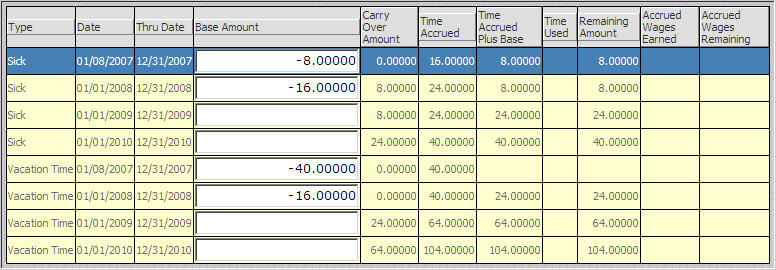
Accrual System Documentation
Accrual Introduction (Accrual Periods, Carry Over, Reset Type, Effective Date, General Setup Instructions)
Using Maximum Negative Accrual Hours
Recommended Update for Luna and Juno users
An issue with the Juno and Luna Biometric Terminals was identified which caused Employee Punches to be lost if an employee punched at the same time as the Juno or Luna terminal was being polled by the InfiniTime Software. This issue has been resolved. It is recommended that any customers using the Juno or Luna Terminals upgrade to InfiniTime 7.08 to prevent punch loss caused by this issue.
Recommended Update for Published InfiniTime Servers with Remote Clients
InfiniTime 7.08 provides increased reliability and improved session handling for remote clients with intermittent Internet connectivity. It is recommended that any customers publishing InfiniTime to the web for remote access upgrade to InfiniTime 7.08.
Important: Certain Import Types must be deleted and recreated
Due to changes in the Import Tool, the following import types must be deleted, recreated, and re-mapped manually. It is recommended that customer's use Map by Name to facilitate this process. Map by Name maps all columns in one click, the only requirement is the first column in the import file must include the exact description of the target field. An Example files with required fields and appropriate headers is available for each import type and can be downloaded from the InfiniTime FTP Site.
Employee File
Department File
Employee Accrual Totals File
Employee Groups File
Employee Shifts File
InfiniTime 7.08 Known Issues
The 'Save Grid As' Feature, which makes it possible to export grid records from the InfiniTime Software to various file formats such as Excel and word cannot be used more than once without closing and reopening the window in Safari. This issue is related to the Grid Tool used by InfiniTime, which will be updated in a future version of the software.
InfiniTime users may find that the header columns displaying the Day, Date, and Times do not align with schedule records on the Schedule Gannt Chart. This issue occurs in Internet Explorer 8 when Compatibility View is disabled. InfiniTime 7.08 Users who utilize the Gannt Chart should enable Compatibility View for the InfiniTime URL.
InfiniTime requires specific registry permissions and access rights in order to properly license and activate the InfiniTime Software. Altering NTFS Permissions associated with InfiniTime or Oracle Registry keys can result in a script error when clicking on the Technical Info Button on the About InfiniTime Window. This issue can also be caused by hosting InfiniTime on an upgraded Windows Operating System. Customers experiencing this issue should ensure their InfiniTime Server's Operating system is a clean installation on a supported operating system and not an upgrade such as Windows XP Home Upgraded to Windows XP Professional. Additional information can be found here.
After installing and using the Safari 5 for the first time on either the InfiniTime Server or a Client Machine, Safari may terminate unexpectedly when performing basic actions such as Inserting an Accrual Type, or clicking Close or OK on forms throughout the InfiniTime Application. These errors are related to the Safari Web Browser, once InfiniTime is fully compiled and all temporary files are saved to the client machine and / or InfiniTime Server, these errors no longer occur.
New Software Functionality
Upgrading from Timewolf 4 to InfiniTime 7:
In order to make the Timecard User Interface more user friendly, the Date Range for Review and Purge will automatically be set to match the date range being viewed on the Timecard. For example, while editing employee hours for last pay period, if the review button is clicked the Review Date Range will be preset to Last Pay Period.
In order to make the Timecard User Interface more user friendly, the Timecard Table will return to the page the user was viewing rather than returning to Page 1 after Recalculate or Review are performed. This allows the user to continue editing employee timecards where they left off, rather than forcing the user to switch pages on the timecard to find where they were.
Schedule Gannt Chart entries can now be imported from a comma delimited file by using the Import Tool and selecting 'Employee Schedules File' as the file type.
Timecard Notes have been added to the Company, Employee, and Employee Module Timecards for users with appropriate security rights. Timecard notes allow supervisors to enter comments for Punch Pairs. While similar to the Audit Trail and the Audit Trail Report, Timecard Notes have indication of entry and only exist when specifically entered by a supervisor. In comparison, Audit trail records are generated each time a timecard record is inserted, deleted, or modified. Links to additional information can be found below.
The Attendance Review Report now has the ability to display a Character for days on which employee's had Other Activity.
The Title Bar for the Employee Update Form will now display 'New Record' when inserting a new employee.
The Title Bar for the Policy Update Form will now display 'New Record' when inserting a new policy.
The Tile Bar for the Reader Address Update Form will now display 'New Record' when inserting a new Reader Address Record.
The Job and Task tabs will now be hidden on the Selection Criteria Update Form when Quick Printing or creating Saved Reports if there are no Jobs or Tasks in the InfiniTime Database.
The Group by Job Report option will now be hidden on the Report Options Tab for all reports with the option if there are no Groups in the InfiniTime Database.
The Group by Task option will now be hidden on the Report Options Tab for all reports with the option if there are no Tasks in the InfiniTime Database.
When opening InfiniTime with Firefox or Safari an extra window is opened which cannot be closed by InfiniTime. The extra window now displays a notification informing the user the window can be closed as shown below.

Timecard Detail
Timecard Detail with Weekly Totals
Timecard With Clock Description
Timecard With Phone Numbers
Example Timecard Detail Report with Timecard Review History:
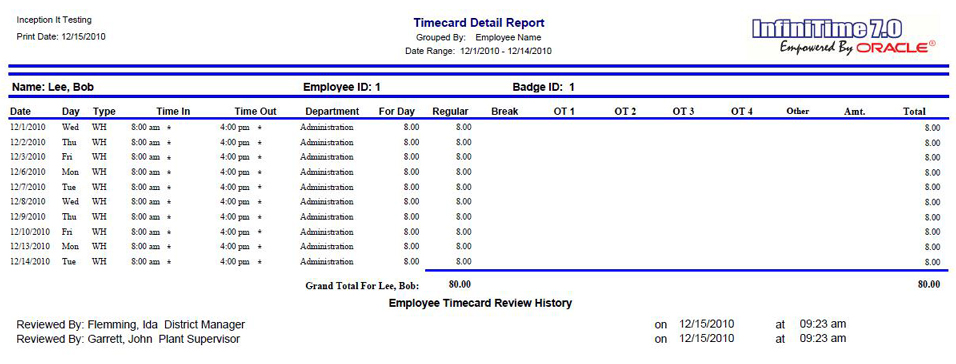
The Insert Button on the Company Timecard Table, Employee Timecard Table, and Employee Module Timecard Table now properly inserts timecard records with respect to the Clock In and Clock Out Missed Punch Day Change Policy Settings for employees who work overnight.
Installation Changes
Software Issues Resolved
Form |
Field |
Quick Assign Update Form |
Activity Job Description |
Quick Assign Update Form |
Activity Task Description |
Accrual Type Details Update Form |
Start Accruing Hire Date Plus |
Accrual Type Details Update Form |
Start At Amount |
Accrual Type Details Update Form |
Stop At Amount |
Accrual Type Details Update Form |
Accrue for Every Amount |
Accrual Type Update Form |
Accrual Type Employee Tenure From Years |
Accrual Type Update Form |
Accrual Type Employee Tenure To Years |
Accrual Type Update Form |
Accrual Inactive Flag |
Accrual Type Update Form |
Accrual Type Default Flag |
Accrual Type Rate Mapping Update Form |
Min. Amount Worked |
Accrual Type Rate Mapping Update Form |
Max. Amount Worked |
Employee Wage Update Form |
Wage Amount |
Employee Security Filter Update Form |
Employee Filter Department Number From |
Employee Security Filter Update Form |
Employee Filter Employee ID From |
Employee Security Filter Update Form |
Employee Filter Department Number To |
Employee Security Filter Update Form |
Employee Filter Employee ID To |
Employee Update Form |
Emergency Contact Information |
Employee Update Form |
Employee Default Wage |
Employee Update Form |
Federal Exemptions |
Employee Update Form |
State Exemptions |
Employee Update Form |
Additional State Withholding |
Employee Update Form |
Local Exemptions |
Employee Update Form |
Direct Deposit Account 1 - From Date |
Employee Update Form |
Direct Deposit Account 2 - From Date |
Employee Update Form |
Direct Deposit Account 3 - From Date |
Employee Update Form |
Direct Deposit Account 4 - From Date |
Employee Update Form |
Direct Deposit Account 1 - To Date |
Employee Update Form |
Direct Deposit Account 2 - To Date |
Employee Update Form |
Direct Deposit Account 3 - To Date |
Employee Update Form |
Direct Deposit Account 4 - To Date |
Employee Update Form |
Employee Work Status |
Report Selection Criteria Update Form |
Report Setting Departments Selected Option |
Report Selection Criteria Update Form |
Report Setting To Date |
Report Selection Criteria Update Form |
Report Setting Groups Selected Option |
Report Selection Criteria Update Form |
Report Setting Employee ID From |
Report Selection Criteria Update Form |
Report Setting Employee ID To |
Report Selection Criteria Update Form |
Report Setting Department Number From |
Company Update Form |
Inactivity Time Out |
Company Update Form |
User Passwords Expire In |
Resolved an issue which led to a script error if the Rounding Method was set to 'Net Round each Day' on the Policy Rounding Rules Update Form.
The Activity Job Description field is no longer displayed on the Select Sort Columns Table as called from the Employee Wage Table if there are no Activity Jobs present in the TimeWolf Database.
The Activity Task Description field is no longer displayed on the Select Sort Columns Table as called from the Employee Wage Table if there are no Activity Tasks present in the TimeWolf Database.
The Activity Job Description field is no longer displayed on the Grid Column Selection Table as called from the Employee Wage Table if there are no Activity Jobs present in the InfiniTime Database.
The Activity Task Description field is no longer displayed on the Grid Column Selection Table as called from the Employee Wage Table if there are no Activity Tasks present in the InfiniTime Database.
Resolved an issue which prevented the In and Out Board Report from properly displaying the Last Punch In and Out Times when the 'Display In and Out Times' option was set to Yes. The In and Out Board Report now properly displays this information.
Resolved an issue with the Attendance Review report where working days were incorrectly reported when running the Attendance Review Report for a date range spanning multiple months.
Resolved an issue with Ignore Duplicate Scan where Duplicate Scans would not be recognized and ignored as intended if the employee's Last Punch was a Clock In.
Resolved an issue which prevented the Quick Punch Update Form from closing after clicking OK if the Lookup Button was used to select an Other Activity Type.
Resolved an issue where a Print Job was not generated for Automated Reports without an Export File Name or an Email Address. A print job is now properly generated by the InfiniTime Housekeeping Service and Automated reports will print to hard copy as intended.
Resolved an issue where User Defined Fields of the Document Type did not properly export from the InfiniTime Oracle Database. Documents stored in User Defined Fields can now be viewed as intended.
Resolved an issue where the Billing Info. Button was displayed on the Company Update Form after viewing the Form Security Table for the window.
Resolved an issue with the Day Before Holiday Must be Worked Option whereby Holidays would not be awarded to employees for two consecutive Holiday Dates even if the Holiday Other Activity Type was set to Count as Day Worked. InfiniTime now properly recognizes the Count As Day Worked Other Activity Option for the Day Before Holiday Must be worked option.
Resolved an issue with the Day Before Holiday Must be Worked Option whereby holidays would not be awarded to employees even if the employee worked on the date before the holiday.
Resolved an issue with the Day After Holiday Must be Worked Option whereby holidays would not be awarded to employees even if the employee worked on the date before the holiday.
Resolved an issue where reviewing an Other Activity Record using the right click menu item 'Toggle Supervisor Review' immediately after editing the Other Activity Hours Amount caused the Other Activity Record to be removed from the Company Timecard Table.
Resolved an issue where closing the Form Security Table, as called from the Form Security Key on the Employee Module Timecard Tab, caused a Script Error.
Resolved an issue where closing the Browse Security Form, as called from the Form Security Key on the Employee Module Timecard Tab, caused a Script Error
The InfiniTime User Interface no longer permits users to add multiple holidays on the same date to a single holiday type. The holiday system is not intended to support multiple holidays on the same date in this manner.
Resolved an issue which caused the Source Grid Fields to not be displayed on the Export Update Form for the Activity Job Information File.
Resolved an issue which caused the Source Grid Fields to not be displayed on the Export Update Form for the Activity Task Information File.
A warning will be displayed if the Valid From Date is greater than the Valid To Date when adding Employee Alternate Wages using the Employee Wage Update Form. The Valid From Date must be less than the Valid To Date.
Resolved an issue which prevented the VCR fields on the Employee Wage Update form from finding records that matched the text entered in the VCR Search Field.
Resolved an issue with the Delete Other Activity right click menu item which caused the Company and Employee Timecard windows to close. The Software Activation warning would then be displayed repeatedly until the software was closed if the InfiniTime Software had not been activated. The Delete Other Activity right click menu item now functions as intended.
As a required field, Payroll Mapping Codes for Other Activity Types created during the Timewolf 3 to InfiniTime 7 upgrade process will be set to match the Other Activity Type Description.
As a required field, Payroll Mapping Numbers for Other Activity Types created during the Timewolf 3 to InfiniTime 7 upgrade process will be set to match the Other Activity Type Code Number.
Resolved an issue where schedules with a custom length of more than seven days were not properly displayed on the Schedule Gannt Chart in the Weekly View. Multiple lines are no longer displayed for a single record.
Resolved an issue which made it possible for employees assigned to a security role without the ability to edit security to gain access to the Security Key for any form with VCR buttons.
Resolved an issue which prevented the Default Button on the Form Security Table from functioning for all windows.
Resolved an issue which prevented the Tag, Untag, Tag-All, and Un-Tag All buttons from displaying as intended on the Pay Type and Pay Method Tabs of the In & Out Board Filter Update Form.
Resolved an issue which caused the Local Tax Authority Table to be displayed when using the VCR Buttons on the Local Tax Authority Update Form.
The red asterisk used to indicate required fields that have been left null or with data of the wrong format now aligns with the Clock ID Field on the Employee Update Form if the field is left blank or an alphanumeric value is entered in the field.
The red asterisk used to indicate required fields that have been left null or with data of the wrong format now aligns with the Clock ID Password on the Employee Update Form if the field is left blank or an alphanumeric value is entered in the field.
Resolved an issue which caused a script error and prevented users from saving schedules with Valid To and From Dates using the Quick Schedule Form.
Resolved an issue which displayed the 'Data Could Not Be Loaded' application error when printing the Payroll Detail or Payroll Summary Reports with Overtime Hours One Wages, Overtime Hours Two Wages, and Regular Hours One Wages.
Resolved an issue which caused the InfiniTime Application's ASP.NET session to terminate unexpectedly if a Purge Action was performed for a date range with no timecard activity while Audit Trail and Delayed Save were both enabled.
Resolved an issue where the Activity Job Cost Center Field was not exported for Payroll Interfaces of the Shift Activity Export Type. Shift Activity Payroll Interfaces export one record for each day per employee for each Department / Job / Task and Activity Type / Shift Differential Combination.
The Escort Export Button will no longer be displayed on the Escort Settings Description Table if there are no Escorts in the Database.
Resolved an issue where entering an apostrophe ( ' ) in any Search Field would cause a script error. Apostrophe's will now be filtered out of the Search Field.
Resolved an issue which permitted fields such as the Access Control Group Description to be set to required even if they were not present on the Employee Update Form. For example, if there are no Groups, Accruals, Access Control Types, Jobs, or Tasks in the database but the corresponding field was set to required it was not possible to close the Employee Update Form. Fields hidden in this manner can no longer be set to required.
Resolved an issue where Inactive Records were included in the AutoFill results for the State Tax Authority Lookup Field. Inactive Records are now properly filtered out of the AutoFill Results for the State Tax Authority Lookup Field.
Resolved an issue where Inactive Records were included in the AutoFill results for the Local Tax Authority Lookup Field. Inactive Records are now properly filtered out of the AutoFill Results for the Local Tax Authority Lookup Field.
Resolved an issue which caused a JavaScript error when closing the Browse Security Table as called from the Employee Accrual Totals Table.
Resolved an issue where the Thor Function Keys were cleared when viewing the Reader Address Update Form for a second time after setting up the Thor Terminal.
Resolved an issue where the Scout Function Keys were cleared when viewing the Reader Address Update Form for a second time after setting up the Scout Terminal.
Resolved an issue which caused the Script Error "'Items' is null or not an object" when right clicking on an open area of the Schedule Gannt Chart.
Resolved an issue with the Employee Security Filter where un-tagging an employee without viewing the Department Filter caused a Script Error.
For Security Purposes, the Misc. Selections Tab is now hidden for reports assigned to the Print Timecard, Print Schedule, and Print Accruals Buttons within the Employee Module. This prevents employees from tagging Pay Methods or Pay Types to view information for other employees.
For Security Purposes, a Pay Method Selected Option was added to the Misc. Selections Tab of the Report Selection Criteria Update Form. This makes it possible to control the status of the Tag, Tag All, Un-Tag, and Un-Tag All buttons on the Pay Methods Tab for each security role.
For Security Purposes, a Pay Types Selected Option was added to the Misc. Selections Tab of the Report Selection Criteria Update Form. This makes it possible to control the status of the Tag, Tag All, Un-Tag, and Un-Tag All buttons on the Pay Types Tab for each security role.
For Security Purposes, the options listed below on the Report Selection Criteria Update Form are always disabled for reports assigned to the Print Timecard, Print Schedule, and Print Accruals Buttons within the Employee Module. This prevents employees from selecting Departments, Jobs, Tasks, Other Activities, and Exceptions.
Resolved an Issue with the Picture Column on the Map Destination Fields tab of the Import Update Form where the Picture was not displayed properly for Time Fields with a Double Digit Hour and Single Digit Minute such as 11:04 AM.
Scheduled Days: Monday to Friday
8:00 AM - 10:00 AM Sales
10:00 AM - 4:00 PM Marketing
Resolved an issue where Paid Break hours were incorrectly counted toward a Shift Differential starting at midnight for employees who took a paid break prior to midnight when working overnight on the last day of a pay period.
Resolved an issue where Late Departure Clock Out Punches for overnight working periods were incorrectly flagged as Early Departure.
Resolved an issue which caused duplicate Clock IDs and Passwords when initially setting the Clock ID and Clock Password field values during the upgrade process from a Pre-7.06c InfiniTime Installation
'Error Deleting User ID Employee Clock ID from reader Reader Description'
Employee First Dir. Dep. ABA Routing Number
Employee First Dir. Dep. Acct Type
Employee First Dir. Dep. Amount
Employee First Dir. Dep. Amt Type
Employee First Dir. Dep. Bank Account Number
Employee First Dir. Dep. End Date
Employee First Dir. Dep. Name on Account
Employee First Dir. Dep. Priority
Employee First Dir. Dep. Start Date
Employee Fourth Dir. Dep. ABA Routing Number
Employee Fourth Dir. Dep. Acct Type
Employee Fourth Dir. Dep. Amount
Employee Fourth Dir. Dep. Amt Type
Employee Fourth Dir. Dep. Bank Account Number
Employee Fourth Dir. Dep. End Date
Employee Fourth Dir. Dep. Name on Account
Employee Fourth Dir. Dep. Priority
Employee Fourth Dir. Dep. Start Date
Employee Second Dir. Dep. ABA Routing Number
Employee Second Dir. Dep. Acct Type
Employee Second Dir. Dep. Amount
Employee Second Dir. Dep. Amt Type
Employee Second Dir. Dep. Bank Account Number
Employee Second Dir. Dep. End Date
Employee Second Dir. Dep. Name on Account
Employee Second Dir. Dep. Priority
Employee Second Dir. Dep. Start Date
Employee Third Dir. Dep. ABA Routing Number
Employee Third Dir. Dep. Acct Type
Employee Third Dir. Dep. Amount
Employee Third Dir. Dep. Amt Type
Employee Third Dir. Dep. Bank Account Number
Employee Third Dir. Dep. End Date
Employee Third Dir. Dep. Name on Account
Employee Third Dir. Dep. Priority
Employee Third Dir. Dep. Start Date
Group Level Five Desc.
Group Level Four Desc.
Group Level One Desc.
Group Level Three Desc
Group Level Two Desc.
Resolved an issue where the Department File Import type did not fill the Pay Amount field for Overtime Three. An amount, percent, or rate can now be imported into the Overtime Three Pay Amount Field as intended.
Resolved an issue where using Map by Name with the Employee Accrual Totals File import type would cause the grid on the Import Update Form to extend beyond the bounds of the form.
The Employee Accrual Totals File Import type is intended only for importing base amounts and cannot be used to set Accrued Hours, Used Hours, Remaining Accrual Hours, or Accrual Wages. For this reason, fields not associated with importing Accrual Base Amounts have been removed from the Employee Accrual Totals File Import Type. Please see the Target Fields Available for Import for the Employee Accrual Totals File Import Type for a complete list of available and required fields for importing Accrual Base Amounts.
Resolved an issue which caused the Employee Group File Import Type to create an additional Employee Group Assignment instead of performing an in place update of existing Employee Group Assignments. As intended, an employee can now only be assigned to a single group description for each group level.
The Employee Shifts File Import type is intended only for importing employee shift assignments and cannot be used to assign Shifts to Departments or Policies. For this reason, fields not associated with importing Employee Shift Assignments have been removed from the Employee Accrual Totals File Import Type. Please see the Target Fields Available for Import for the Employee Shifts File Import Type for a complete list of available and required fields for assigning Shifts to Employees using the Import Tool.
New Software Functionality: Accrual Calculations System
Software Issues Resolved: Accrual Calculations System
Base Amounts are no longer cleared when employees move from Accrual Type to Accrual Type as they remain with the company.
The Negative Accrual Hours Warning is displayed appropriately if a Supervisor attempts to approve a time off request or insert Other Activity Hours for multiple days in the future.
For example, if an employee has 10 Hours available and the time off request is for 2 days at 8 hours each for a total of 16 hours, the Negative Accrual Warning will now be displayed.
Negative Base Amounts are now taken into account for the Negative Accrual Hours Warning.
For example, if an employee accrued 16 Hours of Sick Time a negative base amount of 12 hours would result in 4 hours available. A request for 8 Hours of time off will now be denied appropriately.
Employee Accrual Total records for past accrual periods are no longer affected when an employee moves from one accrual type to another based on tenure settings.
Hardware Issues Resolved
An issue with the Juno and Luna Biometric Terminals was identified which caused Employee Punches to be lost if an employee punched at the same time as the Juno or Luna terminal was being polled by the InfiniTime Software. This issue has been resolved. It is recommended that any customers using the Juno or Luna Terminals upgrade to InfiniTime 7.08 to prevent punch loss caused by this issue.
Resolved an issue where the Juno Terminal played "Punch Accepted" when employees attempted to punch in before the ReCheck Min Duration expired. The Juno terminal now properly plays "Access Denied" and displays 'Access Denied,' on screen.
Updated Hardware Documentation for the ReCheck Min feature for the Juno and Thor Terminals. The ReCheck Min feature defines a duration after the last punch out time, in minutes, during which employees may not punch in. This setting prevents employees from Punching In early after leaving for a break period and does not require the use of Schedules or Schedule Lockout. Employees will simply not be permitted to punch in during the ReCheck Min Duration. If an employee should attempt to punch in before the ReCheck Min duration expires, the Terminal will display 'Access Denied,' and play "Access Denied."
The Password Validation Prompt displayed on the Juno Terminal has been altered to accurately represent the terminal's hardware. The Juno terminal now displays 'Enter Admin PIN Place Finger' instead of 'Enter Admin PIN Scan Admin Badge'.
.gif)